1 | struct input_dev{ //代表输入设备,会加到全局input_dev队列 |
platform驱动架构
1 | struct device platform_bus = { |
S5PV210的中断理解
中断方式1:发生中断后,在中断处理函数内读中断状态寄存器得到中断源(是uart还是key还是其他),再经过switch(中断源)各个case调用到不同的处理函数
中断方式2:发生中断后,芯片自己判断中断源并跳转到我们预先给“中断源处理地址寄存器”设定的地址处运行。(S5PV210)
VIC:vector interrupt controller: 使用4个VIC来处理一共93个中断源 VIC[0-3]
- 向量中断控制器中硬件实现的向量表
1
2
3
4
5
VIC0VECTORADDR0
...
VIC0VECTORADDR16 //key接到了16号中断,所以关心这个寄存器
...
VIC0VECTORADDR31 - 中断源的优先级寄存器
1
2
3
4
5
VIC0VECPRIORITY0
...
VIC0VECPRIORITY16 //暂时不关心优先级
...
VIC0VECPRIORITY31 - 对控制器做开关
1
2
VIC0INTENABLE
VIC0INTENCLEAR - 状态寄存器
1
2
VIC0IRQSTATUS
VIC0FIQSTATUS - 中断处理函数地址寄存器多个中断源(gpio,extern,uart,key…)控制器 –> VIC[0-4] -> 中断主控制器 –> CPU
1
VIC0ADDRESS
1 | asm_irq: |
1 | extern void asm_irq(void); |
1 | irq_handler: |
1 | void irq_c_handler(void){ |
Open62541编译与安装
克隆open62541源码
1 | git clone -b v1.0.6 https://github.com/open62541/open62541.git |
编译
1 | # 进入源码目录 |
安装与卸载
1 | # 安装 |
proxychains笔记
解决’libproxychains.so.3’ from LD_PRELOAD cannot be preloaded
1 | ProxyChains-3.1 (http://proxychains.sf.net) |
1 | $ find /usr/ -name libproxychains.so.3 -print |
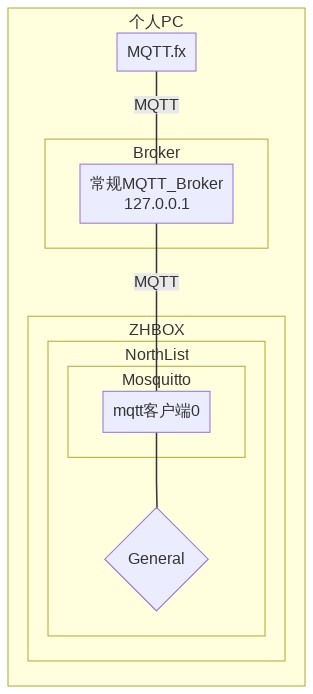
zhbox连接常规MQTT-Broker
拓扑结构

需求
已知服务器(IP:127.0.0.1,Port:1883)运行的是常规的MQTT_Broker(cloud:0),并且接受任何clientid、用户、密码的连接
zhbox使用以下用户连上MQTT_Broker,并创建2个任务
- 每间隔30秒,给主题(topic):
hello发布(publish)一条消息(payload):{”hello":30} - 每间隔60秒,给主题(topic):
world发布(publish)一条消息(payload):{”wrold":60}
1
2
3clientid = "test1clientid";
usr = "test1usr";
pwd = "test1pwd";- 每间隔30秒,给主题(topic):
PC端打开一个常规MQTT客户端(如:mqtt.fx)使用以下用户连上MQTT_Broker后,订阅主题(topic):
hello,应该就能收到zhbox发出并经过MQTT_Broker转发过来的消息:{”hello":"World"}1
2
3clientid = "mqttfx";
usr = "mqttfxusr";
pwd = "mqttfxpwd";
配置zhbox
1 | //filename: test1.cfg |
运行zhbox
1 | zhbox -sc ./test/test1config/test1.cfg -f |
运行mqtt.fx
订阅主题(topic):hello
接收消息{"hello":30}
hexo笔记
hexo安装
1 | sudo npm install hexo-cli -g |
若出现npm ERR! Unexpected end of JSON input while parsing near '...ublish-latest":"^1.1.'
1 | sudo npm cache clean --force |
ubuntu 16.04 nodejs 版本低会出现
1 | /usr/local/lib/node_modules/npm/bin/npm-cli.js:79 |
先卸载nodejs,然后安装稳定最新版
1 | sudo apt-get remove --purge nodejs |
测试安装结果
1 | hexo init blog |
浏览器访问: localhost:4000
部署到github
- 安装 hexo-deployer-git
1
sudo npm install hexo-deployer-git --save
- 在
_config.yml(如果有已存在的请删除)添加如下配置:运行1
2
3
4
5
6
7deploy:
type: git
repo: https://github.com/<username>.github.io # example, https://github.com/hexojs/hexojs.github.io
branch: <YourBranch>
message: <update>
name: <username>
email: <youremail@xxx.com>查看 username.github.io 上的网页是否部署成功。1
hexo clean && hexo deploy
hexo d 部署时在Copying files from public folder就停掉的问题
1 | $ hexo d |
用下面指令解决
1 | cd blog |
主题使用
concise
1 | npm install hexo-renderer-less --save |
Hexo-Theme-AirCloud
1 | git clone https://github.com/aircloud/hexo-aircloud-blog.git --recursive |
1 | # 假设有篇文章 hexo-github-blog.md |
win笔记
win10上搭建open DHCP server
openDHCPserver官网下载地址 根据网上的资料,open dhcp server 最好不要安装在C盘。这里我安装在了D盘
win+r - services.msc - 右键Open DHCP Server - 启动 - 修改本地ip为192.168.2.1 - 关闭防火墙
修改地址池:把安装目录下的OpenDHCPServer.ini的DHCPRange改为192.168.2.2-192.168.2.254,重启服务(或者执行RunStandAlone.bat)
想查看当前有那些设备获取了ip可用浏览器访问http://127.0.0.1:6789
局域网无法ping通
控制面板 - 网络和Internet - 网络和共享中心 - 更改高级共享设置 - 所有都设置’启用网络发现’,’启用文件和打印机共享’
QT5.9.3安装静态编译库
- 解压openssl-1.0.1c_static_w32_mingw.zip到C:\Dev\openssl\lib(拷贝include/ libcrypto.a或libssl.a进去)
- 解压Qt5.9.3_MinGW32_static.7z到D:\Qt5.9.3_MinGW32_static
- 删除项目内的hello.pro.user和hello.pro.user***
- 重新打开hello.pro配置
- Manage Kits - QT Version - 添加 - D:\Qt5.9.3_MinGW32_static\bin\qmake.exe
- Manage Kits - 构建套件(Kit) - 添加 - 名称:static_new - QT版本:Qt5.9.3_MinGW32_static
- 左下角Debug - static_new - Release 编译生成exe即可拷贝到其他电脑运行
关闭java自动更新 右下角弹出 java update
找到C:\Program Files (x86)\Java\jre7\bin\javacpl.exe,以管理员身份运行,点 更新-取消勾选自动检查更新
WSL的sshServer无法启动
使用 sudo service ssh start 启动 ssh 服务,提示:
1 | * Restarting OpenBSD Secure Shell server sshd |
然后使用 powershell 连接,提示 refused:
1 | PS C:\Users\suyua> ssh ryan@localhost |
卸载重装 openssh-server:
1 | sudo apt-get purge openssh-server # purge 是卸载并删除配置文件 |
然后修改 /etc/ssh/sshd_config 的下列几行参数:
1 | #Port 22 # 如果端口冲突,就需要修改这个 |
重启 ssh 服务:
1 | sudo service ssh restart |
然后连接:
1 | PS C:\Users\suyua> ssh ryan@localhost |
参考
XShell笔记
xshell启动默认打开会话
工具-选项-常规-(会话-启动时打开的会话)添加
xshell修改配色
打开记事本,粘贴以下内容,另存为随便名字.xcs,在xshell里:工具-配色方案-导入-选择ubuntu-确定
1 | [ubuntu] |
修改拷贝粘贴快捷键
工具-选项-键盘和鼠标-(按键对应)编辑-查找[Ctrl+Shift+c]-(找不到)新建-类型(菜单)-编辑(复制)确定
tmux笔记
常用配置
1 | git clone https://github.com/tmux-plugins/tpm ~/.tmux/plugins/tpm |
1 | set -g mouse on |
动态更新tmux配置文件
方法1. 在shell终端加载
1 | tmux source-file ~/.tmux.conf |
方法2. 在tmux内加载。Ctrl+b :
1 | :source-file ~/.tmux.conf |
配置tmux滚动速度
先安装插件 tmux-scroll-copy-mode ,再把添加下面行到 ~/.tmux.conf
1 | set -g @scroll-speed-num-lines-per-scroll 10 |
tmuxp
1 | $ cat ~/op.yaml |