input子系统

1
2
3
4
5
6
7
8
9
10
11
12
13
14
15
16
17
18
19
20
21
22
23
24
25
26
27
28
29
30
31
32
33
34
35
36
37
38
39
40
41
42
43
44
45
46
47
48
49
50
51
52
53
54
55
56
57
58
59
60
61
62
63
64
65
66
67
struct input_dev{ //代表输入设备,会加到全局input_dev队列
const char *name;
}
struct input_handler{//代表输入设备的处理方法,会加到全局input_handler队列

}
struct input_handle{//用来关联某个input_dev和某个input_handler

}
//一个input_dev可有多个input_handler:鼠标可有按键事件evdev和移动事件mousedev
//一个input_handler可以用于多个输入设备:比如按键evdev可用于鼠标和键盘

input_table[8]
input_handler_list

input_register_handler(&evdev_handler->handler)
INIT_LIST_HEAD(&handler->h_list)
input_table[handler->minor>>5] = handler
list_add_tail(&handler->node,&input_handler_list)
list_for_each_entry(dev,&input_dev_list, node)
input_attach_handler(dev,handler)//遍历执行
input_match_device(handler,dev)
if handler->id_table[i].flag & xx
handler->id_table[i].bustype == dev->id.bustype
handler..evbit[] == dev..evbit[]
...
return id->struct input_device_id *id
handler->connect(handler,dev,id) //evdev_connect

evdev_connect(struct input_handler *handler,struct input_dev *dev, const struct input_device_id *id)
//找evdev_table[]中首个未使用的下标minor
evdev = kzmalloc()
INIT_LIST_HEAD(&evdev->client_list)
dev_set_name(&evdev->dev,"event%d",minor)
evdev->exist=true
evdev->minor=minor
evdev->handle.dev=input_get_device(dev)
evdev->handle.name=dev_name(&evdev->dev)
evdev->handle.handler=handler
evdev->handle.private=evdev
evdev->dev.devt=MKDEV(INPUT_MAJOR,EVDEV_MINOR_BASE+minor)
evdev->dev.class=&input_class
evdev->dev.parent=&dev->dev
evdev->dev.release=evdev_free
device_initialize(&evdev->dev)
input_register_handle(&evdev->handle)
struct input_handler *handler=handle->handler
struct input_dev *dev=handle->dev
list_add_tail_rcu(&handle->d_node,&dev->h_list)
list_add_tail_rcu(&handle->h_node,&handler->h_list)
if(handler->start) handler->start(handle)
evdev_install_chrdev(evdev)
evdev_table[evdev->minor]=evdev
device_add(&evdev->dev)//创建设备节点

应用层对设备节点读,就会调用到
evdev_read(struct file *file,char __user *buffer, size_t count, loff_t *ppos)
struct evdev_client *client = file->private_data;
struct evdev *evdev = client->evdev;
struct input_event event;
if(BLOCK) wait_event_interruptible(evdev->wait,client->packet_head!=client->tail||!evdev->exist)
while ... evdev_fetch_next_event(client,&event)
input_event_to_user(buffer+retval,&event)
retval+=input_event_size()


evdev_open(struct inode *inode,struct file *file)

platform驱动架构

1
2
3
4
5
6
7
8
9
10
11
12
13
14
15
16
17
18
19
20
21
22
23
24
25
26
27
28
29
30
31
32
33
34
35
36
37
38
39
40
41
42
43
44
45
46
47
48
49
50
51
52
53
54
55
56
57
58
59
60
61
62
63
64
65
66
67
68
69
70
71
72
73
74
75
76
77
78
79
80
81
82
83
84
85
86
87
88
89
90
91
92
93
94
95
96
struct device platform_bus = {
.init_name = "platform",
};
struct bus_type platform_bus_type = {
.name = "platform",
.dev_attrs=platform_dev_attrs,
.match = platform_match,
.uevent = platform_uevent,
.pm = &platform_dev_pm_ops,
};
stat_kernel()
rest_init()
kernel_thread(kernel_init...)
kernel_init
do_basic_setup()
driver_init()
platform_bus_init()
device_register(&platform_bus) //注册总线设备
bus_register(&platform_bus_type) //注册总线
//至此虚拟总线已经注册成功,可以用它来管理设备和驱动了

struct resources{
resource_size start;//资源起始地址
resource_size end;//资源结束地址
const char *name;
ulong flags; //IO资源还是内存资源还是中断资源
struct resources *parent, *sibling, *child;
}
struct platform_device{
const char *name;
int id;
struct device dev;//描述设备的基类
u32 num_resources;//资源数组长度
struct resources *resources;//资源数组
const struct platform_device_id *id_entry;//某种匹配方式用到的
...
}

struct platform_driver{
int (*probe)(struct platform_device *);
int (*remove)(struct platform_device* );
shutdown,suspend,resume
struct device_driver driver;
const struct platform_device_id *id_table;//某种匹配方式用到的
}

//在你的驱动内初始化struct platform_device *pdev,调用该函数
platform_device_register(struct platform_device *pdev)
platform_device_add(pdev);
pdev->dev.parent = &platform_bus;//设置其父类为
pdev->dev.bus = &platform_bus_type;//设置其所属总线
//至此pdev已经挂到虚拟总线上了
device_add(&pdev->dev); //把pdev注册到内核

//在你的驱动内初始化struct platform_driver *drv,调用该函数
platform_driver_register(struct platform_driver *drv)
drv->driver.bus = &platform_bus_type;//设置其所属总线
drv->driver.probe = platform_drv_probe;
drv->driver.remove = platform_drv_remove;
dirver_register(&drv->dirver);//把drv注册到内核
bus_add_driver(&drv->dirver)
dirver_attach(&drv->dirver)
bus_for_each_dev(drv->bus, NULL, &drv->driver, __driver_attach)//遍历全部dev,执行__driver_attach(dev,&drv->driver)
__driver_attach(dev, drv)
if(!driver_match_device(drv,dev)) return 0; //调用platform_match,失败就返回
driver_probe_device(drv, dev)
really_probe(dev,drv)
dev->driver = drv;
drv->probe(dev) //platform_drv_probe(struct device *_dev)


platform_match(struct device *dev, struct device_driver *drv)
struct platform_device *pdev = to_platform_device(dev);
struct platform_driver *pdrv = to_platform_driver(drv);
if(pdrv->id_table){ return platform_match_id(pdrv->id_table, pdev); }
return (strcmp(pdev->name, drv->name) == 0);

platform_drv_probe(struct device *_dev)
struct platform_driver *drv = to_platform_ddriver(_dev->driver);
struct platform_device *dev = to_platform_device(_dev);
drv->probe(dev);


//驱动代码

int charDrvInit(void)
{
platform_device_register(&s3c_device_lcd);
platform_driver_register(&s3c2410led_driver);
}
void __exit charDrvExit(void)
{
platform_device_unregister(&s3c_device_lcd);
platform_driver_unregister(&s3c2410led_driver);
}

S5PV210的中断理解

中断方式1:发生中断后,在中断处理函数内读中断状态寄存器得到中断源(是uart还是key还是其他),再经过switch(中断源)各个case调用到不同的处理函数

中断方式2:发生中断后,芯片自己判断中断源并跳转到我们预先给“中断源处理地址寄存器”设定的地址处运行。(S5PV210)

VIC:vector interrupt controller: 使用4个VIC来处理一共93个中断源 VIC[0-3]

  1. 向量中断控制器中硬件实现的向量表
    1
    2
    3
    4
    5
    VIC0VECTORADDR0
    ...
    VIC0VECTORADDR16 //key接到了16号中断,所以关心这个寄存器
    ...
    VIC0VECTORADDR31
  2. 中断源的优先级寄存器
    1
    2
    3
    4
    5
    VIC0VECPRIORITY0
    ...
    VIC0VECPRIORITY16 //暂时不关心优先级
    ...
    VIC0VECPRIORITY31
  3. 对控制器做开关
    1
    2
    VIC0INTENABLE
    VIC0INTENCLEAR
  4. 状态寄存器
    1
    2
    VIC0IRQSTATUS
    VIC0FIQSTATUS
  5. 中断处理函数地址寄存器
    1
    VIC0ADDRESS
    多个中断源(gpio,extern,uart,key…)控制器 –> VIC[0-4] -> 中断主控制器 –> CPU
1
2
asm_irq:
b irq_handler
1
2
3
4
5
6
7
8
9
10
extern void asm_irq(void);
void irq_init(void){
#if 0 //方案1:直接把指令内容放到寄存器,中断来之后cpu直接执行该指令(无法工作)
unsigned int tmp;
tmp = *((unsigned int *)asm_irq); //把asm_irq地址的4字节内容赋值给tmp(也就是把指令赋值给tmp)
pEXECEPTION_IRQ = tmp; //把指令赋值给该寄存器,当发生中断,该寄存器内的指令被cpu执行
#else //方案2:把地址放到寄存器,中断来之后cpu读出该地址的指令来执行
pEXECEPTION_IRQ = (unsigned int)asm_irq;
#endif
}
1
2
3
4
5
irq_handler:
stmfd sp!,{r0-r3,lr}
bl irq_c_handler
ldmfd sp!,{r0-r3,lr}
subs pc,lr,#4
1
2
3
4
5
6
7
8
9
10
11
12
13
14
15
16
17
18
19
20
21
22
23
24
25
26
27
28
29
30
31
32
33
34
void irq_c_handler(void){
myputs("irq_c_handler\n");
if(VIC0IRQSTATU|VIC1IRQSTATUS|VIC2IRQSTATUS|SVIC3IRQSTATUS){ }
void (*handler)(void) = NULL;
handler = (void (*)(void))VIC0ADDRESS; //handler的值应该就是key1_handler
if(handler) handler();
}
void key1_handler(void){
myputs("key1_handler\n");
set EXT_INT_2_PENDING[0] = 1; //清除中断源控制器的pending位EXT_INT[16]。pending:用于多个中断源同时发生,pending寄存器就暂存中断信号,等cpu处理完一个之后将其取消,接着处理下一个中断源
set VIC0ADDRESS = 0; //清除中断主控制器的pending
}

void key_init(void)
{
//1.对引脚进行功能选择,把GPH2.0引脚配置为中断 EXT_INT[16]
set GPH2.CON[3:0] = 1111;

//配置中断源(extern)控制器 extern interrupt controller register
set EXT_INT_2_CON[2:0] = 0b010; //上升沿触发EXT_INT[16]
set EXT_INT_2_MASK[0] = 0b0; //取消屏蔽EXT_INT[16],让中断可以去到主中断控制器

//配置中断主控制器
set VIC0INTENABLE[16] = 1; //使能接受中断EXT_INT[16],若想禁用 set VIC0INTENCLEAR[16] = 1;
VIC0VECTORADDR16 = key1_handler; //把处理函数的地址放到寄存器里面,当发生中断时,该地址会被cpu写到VIC0ADDRESS里面
}

int main(void)
{
irq_init();
key_init();
while(1);
return 0;
}

Open62541编译与安装

克隆open62541源码

1
git clone -b v1.0.6 https://github.com/open62541/open62541.git

编译

1
2
3
4
5
6
7
8
9
10
11
12
13
14
# 进入源码目录
cd open62541/

# 拉取子模块,当编译使能某些特殊功能时就需要,如自定义namespace等
git submodule update --init --recursive --progress

# 创建编译目录并且进入
mkdir build/ && cd build

# 配置编译选项,-DBUILD_SHARED_LIBS=ON 表示生成动态库,-DCMAKE_INSTALL_PREFIX=/usr表示安装路径为/usr
cmake .. -DBUILD_SHARED_LIBS=ON -DCMAKE_INSTALL_PREFIX=/usr

# 开始编译
make VERBOSE=1

安装与卸载

1
2
3
4
5
# 安装
sudo make install

# 卸载
sudo xargs rm < install_manifest.txt

proxychains笔记

解决’libproxychains.so.3’ from LD_PRELOAD cannot be preloaded

1
2
3
ProxyChains-3.1 (http://proxychains.sf.net)
ERROR: ld.so: object 'libproxychains.so.3' from LD_PRELOAD cannot be preloaded
(cannot open shared object file): ignored.
1
2
3
4
$ find /usr/ -name libproxychains.so.3 -print
/usr/lib/x86_64-linux-gnu/libproxychains.so.3
$ sudo vim /usr/bin/proxychains
# export LD_PRELOAD=libproxychains.so.3 改为 export LD_PRELOAD=/usr/lib/x86_64-linux-gnu/libproxychains.so.3

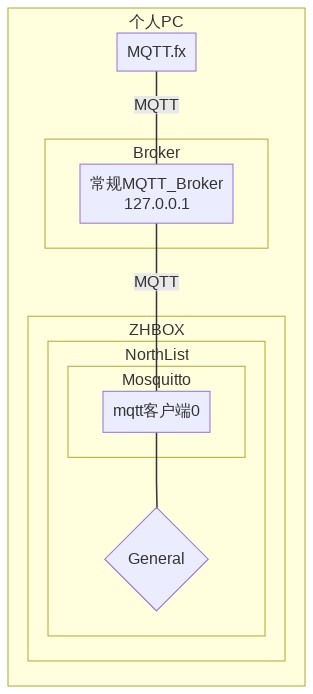
zhbox连接常规MQTT-Broker

拓扑结构

需求

  1. 已知服务器(IP:127.0.0.1,Port:1883)运行的是常规的MQTT_Broker(cloud:0),并且接受任何clientid、用户、密码的连接

  2. zhbox使用以下用户连上MQTT_Broker,并创建2个任务

    • 每间隔30秒,给主题(topic):hello发布(publish)一条消息(payload):{”hello":30}
    • 每间隔60秒,给主题(topic):world发布(publish)一条消息(payload):{”wrold":60}
    1
    2
    3
    clientid = "test1clientid";
    usr = "test1usr";
    pwd = "test1pwd";
  3. PC端打开一个常规MQTT客户端(如:mqtt.fx)使用以下用户连上MQTT_Broker后,订阅主题(topic):hello,应该就能收到zhbox发出并经过MQTT_Broker转发过来的消息:{”hello":"World"}

    1
    2
    3
    clientid = "mqttfx";
    usr = "mqttfxusr";
    pwd = "mqttfxpwd";

配置zhbox

1
2
3
4
5
6
7
8
9
10
11
12
13
14
15
16
17
18
19
20
21
22
23
24
25
26
27
28
29
30
31
32
33
34
35
36
37
//filename: test1.cfg
enable = true; //使能
loglevel = 5; //0 Emergency,1 Alert,2 Critical,3 Error,4 Warning,5 Notice,6 Informational,7 Debug

northls = ( //多个连接,数组
{ //第1个连接
cloud = 0; //云平台,0表示常规MQTT_Broker
name = "localgeneral"; //给该连接起个名字

addr = "127.0.0.1"; //Broker端的地址
port = 1883; //Broker端的端口
clean_session = true;
clientid = "test1clientid"; //客户端ID,连接的唯一标识
usr = "test1usr"; //用户名字
pwd = "test1pwd"; //用户密码
keepalive = 60;
qos = 2;

subtopics = []; //订阅的主题
tasksls = ( //任务列表
{ //第1个任务
interval = 30; //间隔30秒
pubtopic = "hello"; //publish to topic 发送到该主题
payloadfmt = "{\"hello\":30}"; //payload format
propertyfmt = "";
properties = ();
},
{ //第2个任务
interval = 60; //间隔60秒
pubtopic = "world"; //publish to topic 发送到该主题
payloadfmt = "{\"world\":60}"; //payload format
propertyfmt = "";
properties = ();
}
);
}
)

运行zhbox

1
zhbox -sc ./test/test1config/test1.cfg -f

运行mqtt.fx

订阅主题(topic):hello

接收消息{"hello":30}

hexo笔记

hexo安装

1
sudo npm install hexo-cli -g

若出现npm ERR! Unexpected end of JSON input while parsing near '...ublish-latest":"^1.1.'

1
sudo npm cache clean --force

ubuntu 16.04 nodejs 版本低会出现

1
2
3
4
5
6
7
8
9
10
11
12
13
/usr/local/lib/node_modules/npm/bin/npm-cli.js:79
let notifier = require('update-notifier')({pkg})
^^^

SyntaxError: Block-scoped declarations (let, const, function, class) not yet supported outside strict mode
at exports.runInThisContext (vm.js:53:16)
at Module._compile (module.js:374:25)
at Object.Module._extensions..js (module.js:417:10)
at Module.load (module.js:344:32)
at Function.Module._load (module.js:301:12)
at Function.Module.runMain (module.js:442:10)
at startup (node.js:136:18)
at node.js:966:3

先卸载nodejs,然后安装稳定最新版

1
2
3
4
5
6
sudo apt-get remove --purge nodejs
curl -sL https://deb.nodesource.com/setup_8.x | sudo bash -
sudo apt-get update
sudo apt-get install nodejs
sudo npm install npm -g
npm --version

测试安装结果

1
2
3
4
hexo init blog
cd blog
npm install
hexo s

浏览器访问: localhost:4000

部署到github

  1. 安装 hexo-deployer-git
    1
    sudo npm install hexo-deployer-git --save
  2. _config.yml(如果有已存在的请删除)添加如下配置:
    1
    2
    3
    4
    5
    6
    7
    deploy:
    type: git
    repo: https://github.com/<username>.github.io # example, https://github.com/hexojs/hexojs.github.io
    branch: <YourBranch>
    message: <update>
    name: <username>
    email: <youremail@xxx.com>
    运行
    1
    hexo clean && hexo deploy
    查看 username.github.io 上的网页是否部署成功。

hexo d 部署时在Copying files from public folder就停掉的问题

1
2
3
4
5
$ hexo d
INFO Validating config
INFO Deploying: git
INFO Clearing .deploy_git folder...
INFO Copying files from public folder...

用下面指令解决

1
2
3
cd blog
npm un hexo-deployer-git
npm i hexojs/hexo-deployer-git

主题使用

concise

预览地址

1
2
3
4
5
6
npm install hexo-renderer-less --save
npm uninstall hexo-renderer-stylus --save
git clone https://github.com/sanonz/hexo-theme-concise.git themes/concise
cp themes/concise/_config.example.yml themes/concise/_config.yml
#vim _config.yml #改theme: concise
#vim themes/concise/_config.yml #个性化博客主题页面

Hexo-Theme-AirCloud

预览地址

1
2
3
4
5
git clone https://github.com/aircloud/hexo-aircloud-blog.git --recursive
cd hexo-aircloud-blog
git clone https://github.com/aircloud/hexo-theme-aircloud.git themes/aircloud
npm install
hexo s

Hexo引用站内文章

1
2
3
# 假设有篇文章 hexo-github-blog.md
{% post_link hexo-github-blog %} #使用原文章title名字
{% post_link hexo-github-blog 显示的名字 %} #显示新名字

win笔记

win10上搭建open DHCP server

openDHCPserver官网下载地址 根据网上的资料,open dhcp server 最好不要安装在C盘。这里我安装在了D盘

win+r - services.msc - 右键Open DHCP Server - 启动 - 修改本地ip为192.168.2.1 - 关闭防火墙

修改地址池:把安装目录下的OpenDHCPServer.ini的DHCPRange改为192.168.2.2-192.168.2.254,重启服务(或者执行RunStandAlone.bat)

想查看当前有那些设备获取了ip可用浏览器访问http://127.0.0.1:6789

局域网无法ping通

控制面板 - 网络和Internet - 网络和共享中心 - 更改高级共享设置 - 所有都设置’启用网络发现’,’启用文件和打印机共享’

QT5.9.3安装静态编译库

  1. 解压openssl-1.0.1c_static_w32_mingw.zip到C:\Dev\openssl\lib(拷贝include/ libcrypto.a或libssl.a进去)
  2. 解压Qt5.9.3_MinGW32_static.7z到D:\Qt5.9.3_MinGW32_static
  3. 删除项目内的hello.pro.user和hello.pro.user***
  4. 重新打开hello.pro配置
  5. Manage Kits - QT Version - 添加 - D:\Qt5.9.3_MinGW32_static\bin\qmake.exe
  6. Manage Kits - 构建套件(Kit) - 添加 - 名称:static_new - QT版本:Qt5.9.3_MinGW32_static
  7. 左下角Debug - static_new - Release 编译生成exe即可拷贝到其他电脑运行

关闭java自动更新 右下角弹出 java update

找到C:\Program Files (x86)\Java\jre7\bin\javacpl.exe,以管理员身份运行,点 更新-取消勾选自动检查更新

WSL的sshServer无法启动

使用 sudo service ssh start 启动 ssh 服务,提示:

1
2
3
4
5
* Restarting OpenBSD Secure Shell server sshd
Could not load host key: /etc/ssh/ssh_host_rsa_key
Could not load host key: /etc/ssh/ssh_host_ecdsa_key
Could not load host key: /etc/ssh/ssh_host_ed25519_key
[ OK ]

然后使用 powershell 连接,提示 refused:

1
2
PS C:\Users\suyua> ssh ryan@localhost
ssh: connect to host localhost port 22: Connection refused

卸载重装 openssh-server:

1
2
sudo apt-get purge openssh-server # purge 是卸载并删除配置文件
sudo apt-get install openssh-server

然后修改 /etc/ssh/sshd_config 的下列几行参数:

1
2
3
#Port 22 # 如果端口冲突,就需要修改这个
ListenAddress localhost # 只接受本地请求
PasswordAuthentication yes # 允许密码登录

重启 ssh 服务:

1
sudo service ssh restart

然后连接:

1
2
3
PS C:\Users\suyua> ssh ryan@localhost
ryan@localhost's password:
Welcome to Ubuntu 18.04.2 LTS (GNU/Linux 4.4.0-17763-Microsoft x86_64)

参考

windows-wsl sshd配置

XShell笔记

xshell启动默认打开会话

工具-选项-常规-(会话-启动时打开的会话)添加

xshell修改配色

打开记事本,粘贴以下内容,另存为随便名字.xcs,在xshell里:工具-配色方案-导入-选择ubuntu-确定

1
2
3
4
5
6
7
8
9
10
11
12
13
14
15
16
17
18
19
20
21
22
23
24
[ubuntu]
text(bold)=ffffff
magenta(bold)=ad7fa8
text=7cfc00
white(bold)=eeeeec
green=4e9a06
red(bold)=ef2929
green(bold)=8ae234
black(bold)=555753
red=cc0000
blue=3465a4
black=000000
blue(bold)=729fcf
yellow(bold)=fce94f
cyan(bold)=34e2e2
yellow=c4a000
magenta=75507b
background=000000
white=d3d7cf
cyan=06989a

[Names]
count=1
name0=ubuntu

修改拷贝粘贴快捷键

工具-选项-键盘和鼠标-(按键对应)编辑-查找[Ctrl+Shift+c]-(找不到)新建-类型(菜单)-编辑(复制)确定

tmux笔记

常用配置

1
git clone https://github.com/tmux-plugins/tpm ~/.tmux/plugins/tpm
1
2
3
4
5
6
7
8
9
10
11
12
13
14
15
16
17
18
19
20
21
22
set -g mouse on
set -g base-index 1 #让窗口从1开始
set -g default-terminal "tmux-256color"
set -ga terminal-overrides ",*256col*:Tc"


set -g @scroll-speed-num-lines-per-scroll 10 #鼠标滚轮滚动速度10


# List of plugins #安装的插件列表
set -g @plugin 'tmux-plugins/tpm'
set -g @plugin 'tmux-plugins/tmux-sensible'
set -g @plugin 'nhdaly/tmux-better-mouse-mode'

# Other examples:
# set -g @plugin 'github_username/plugin_name'
# set -g @plugin 'git@github.com:user/plugin'
# set -g @plugin 'git@bitbucket.com:user/plugin'

# Initialize TMUX plugin manager (keep this line at the very bottom of
# tmux.conf)
run '~/.tmux/plugins/tpm/tpm' #插件管理器tpm

动态更新tmux配置文件

方法1. 在shell终端加载

1
tmux source-file ~/.tmux.conf

方法2. 在tmux内加载。Ctrl+b :

1
:source-file ~/.tmux.conf

配置tmux滚动速度

先安装插件 tmux-scroll-copy-mode ,再把添加下面行到 ~/.tmux.conf

1
set -g @scroll-speed-num-lines-per-scroll 10

tmuxp

1
2
3
4
5
6
7
8
9
10
11
12
13
$ cat ~/op.yaml
session_name: op
windows:
- window_name: vim
layout: tiled
shell_command_before:
- cd ~/tmp/openwrt
- window_name: make
layout: tiled
shell_command_before:
- cd ~/tmp/openwrt

$ tmuxp load ~/op.yaml