Docker快速上手指南

Source

【docker入门】10分钟,快速学会docker

1 获取镜像

1
2
docker pull nginx
docker pull nginx:latest

2 查看本地镜像

1
docker images

3 运行镜像

1
docker run -d -p 80:80 nginx

-d 后台运行

-p 内外端口映射

4 查看正在运行的容器

1
docker ps

5 修改容器

1
docker exec -it xxxx bash

-it 接容器id

6 删除容器

1
docker rm -f xxx

7 提交容器

1
docker commit xxx name(自己定一个名字)

8 通过dockerfile构建镜像跑成容器

新建dockerfile文件(写法自行查阅官方文档)

然后在当前目录新建index.html

9 保存文件和重新加载

摘一个网友(湿漉漉的小狐狸)的笔记

1
2
3
4
5
6
7
8
9
10
11
12
13
14
15
16
17
18
19
20
21
22
23
24
安装和常用CLI:
添加阿里云镜像:sudo yum-config-manager --add-repo https://mirrors.aliyun.com/docker-ce/linux/centos/docker-ce.repo
安装命令:sudo yum install -y docker-ce docker-ce-cli containerd.io
启动命令:sudo systemctl start docker
添加当前用户到docker用户组:sudo usermod -aG docker $USER (需注销),newgrp docker (立即生效)
Helloworld:docker run hello-world (本地没有镜像的话会自动从远端仓库pull)
pull nginx 镜像:docker pull nginx(等效于nginx:latest)
运行:docker run -【d】(后台运行不阻塞shell) 【-p 80:80】(指定容器端口映射,内部:外部) nginx
查看正在运行:docker ps
删除容器:docker rm -f <container id(不用打全,前缀区分)>
进入bash:docker exec -it <container id(不用打全,前缀区分)> bash
commit镜像:docker commit <container id(不用打全,前缀区分)> <name>
查看镜像列表:docker images (刚才commit的镜像)
使用运行刚才commit的镜像:docker run -d <name>
使用Dockerfile构建镜像:docker build -t <name> <存放Dockerfile的文件夹>
删除镜像:docker rmi <name>
保存为tar:docker save <name> > <tar name>
从tar加载:docker load < <tar name>

一些启动参数:
后台运行容器:-d
容器内外端口映射:-p 内部端口号:外部端口号
目录映射:-v 'dir name' : <dir>
指定映像版本:<name>:<ver>

【docker入门2】实战~如何组织一个多容器项目docker-compose

https://github.com/sunwu51/notebook/tree/master/19.07

https://github.com/bobo132/docker-compose-demo-1

多容器项目的组织

1
2
3
4
docker run -d -p 80:80 --name mynginx nginx
docker ps
docker exec -it mynginx bash
cat /etc/hosts

172.17.0.2是容器的ip,然后我们退出(exit)然后又启动一个新的容器

1
2
3
4
5
docker run -dit alpine
docker exec -it xxxx(容器id)

apk add curl
curl 172.17.0.2

–link 参数 把另一个容器映射到本容器里面(通过修改/etc/hosts文件)

三个容器的组织

注意:创建顺序需要先mysql,然后启动php的时候link参数映射到mysql,同理类推~
这样对运维来说太麻烦了,有什么好方法吗?docker-compose

docker-compose 用法

(本小节实验涉及的文件参考:https://github.com/bobo132/docker-compose-demo-1)

新建俩文件夹

1
2
3
--
|- conf
|- html

然后在conf/下面建立nginx.conf

(略)

然后写docker-compose.yml

(不能指定官方的php,因为缺少扩展,搜索php-fpm然后选一个~

然后退出vim~ 在该目录下运行docker-compose up -d (-d 后台启动)

【Docker】Dockerfile用法全解析

漏掉了USER,用于指定RUN CMD等指令运行时的用户身份,不指定是root。 用法(下面组相关的可以不指定):

USER 用户名:用户组 或 USER 用户id:组id

【kubernetes入门】快速了解和上手容器编排工具k8s

https://github.com/sunwu51/notebook/tree/master/19.07

docker笔记

安装

1
sudo pacman -S docker

解决未运行问题

1
Cannot connect to the Docker daemon at unix:///var/run/docker.sock. Is the docker daemon running?
1
2
sudo systemctl daemon-reload
sudo systemctl restart docker.service

解决权限问题

1
Got permission denied while trying to connect to the Docker daemon socket at unix:///var/run/docker.sock: Post "http://%2Fvar%2Frun%2Fdocker.sock/v1.24/images/create?fromImage=emqx%2Femqx&tag=4.2.7": dial unix /var/run/docker.sock: connect: permission denied
1
2
3
4
sudo groupadd docker #添加docker用户组
sudo gpasswd -a $USER docker #把当前用户添加到docker组中
newgrp docker #更新用户组
#sudo chmod a+rw /var/run/docker.sock #永久生效

改为国内源

1
2
3
# zh @ li in ~ [9:24:26]
$ cat /etc/docker/daemon.json
{"registry-mirrors":["https://docker.mirrors.ustc.edu.cn/","https://hub-mirror.c.163.com/","https://reg-mirror.qiniu.com/"]}

测试

安装emqx

1
2
docker pull emqx/emqx:4.2.7
docker run -d --name emqx -p 1883:1883 -p 8083:8083 -p 8883:8883 -p 8084:8084 -p 18083:18083 emqx/emqx:4.2.7

java学习7 多线程详解

多线程详解

进程

  一个进程可以有多个线程,如视频中同时听声音,看图像,看弹幕,等等

  1. 程序是指令和数据的有序集合,其本身没有任何运行的含义,是一个静态的概念。
  2. 进程是执行程序的一次执行过程,它是动态的概念。是系统资源分配的单位
  3. 通常在一个进程中可以包含若干个线程,当然一个进程至少有一个线程,不然没有存在的意义。线程是CPU调度和执行的单位。

注意:不少多线程都是模拟出来的,真正的多线程是指有多个CPU,即多核,如服务器。如果是模拟出来的多线程,即在一个CPU的情况下,在同一时间点,cpu只能执行一个代码,因为切换的很快,所以有同时执行的错觉。

总结:

  1. 线程就是独立的执行路径;
  2. 在程序运行时,即使没有自己创建线程,后台也会有多个线程,如主线程,gc线程;
  3. main()称之为主线程,为系统的入口,用于执行整个程序;
  4. 在一个进程中,如果开辟了多个线程,线程的运行由调度器(CPU)安排调度,调度器是与操作系统紧密相关的,先后顺序是不能人为的干预的。
  5. 对同一份资源操作时,会存在资源抢夺的问题,需要加入并发控制。
  6. 线程会带来额外的开销,如cpu调度时间,并发控制开销。
  7. 每个线程在自己的工作内存交互,内存控制不当会造成数据不一致;

多线程

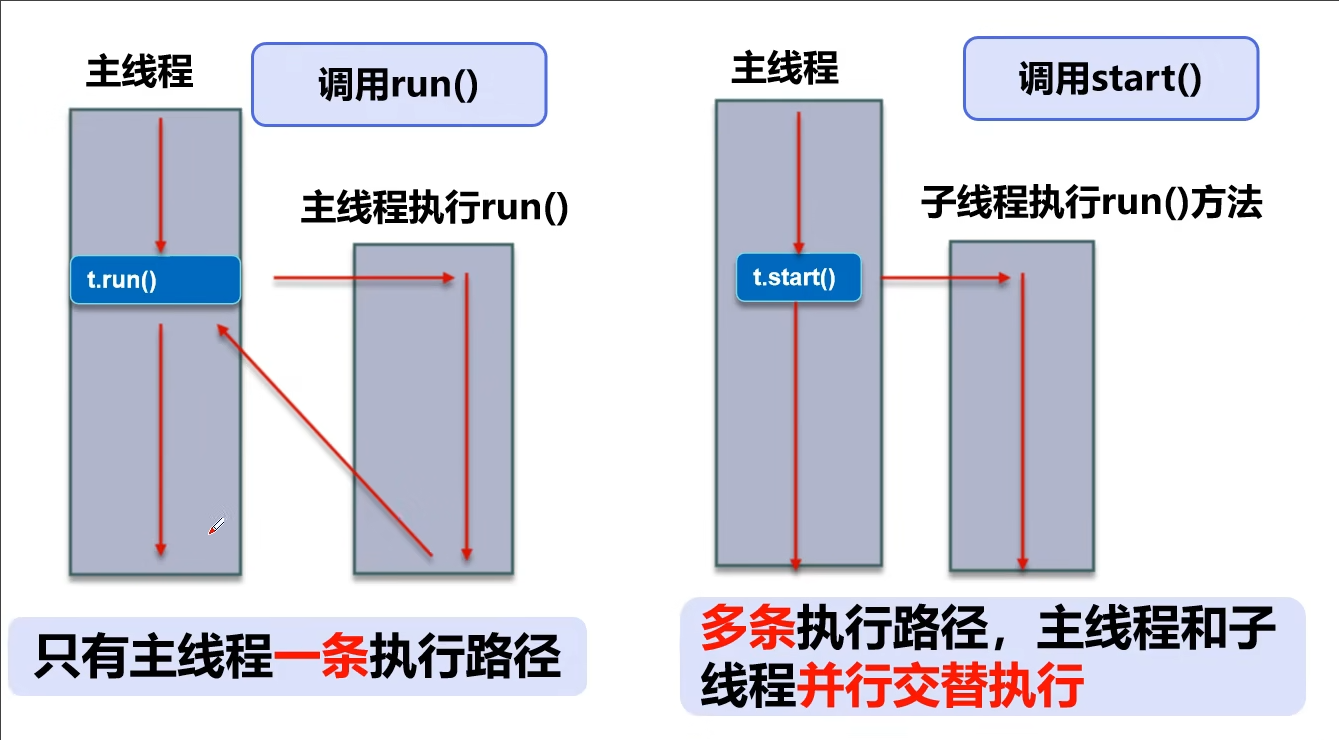
原来的方法调用 vs 多线程下的方法调用

方法与线程

线程实现

继承Thread类

继承Thread类实现多线程步骤如下:

  1. 自定义线程类继承Thread类
  2. 重写run() 方法,编写线程执行体
  3. 创建线程对象,调用start() 方法启动线程

通过查看源码发现Thread 是实现Runnable接口的。
注意:线程开启不一定立即执行,由CPU调度安排。

1
2
3
4
5
6
7
8
9
10
11
12
13
public class TestThread1 extends Thread {
@Override
public void run() {
for (int i = 0; i < 5; i++) { System.out.println("我在撸代码--"+i); }
}
public static void main(String[] args) {
TestThread1 testThread1 = new TestThread1();
testThread1.start();

for (int i = 0; i < 5; i++) { System.out.println("我在学习--"+i); }
}
}
1
2
3
4
5
6
7
8
9
10
我在学习--0
我在学习--1
我在撸代码--0
我在学习--2
我在学习--3
我在撸代码--1
我在撸代码--2
我在撸代码--3
我在学习--4
我在撸代码--4

网图下载

下载jar

http://commons.apache.org/-左Release-右IO-Binaries

  • commons-io-2.11.0-bin.zip(Win)
  • commons-io-2.11.0-bin.tar.gz(Linux)

添加库(jar)

  • 右键com-New-Package-lib-[ctrl+v]
  • 右键lib-AddasLibrary
  • name:lib,level和Addtomodule默认
  • ProjectStruct-ProjectSettings-Libraries-可以看到库
1
2
3
4
5
6
7
8
9
10
11
12
13
14
15
16
17
18
19
20
21
22
23
24
25
26
27
28
29
30
31
32
33
34
35
36
37
38
39
40
package com.humble.thread;
import org.apache.commons.io.FileUtils;
import java.io.File;
import java.io.IOException;
import java.net.URL;

public class TestThread2 extends Thread{
private String url;
private String name;

public TestThread2(String url,String name){ this.name = name; this.url = url; }

@Override
public void run(){
WebDownloader webDownloader = new WebDownloader();
webDownloader.downLoader(url,name);
System.out.println("下载了文件名为:"+name);
}

public static void main(String[] args) {
TestThread2 thread1 = new TestThread2("http://192.168.1.1/tmp/a.jpg", "1.jpg");
TestThread2 thread2 = new TestThread2("http://192.168.1.1/tmp/b.jpg", "2.jpg");
TestThread2 thread3 = new TestThread2("http://192.168.1.1/tmp/c.jpg", "3.jpg");

thread1.start();
thread2.start();
thread3.start();
}
}
class WebDownloader{
public void downLoader(String url,String name){
try {
FileUtils.copyURLToFile(new URL(url),new File(name));
} catch (IOException e) {
e.printStackTrace();
System.out.println("IO 异常,Downloader方法出现问题");
}
}
}
1
2
3
下载了文件名为:2.jpg
下载了文件名为:1.jpg
下载了文件名为:3.jpg

实现Runnable 接口

1
2
3
4
5
6
7
8
9
10
11
12
13
14
15
16
17
package com.humble.thread;

public class TestThread3 implements Runnable{
@Override
public void run() {
for (int i = 0; i < 5; i++) { System.out.println("我在撸代码--"+i); }
}

public static void main(String[] args) {
TestThread3 testThread3 = new TestThread3();

Thread thread = new Thread(testThread3);
thread.start();

for (int i = 0; i < 5; i++) { System.out.println("我在学习--"+i); }
}
}
1
2
3
4
5
6
7
8
9
10
我在学习--0
我在学习--1
我在撸代码--0
我在学习--2
我在学习--3
我在撸代码--1
我在撸代码--2
我在撸代码--3
我在学习--4
我在撸代码--4

Thread 和Runnable小结

继承Thread类

  1. 子类继承Thread 类具有多线程能力
  2. 启动线程:子类对象.start()
  3. 不建议使用:避免OOP单继承局限性

实现Runnable 接口

  1. 实现接口Runnable 具有多线程能力
  2. 启动线程:传入目标对象+Thread对象.start()
  3. 推荐使用:避免单继承局限性,灵活方便,方便同一个对象被多个线程使用

案例:龟兔赛跑

  1. 首先来个赛道距离,然后要离终点越来越近
  2. 判断比赛是否结束
  3. 打印出胜利者
  4. 龟兔赛跑开始
  5. 故事中是乌龟赢了,兔子需要睡觉,所以我们模拟兔子睡觉
  6. 终于,乌龟赢了
1
2
3
4
5
6
7
8
9
10
11
12
13
14
15
16
17
18
19
20
21
22
23
24
25
26
27
28
29
30
31
32
33
34
35
36
37
38
39
40
41
42
package com.humble.thread;

public class Race implements Runnable {
private static String winner;

@Override
public void run() {
for (int i = 1; i <= 100; i++) {
if (Thread.currentThread().getName().equals("兔子") && i % 10 == 0) {
try {
Thread.sleep(10);
} catch (InterruptedException e) {
e.printStackTrace();
}
}

boolean flag = gameOver(i);
if (flag) { break; }

System.out.println(Thread.currentThread().getName() + "-->跑了" + i + "步");
}
}

private boolean gameOver(int steps) {
if (winner != null) {
return true;
} else {
if (steps >= 100) {
winner = Thread.currentThread().getName();
System.out.println("Winner is " + winner);
return true;
}
}
return false;
}

public static void main(String[] args) {
Race race = new Race();
new Thread(race, "乌龟").start();
new Thread(race, "兔子").start();
}
}
1
Winner is 乌龟

实现Callable 接口

  1. 实现Callable接口,需要返回值类型
  2. 重写call 方法,需要抛出异常
  3. 创建目标对象
  4. 创建执行服务:
  5. 提交执行:
  6. 获取结果:
  7. 关闭服务:
1
2
3
4
5
6
7
8
9
10
11
12
13
14
15
16
17
18
19
20
21
22
23
24
25
26
27
28
29
30
31
32
33
34
35
36
37
38
39
40
41
42
43
44
45
46
47
48
49
50
package com.humble.callable;
import com.humble.thread.TestThread2;
import org.apache.commons.io.FileUtils;
import java.io.File;
import java.io.IOException;
import java.net.URL;
import java.util.concurrent.*;

public class TestCallable implements Callable<Boolean> {
private String url;
private String name;

public TestCallable(String url, String name) { this.name = name; this.url = url; }

@Override
public Boolean call() throws Exception {
WebDownloader webDownloader = new WebDownloader();
webDownloader.downLoader(url,name);
System.out.println("下载了文件名为:"+name);
return true;
}

public static void main(String[] args) throws ExecutionException, InterruptedException {
TestCallable t1 = new TestCallable("http://192.168.1.1/tmp/a.jpg", "1.jpg");
TestCallable t2 = new TestCallable("http://192.168.1.1/tmp/b.jpg", "2.jpg");
TestCallable t3 = new TestCallable("http://192.168.1.1/tmp/c.jpg", "3.jpg");

ExecutorService ser = Executors.newFixedThreadPool(3);

Future<Boolean> r1 = ser.submit(t1);
Future<Boolean> r2 = ser.submit(t2);
Future<Boolean> r3 = ser.submit(t3);
Boolean rs1 = r1.get();
Boolean rs2 = r2.get();
Boolean rs3 = r3.get();
ser.shutdownNow();
}
}

class WebDownloader {
public void downLoader(String url, String name) {
try {
FileUtils.copyURLToFile(new URL(url), new File(name));
} catch (IOException e) {
e.printStackTrace();
System.out.println("IO 异常,Downloader方法出现问题");
}
}

}

静态代理

静态代理总结:

  1. 真实对象和代理对象都要实现同一个接口
  2. 代理对象要代理真实角色

好处:

  • 代理对象可以做很多对象做不了的事情
  • 真实对象专注做自己的事情
1
2
3
4
5
6
7
8
9
10
11
12
13
14
15
16
17
18
19
20
21
22
23
24
25
26
27
28
29
30
package com.humble.proxy;

public class StacticProxy {
public static void main(String[] args) {
//new Thread( () -> System.out.println("ahaha")).start();
new WeddingCompany(new You()).happyMarry();
}
}

interface Marry { void happyMarry(); }

class You implements Marry {
@Override
public void happyMarry() { System.out.println("星星要结婚了,超开心"); }
}

class WeddingCompany implements Marry {
private Marry target;
public WeddingCompany(Marry target) { this.target = target; }

@Override
public void happyMarry() {
before();
this.target.happyMarry();
after();
}

private void after() { System.out.println("结婚之后,收尾款"); }
private void before() { System.out.println("结婚之前,布置现场"); }
}

Lambda表达式

  • 入 希腊字母表中排序第十一位的字母,英语名称为Lambda
  • 避免内部类定义过多
  • 其实质属于函数式编程概念
1
2
3
4
5
(params) -> expression [表达式]
(params) -> statement [语句]
(params) -> { statement }

new Thread(()-> System.out.println("多线程学习")).start();

为什么要使用lambda表达式

  1. 避免你们内部类定义过多
  2. 可以让你的代码看起来很简洁
  3. 去掉了一堆没有意义的代码,只留下核心的逻辑

函数式接口(function interface)的定义

  1. 任何接口,如果只包含唯一一个抽象方法,那么它就是一个函数式接口。
    1
    public interface Runnable{ public abstract void run(); }
  2. 对于函数式接口,我们可以通过lambda 表达式来创建该接口的对象。

案例1

1
2
3
4
5
6
7
8
9
10
11
12
13
14
15
16
17
18
19
20
21
22
23
24
25
26
27
28
29
30
31
32
33
34
35
36
37
38
39
40
package com.humble.lambda;

public class TestLambda {
static class Like2 implements ILike { //静态内部类
@Override
public void lambda() { System.out.println(" i like lambda2"); }
}

public static void main(String[] args) {
ILike like = new Like();
like.lambda();

like = new Like2();
like.lambda();

class Like3 implements ILike { //局部内部类
@Override
public void lambda() { System.out.println(" i like lambda3"); }
}

like = new Like3();
like.lambda();

like = new ILike() { //匿名内部类,无类名,必须借助接口或父类
@Override
public void lambda() { System.out.println(" i like lambda4"); }
};
like.lambda();

like = ()->{ System.out.println(" i like lambda5"); };
like.lambda();
}
}

interface ILike { void lambda(); } //只有1个抽象方法的接口

class Like implements ILike { //外部类
@Override
public void lambda() { System.out.println(" i like lambda"); }
}

案例2

1
2
3
4
5
6
7
8
9
10
11
12
13
14
package com.humble.lambda;

public class TestLambda2 {
public static void main(String[] args) {
ILove love = null;
love = (int a,int b)->{ System.out.println("i love-"+a); };
love = (a,b)->{ System.out.println("i love-"+a); }; //等同上
//若只有参数a可用a->{ System.out.println("i love-"+a); };
love = (a,b)->System.out.println("i love-"+a); //等同上(但是只能单语句)
love.love(520); //i love-520
}
}

interface ILove { void love(int a, int b); } //只有1个抽象方法的接口

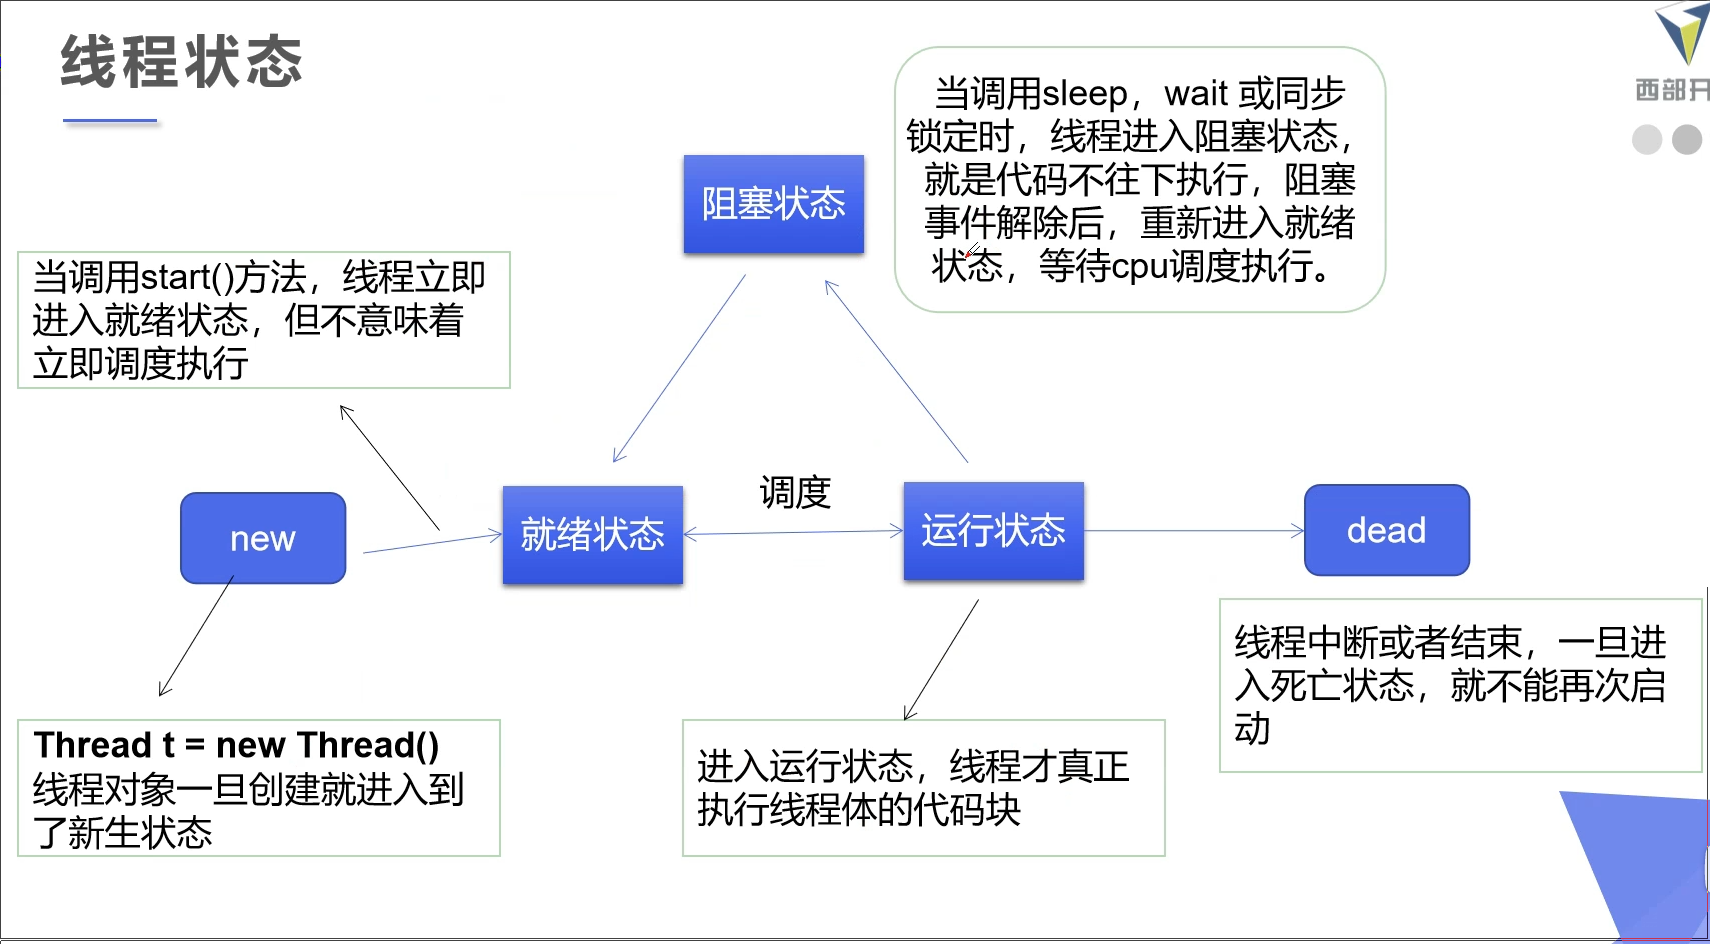
线程状态

线程状态

线程状态

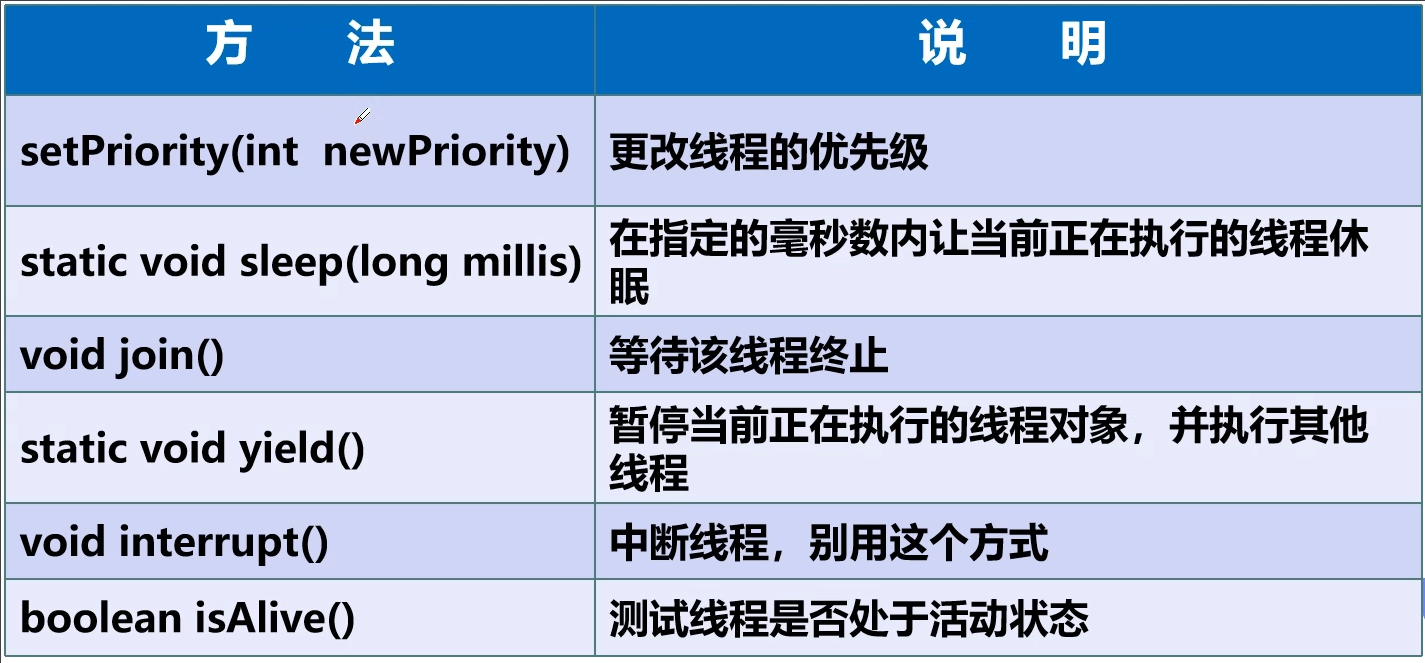
线程方法

线程停止

  1. 建议线程正常停止->利用次数。不建议死循环
  2. 建议使用标志位->设置一个标志位
  3. stop和destory等过时方法不建议使用
1
2
3
4
5
6
7
8
9
10
11
12
13
14
15
16
17
18
19
20
21
22
23
24
25
26
package com.humble.state;

public class TestStop implements Runnable {
private boolean flag = true;

@Override
public void run() {
int i = 0;
while (flag) { System.out.println("run...Thread->" + i++); }
}

public void stop() { this.flag = false; }

public static void main(String[] args) {
TestStop testStop = new TestStop();
new Thread(testStop).start();

for (int i = 0; i < 1000; i++) {
System.out.println("main" + i);
if (i == 900) {
testStop.stop();
System.out.println("该线程停止了");
}
}
}
}
1
2
3
4
5
6
7
8
9
main0
...
run...Thread->0
...
main900
run...Thread->2
该线程停止了
main901
...

线程休眠(sleep)

  1. sleep(时间)指定当前线程阻塞的毫秒数;
  2. sleep 存在异常InterruptedException;
  3. sleep 时间达到后线程进入就绪状态
  4. sleep 可以模拟网络延时,倒计时等。
  5. 每一个对象都有一个锁,sleep不会释放锁;

案例:模拟网络延时

1
2
3
4
5
6
7
8
9
10
11
12
13
14
15
16
17
18
19
20
21
22
23
24
25
package com.humble.state;

public class TestSleep implements Runnable {
private int ticketNums = 10;

@Override
public void run() {
while (true) {
if (ticketNums <= 0) { break; }
try {
Thread.sleep(100);
} catch (Exception e) {
e.printStackTrace();
}
System.out.println(Thread.currentThread().getName() + "--->拿到了第" + ticketNums-- + "票");
}
}

public static void main(String[] args) {
TestSleep testSleep = new TestSleep();
new Thread(testSleep,"小明").start();
new Thread(testSleep,"小红").start();
new Thread(testSleep,"小黄牛").start();
}
}

案例:模拟倒计时

1
2
3
4
5
6
7
8
9
10
11
12
13
14
15
16
17
18
19
20
21
22
23
24
25
26
27
28
29
package com.humble.state;
import java.text.SimpleDateFormat;
import java.util.Date;

public class TestSleep2 {
public static void testDown() throws InterruptedException {
int num = 10;
while (true) {
Thread.sleep(1000);
System.out.println(num--);
if (num == 0) { break; }
}
}

public static void printNowDate() {
Date stattTime = new Date(System.currentTimeMillis());
while (true) {
try {
Thread.sleep(1000);
System.out.println(new SimpleDateFormat("yyyy年MM月dd日 HH:mm:ss").format(stattTime));
stattTime = new Date(System.currentTimeMillis());
} catch (Exception e) {
e.printStackTrace();
}
}
}

public static void main(String[] args) { printNowDate(); }
}

线程礼让(yield)

  1. 礼让线程,让当前正在执行的线程暂停,但不阻塞
  2. 将线程从运行状态转为就绪状态
  3. 让cpu 重新调度,礼让不一定成功!看cpu心情
1
2
3
4
5
6
7
8
9
10
11
12
13
14
15
16
17
18
package com.humble.state;

public class TestYield {
public static void main(String[] args) {
MyYield myYield = new MyYield();
new Thread(myYield,"a").start();
new Thread(myYield,"b").start();
}
}

class MyYield implements Runnable {
@Override
public void run() {
System.out.println(Thread.currentThread().getName()+"执行");
Thread.yield();
System.out.println(Thread.currentThread().getName()+"停止");
}
}
1
2
3
4
a执行
a停止
b执行
b停止
1
2
3
4
a执行
b执行
b停止
a停止

线程强制执行(join)

Join合并线程,待此线程执行完成后,再执行其他线程,其他线程阻塞,可以想象成插队

1
2
3
4
5
6
7
8
9
10
11
12
13
14
15
16
17
18
19
package com.humble.state;

public class TestJoin implements Runnable {
@Override
public void run() {
for (int i = 0; i < 100; i++) { System.out.println("线程vip来了" + i); }
}

public static void main(String[] args) throws InterruptedException {
TestJoin testJoin = new TestJoin();
Thread thread = new Thread(testJoin);
thread.start();

for (int i = 0; i < 200; i++) {
if (i == 100) { thread.join(); }
System.out.println("main" + i);
}
}
}
1
2
3
4
5
6
7
8
9
main0
...
main99
线程vip来了0
...
线程vip来了99
main100
...
main199

Thread.State

线程状态,线程可以处于以下状态之一:

  • NEW   尚未启动的线程处于此状态
  • RUNNABLE   在Java虚拟机中执行的线程处于此状态
  • BLOCKED   被阻塞等待监视器锁定的线程处于此状态
  • WAITING   正在等待另一个线程执行特定动作的线程处于此状态
  • TIMED_WAITING   正在等待另一个线程执行动作达到指定等待时间的线程处于此状态
  • TERMINATED   已退出的线程处于此状态

一个线程可以在给定时间点处于一个状态,这些状态不反映任何操作系统线程状态的虚拟机状态。

1
2
3
4
5
6
7
8
9
10
11
12
13
14
15
16
17
18
19
20
21
22
23
24
25
26
27
28
29
30
package com.humble.state;

public class TeestState {
public static void main(String[] args) throws InterruptedException {
Thread thread = new Thread(()->{
for (int i = 0; i < 5; i++) {
try {
Thread.sleep(1000);
}catch (Exception e){
e.printStackTrace();
}
System.out.println("/");
}
});

Thread.State state = thread.getState();
System.out.println(state); //NEW

thread.start();
state = thread.getState();
System.out.println(state); //RUNNABLE

while (state != Thread.State.TERMINATED){
Thread.sleep(100);
state = thread.getState();
System.out.println(state);//TIMED_WAITING
}
//thread.start(); //TERMINATED状态的线程再start会报错
}
}
1
2
3
4
5
6
7
NEW
RUNNABLE
TIMED_WAITING
...
TIMED_WAITING
/
TERMINATED

注意:线程中断或结束,一旦进入死亡状态,就不能再次启动。

线程优先级

  1. Java提供一个线程调度器来监控程序中启动后进入就绪状态的所有线程,线程调度器安装优先级决定应该调度哪个线程来执行。
  2. 线程的优先级用数字表示,范围从1-10
    1
    2
    3
    Thread.MIN_PRIORITY = 1;
    Thread.MAX_PRIORITY = 10;
    Thread.NORM_PRIORITY = 5;
    使用以下方式改变或获取优先级
    1
    2
    getPriority()
    setPriority(int xx)
    1
    2
    3
    4
    5
    6
    7
    8
    9
    10
    11
    12
    13
    14
    15
    16
    17
    18
    19
    20
    21
    22
    23
    24
    25
    26
    27
    28
    29
    30
    31
    32
    package com.humble.state;

    public class TestPriority {
    public static void main(String[] args) {
    System.out.println(Thread.currentThread().getName()+"=="+Thread.currentThread().getPriority());

    MyPriority myPriority = new MyPriority();
    Thread t1 = new Thread(myPriority);
    Thread t2 = new Thread(myPriority);
    Thread t3 = new Thread(myPriority);
    Thread t4 = new Thread(myPriority);
    Thread t5 = new Thread(myPriority);
    Thread t6 = new Thread(myPriority);

    t1.start(); //默认5
    t2.setPriority(1); t2.start();

    t3.setPriority(4); t3.start();

    t4.setPriority(Thread.MAX_PRIORITY); t4.start(); //10

    t5.setPriority(8); t5.start();

    t6.setPriority(7); t6.start();
    }
    }
    class MyPriority implements Runnable{
    @Override
    public void run() {
    System.out.println(Thread.currentThread().getName()+"=="+Thread.currentThread().getPriority());
    }
    }
    优先级低只是意味着获得调度的概率低,并不是优先级低就不会被调用,这都是看CPU的调度。

守护(daemon)线程

  1. 线程分为用户线程和守护线程
  2. 虚拟机必须确保用户线程执行完毕
  3. 虚拟机不用等待守护线程执行完毕
    如:后台记录操作日志、监控内存、垃圾回收等等…
1
2
3
4
5
6
7
8
9
10
11
12
13
14
15
16
17
18
19
20
21
22
23
24
25
26
27
28
29
package com.humble.state;

public class TestDaemon {
public static void main(String[] args) {
God god = new God();
You you = new You();

Thread thread = new Thread(god);
thread.setDaemon(true); //false表示用户线程
thread.start();

new Thread(you).start();
}
}

class You implements Runnable {
@Override
public void run() {
for (int i = 0; i < 36500; i++) { System.out.println("你活着"); }
System.out.println("--goodbye");
}
}

class God implements Runnable {
@Override
public void run() {
while (true) { System.out.println("上帝保护着你"); }
}
}
1
2
3
4
5
6
7
8
9
你活着
上帝保护着你
...
上帝保护着你
你活着
--goodbye
上帝保护着你
...
上帝保护着你

线程同步

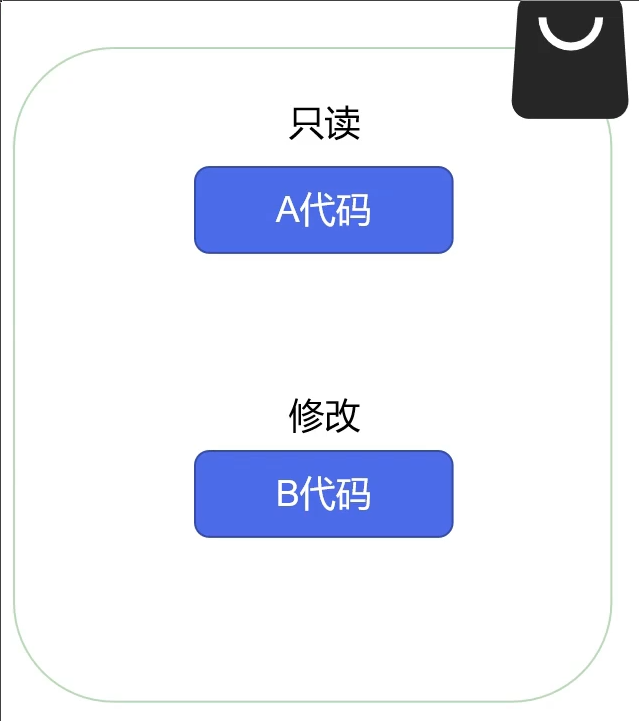
多个线程操作同一个资源

并发:同一个对象被多个线程同时操作

并发

  现实生活中,我们会遇到“同一资源,多个人都想使用”的问题,比如:食堂排队打饭,每个人都想吃饭,最天然的解决办法就是,排队。一个个来

排队

  处理多线程问题时,多个线程访问同一个对象(并发),并且某些线程还想修改这个对象,这个时候我们就需要线程同步,线程同步就是一种机制,多个需要同时访问此对象的线程进入这个对象的等待池形成队列,等待前面线程使用完毕,下一个线程再使用。

队列

由于同一个进程的多个线程共享同一块存储空间,在带来方便的同时,也带来了访问冲突问题,为了保证数据在方法中被访问时的正确性,在访问时加入 锁机制 synchronized ,当一个线程获得对象的排它锁,独占资源,其他线程必须等待,使用后释放锁即可。

存在以下问题:

  1. 一个线程有锁会导致其他需要此锁的线程挂起;
  2. 在多线程竞争下,加锁,释放锁会导致比较多的上下文切换 和 调度延时,引起性能问题;
  3. 如果一个优先级高的线程等待一个优先级低的线程释放锁 会导致优先级倒置,引起性能问题。

3大线程案例

线程案例1:不安全的买票

1
2
3
4
5
6
7
8
9
10
11
12
13
14
15
16
17
18
19
20
21
22
23
24
25
26
27
28
package com.humble.syn;

public class UnsafeBuyTicket {
public static void main(String[] args) {
BuyTicket station = new BuyTicket();
new Thread(station,"你").start();
new Thread(station,"我").start();
new Thread(station,"他").start();
}
}

class BuyTicket implements Runnable {
private int ticketNums = 10;
private boolean flag = true;

@Override
public void run() { while (flag) { buy(); } }

private void buy() {
if (ticketNums <= 0) { flag = false; return; }
try { //模拟延时
Thread.sleep(100);
} catch (InterruptedException e) {
e.printStackTrace();
}
System.out.println(Thread.currentThread().getName() + "拿到第" + ticketNums-- + "张票");
}
}
1
2
3
4
5
6
7
8
9
10
11
你拿到第10张票
他拿到第9张票
你拿到第8张票
我拿到第7张票
他拿到第6张票
你拿到第5张票
我拿到第4张票
你拿到第3张票
我拿到第2张票
他拿到第1张票
我拿到第-1张票 //线程不安全,有-1

线程案例2:不安全的取钱

1
2
3
4
5
6
7
8
9
10
11
12
13
14
15
16
17
18
19
20
21
22
23
24
25
26
27
28
29
30
31
32
33
34
35
36
37
38
39
40
41
42
43
44
45
46
47
package com.humble.syn;

public class UnsafeBank {
public static void main(String[] args) {
Account account = new Account(100, "结婚基金");
Drawing you = new Drawing(account,50,"你");
Drawing girlFriend = new Drawing(account,100,"girlFriend");
you.start();
girlFriend.start();
}
}

class Account {
int money;
String name;
public Account(int money, String name) { this.money = money; this.name = name; }
}

class Drawing extends Thread {
Account account;
int drawingMoney; //取多少
int nowMoney; //手里的钱
public Drawing(Account account, int drawingMoney, String name) {
super(name);
this.account = account;
this.drawingMoney = drawingMoney;
}

@Override
public void run() {
if (account.money - drawingMoney < 0) {
System.out.println(Thread.currentThread().getName() + "钱不够,取不了");
return;
}

try {
Thread.sleep(100);
} catch (InterruptedException e) {
e.printStackTrace();
}

account.money = account.money - drawingMoney;
nowMoney = nowMoney + drawingMoney;
System.out.println(account.name + "余额为:" + account.money);
System.out.println(this.getName() + "手里的钱" + nowMoney);
}
}
1
2
3
4
结婚基金余额为:50
你手里的钱:50
结婚基金余额为:-50
girlFriend手里的钱:100 #总数150已经大于100了

线程案例3:不安全的集合

1
2
3
4
5
6
7
8
9
10
11
12
13
14
15
16
17
18
19
20
package com.humble.syn;
import java.util.ArrayList;
import java.util.List;

public class UnsafeList {
public static void main(String[] args) throws InterruptedException {
List<String> list = new ArrayList<>();
for (int i = 0; i < 10000; i++) {
new Thread(()->{ //不同线程可能写到同一下标里
list.add(Thread.currentThread().getName());
}).start();
}
try {
Thread.sleep(3000);
} catch (InterruptedException e) {
e.printStackTrace();
}
System.out.println(list.size()); //小于10000
}
}

线程同步

同步方法

由于我们可以通过private 关键字来保证数据对象只能被方法访问,所以我们只需要对方法提出一套机制,这套机制就是synchronized 关键字,它包括两种用法:synchronized 方法和synchronized 块;

1
public synchronized void method(int args){}

synchronized 方法 控制对 “对象”的访问,每个对象对应一把锁,每个synchronized 方法都必须获得调用该方法的对象的锁才能执行,否则线程会阻塞,方法一旦执行,就独占该锁,直到该方法返回才释放锁,后面被阻塞的线程才能获得这个锁,继续执行。

缺陷:若将一个大的方法声明为synchronized 将会影响效率。

方法里面需要修改的内容才需要锁,锁的太多,浪费资源。

同步

完善不安全的买票

1
private synchronized void buy() {
1
2
3
4
5
6
7
8
9
10
你拿到第10张票
他拿到第9张票
你拿到第8张票
我拿到第7张票
他拿到第6张票
你拿到第5张票
我拿到第4张票
你拿到第3张票
我拿到第2张票
他拿到第1张票 //没有出现-1了

同步块

1
synchronized (obj){ }

obj 称之为 同步监视器
obj 可以是任何对象,但是推荐使用共享资源作为同步监视器
同步方法中无需指定同步监视器,因为同步方法的同步监视器就是this,就是和这个对象本身,或者是class

同步监视器的执行过程

  1. 第一个线程访问,锁定同步监视器,执行其中代码
  2. 第二个线程访问,发现同步监视器,无法访问
  3. 第一个线程访问完毕,解锁同步监视器
  4. 第二个线程访问,发现同步监视器没有锁,然后锁定并访问

锁的对象就是变化的量,需要增删改的数据

完善不安全的取钱

1
2
3
4
5
6
7
8
9
10
11
12
13
14
15
16
17
18
19
public void run() {
synchronized (account) {
if (account.money - drawingMoney < 0) {
System.out.println(Thread.currentThread().getName() + "钱不够,取不了");
return;
}

try {
Thread.sleep(100);
} catch (InterruptedException e) {
e.printStackTrace();
}

account.money = account.money - drawingMoney;
nowMoney = nowMoney + drawingMoney;
System.out.println(account.name + "余额为:" + account.money);
System.out.println(this.getName() + "手里的钱" + nowMoney);
}
}
1
2
3
结婚基金余额为:50
你手里的钱:50
girlFriend钱不够,取不了

完善不安全的集合

1
2
3
4
5
6
new Thread(()->{
synchronized(list){
list.add(Thread.currentThread().getName());
}
}).start();
//最后结果是10000

JUC并发编程

1
2
3
4
5
6
7
8
9
10
11
12
13
14
15
16
17
18
19
package com.humble.syn;
import java.util.concurrent.CopyOnWriteArrayList;

public class TestJUC extends Thread{
public static void main(String[] args) {
CopyOnWriteArrayList<String> list = new CopyOnWriteArrayList<String>();
for (int i = 1; i < 10000; i++) {
new Thread(()->{
list.add(Thread.currentThread().getName());
}).start();
}
try {
Thread.sleep(3000);
} catch (InterruptedException e) {
e.printStackTrace();
}
System.out.println(list.size()); //10000
}
}

死锁

多个线程互相抱着对象需要的资源,然后形成僵持。

多个线程各自占有一些资源,并且互相等待其他线程占有的资源才能运行,而导致这两个或者多个线程都在等待对方释放资源,都停止执行的情形,某一个同步块同时拥有“两个以上对象的锁时”,就可能发生“死锁”的问题。

死锁案例

1
2
3
4
5
6
7
8
9
10
11
12
13
14
15
16
17
18
19
20
21
22
23
24
25
26
27
28
29
30
31
32
33
34
35
36
37
38
39
40
41
42
43
44
45
46
47
48
49
50
51
52
53
54
55
package com.humble.thread;

public class TestLock {
public static void main(String[] args) {
Makeup g1 = new Makeup(0,"灰姑凉");
Makeup g2 = new Makeup(1,"白雪公主");
g1.start();
g2.start();
}
}

class Lipstick { } //口红
class Mirror { } //镜子

class Makeup extends Thread {
//static修饰可确保变量只有1份
static Lipstick lipstick = new Lipstick();
static Mirror mirror = new Mirror();
int choice;
String girlName;

public Makeup(int choice, String girlName) {
this.choice = choice;
this.girlName = girlName;
}

@Override
public void run() {
try {
makeup();
} catch (InterruptedException e) {
e.printStackTrace();
}
}

private void makeup() throws InterruptedException {
if (choice == 0) {
synchronized (lipstick) {
System.out.println(this.girlName + "获得口红的锁");
Threadksleep(100);
synchronized (mirror) {
System.out.println(this.girlName + "获得镜子的锁");
}
}
} else {
synchronized (mirror) {
System.out.println(this.girlName + "获得镜子的锁");
Thread.sleep(100);
synchronized (lipstick) {
System.out.println(this.girlName + "获得口红的锁");
}
}
}
}
}
1
2
3
灰姑娘获得口红的锁
白雪公主获得镜子的锁
#已经僵持住了

完善

1
2
3
4
5
6
7
8
9
10
11
12
13
14
15
16
17
18
19
private void makeup() throws InterruptedException {
if (choice == 0) {
synchronized (lipstick) {
System.out.println(this.girlName + "获得口红的锁");
Threadksleep(100);
}
synchronized (mirror) {
System.out.println(this.girlName + "获得镜子的锁");
}
} else {
synchronized (mirror) {
System.out.println(this.girlName + "获得镜子的锁");
Thread.sleep(100);
}
synchronized (lipstick) {
System.out.println(this.girlName + "获得口红的锁");
}
}
}
1
2
3
4
灰姑娘获得口红的锁
白雪公主获得镜子的锁
白雪公主获得口红的锁
灰姑娘获得镜子的锁

产生死锁的四个必要条件:

  1. 互斥条件:一个资源每次只能被一个进程使用。
  2. 请求与保持条件:一个进程因请求资源而阻塞,对已获得的资源保持不放。
  3. 不剥夺条件:进程已获得的资源,在未使用完之前,不能强行剥夺。
  4. 循环等待条件:若干个进程之间形成一种头尾相接的循环等待资源关系。

Lock(锁)

可重入锁

  1. 从JDK 5.0开始,Java提供了更强大的线程同步机制——通过显式定义同步锁对象来实现同步。同步锁使用Lock对象充当
  2. java.util.concurrent.locks.Lock接口是控制多个线程对共享资源进行访问的工具。锁提供了对共享资源的独占访问,每次只能有一个线程对Lock对象加锁,线程开始访问共享资源之前应先获得Lock对象。
  3. ReentrantLock 类实现了Lock,它拥有与 synchronized 相同的并发性和内存语义,在实现线程安全的控制中,比较常用的是ReentrantLock,可以显式加锁、释放锁。

lock锁案例

1
2
3
4
5
6
7
8
9
10
11
12
13
14
15
16
17
18
19
20
21
22
23
24
25
26
27
28
29
30
31
32
33
34
35
36
37
38
39
package com.humble.gaoji;
import java.util.concurrent.locks.ReentrantLock;

public class TestLock {
public static void main(String[] args) {
TestLock2 lock2 = new TestLock2();
new Thread(lock2,"你").start();
new Thread(lock2,"我").start();
new Thread(lock2,"他").start();
}
}

class TestLock2 implements Runnable{
int ticketNums = 10;
private final ReentrantLock lock = new ReentrantLock();

@Override
public void run() {
while (true){
try {
lock.lock();
if (ticketNums >0){
try {
Thread.sleep(100);
}catch (Exception e){
e.printStackTrace();
}
System.out.println(Thread.currentThread().getName()+" "+ticketNums--);
}else {
break;
}
}catch (Exception e){
e.printStackTrace();
}finally {
lock.unlock();
}
}
}
}

Synchronized vs Lock

  1. Lock是显式锁(手动开启和关闭锁,别忘记关闭锁) synchronized是隐式锁,出了作用域自动释放
  2. Lock只有代码块锁,synchronized有代码块锁和方法锁
  3. 使用Lock锁,JVM将花费较少的时间来调度线程,性能更好。并且具有更好的扩展性(提供更多的子类)
  4. 优先使用顺序:
    Lock > 同步代码块 (已经进入了方法体,分配相应资源) > 同步方法(在方法体之外)

线程通信问题

生产者和消费者问题

  1. 假设仓库中只能存放一件产品,生产者将生产出来的产品放入仓库﹐消费者将仓库中产品取走消费。
  2. 如果仓库中没有产品﹐则生产者将产品放入仓库﹐否则停止生产并等待,直到仓库中的产品被消费者取走为止。
  3. 如果仓库中放有产品,则消费者可以将产品取走消费﹐否则停止消费并等待,直到仓库再次放入产品为止。

生产消费

这是一个线程同步问题,生产者和消费者共享同一个资源,并且生产者和消费者之间相互依赖,互为条件。

  1. 对于生产者﹐没有生产产品之前,要通知消费者等待﹒而生产了产品之后﹐又需要马上通知消费者消费
  2. 对于消费者﹐在消费之后﹐要通知生产者已经结束消费﹐需要生产新的产品以供消费.
  3. 在生产者消费者问题中,仅有synchronized是不够的
    synchronized可阻止并发更新同一个共享资源,实现了同步
    synchronized不能用来实现不同线程之间的消息传递(通信)

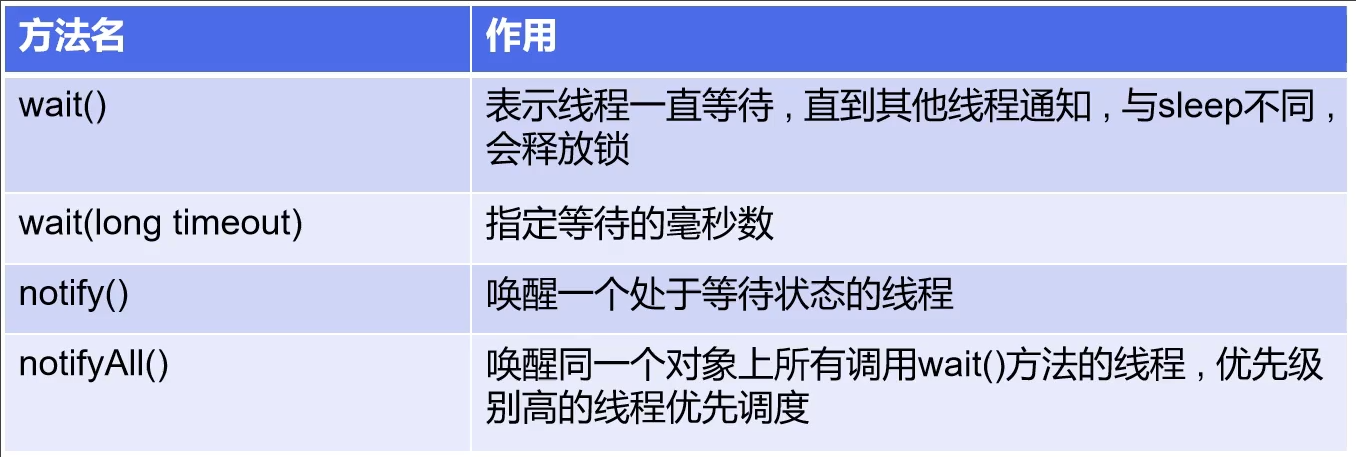
Java提供了几个方法解决线程之间的通信问题

线程通信方法

注意:均是Object类 的方法,都只能在同步方法或者同步代码块中使用,否则会抛出lllegalMonitorStateException

解决方式1

并发协作模型“生产者/消费者模式”->管程法

  1. 生产者:负责生产数据的模块(可能是方法,对象,线程,进程)
  2. 消费者:负责处理数据的模块(可能是方法,对象,线程,进程)
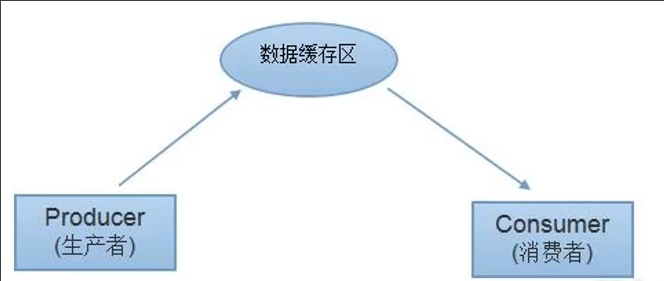
  3. 缓冲区:消费者不能直接使用生产者的数据﹐他们之间有个“缓冲区

生产者将生产好的数据放入缓冲区,消费者从缓冲区拿出数据

1
2
3
4
5
6
7
8
9
10
11
12
13
14
15
16
17
18
19
20
21
22
23
24
25
26
27
28
29
30
31
32
33
34
35
36
37
38
39
40
41
42
43
44
45
46
47
48
49
50
51
52
53
54
55
56
57
58
59
60
61
62
63
64
65
66
67
68
69
70
71
72
73
74
package com.humble.gaoji;

public class TestPC {
public static void main(String[] args) {
SynContainer container = new SynContainer();
new Productor(container).start();
new Consumer(container).start();
}
}

class Productor extends Thread {
SynContainer container;
public Productor(SynContainer container) { this.container = container; }

@Override
public void run() {
for (int i = 1; i <= 20; i++) {
container.push(new Chiken(i));
System.out.println("生产了"+i+"只鸡");
}
}
}

class Consumer extends Thread {
SynContainer container;
public Consumer(SynContainer container) { this.container = container; }

@Override
public void run() {
for (int i = 1; i <= 20; i++) {
Chiken pop = container.pop();
System.out.println("消费了第"+pop.id+"只鸡");
}
}
}

class Chiken {
int id;
public Chiken(int id) { this.id = id; }
}

class SynContainer {
Chiken[] chikens = new Chiken[10];
int count = 0;

public synchronized void push(Chiken chiken) {
if (count == chikens.length) {
try {
this.wait();
} catch (InterruptedException e) {
e.printStackTrace();
}
}
chikens[count] = chiken;
count++;
this.notifyAll();
}

public synchronized Chiken pop() {
if (count == 0) {
try {
this.wait();
} catch (InterruptedException e) {
e.printStackTrace();
}
}

count--;
Chiken chiken = chikens[count];

this.notifyAll();
return chiken;
}
}

解决方式2

并发协作模型“生产者/消费者模式”->信号灯法

1
2
3
4
5
6
7
8
9
10
11
12
13
14
15
16
17
18
19
20
21
22
23
24
25
26
27
28
29
30
31
32
33
34
35
36
37
38
39
40
41
42
43
44
45
46
47
48
49
50
51
52
53
54
55
56
57
58
59
60
61
62
63
64
65
66
67
68
69
70
package com.humble.gaoji;

public class TestPC2 {
public static void main(String[] args) {
TV tv = new TV();
new Player(tv).start();
new Watcher(tv).start();
}
}

class Player extends Thread {
TV tv;
public Player(TV tv) { this.tv = tv; }

@Override
public void run() {
for (int i = 1; i <= 20; i++) {
if(i%2 == 0){
this.tv.play("真还传");
}
else{
this.tv.play("广告");
}
}
}
}

class Watcher extends Thread {
TV tv;
public Watcher(TV tv) { this.tv = tv; }

@Override
public void run() {
for (int i = 1; i <= 20; i++) {
this.tv.watch();
}
}
}

class TV {
String voice;
boolean flag = true;

public synchronized void play(String voice) {
if (!flag) {
try {
this.wait();
} catch (InterruptedException e) {
e.printStackTrace();
}
}
System.out.println("演员表演了:"+voice);
this.voice = voice;
this.flag = !this.flag;
this.notifyAll();
}

public synchronized void watch() {
if (flag) {
try {
this.wait();
} catch (InterruptedException e) {
e.printStackTrace();
}
}
System.out.println("观众观看了:"+voice);
this.flag = !this.flag;
this.notifyAll();
}
}
1
2
3
4
5
6
演员表演了:真还传
观众观看了:真还传
演员表演了:广告
观众观看了:广告
演员表演了:真还传
...

线程池

背景:经常创建和销毁、使用量特别大的资源,比如并发情况下的线程,对性能影响很大。

思路︰提前创建好多个线程,放入线程池中,使用时直接获取,使用完放回池中。可以避免频繁创建销毁、实现重复利用。类似生活中的公共交通工具。

好处:

  1. 提高响应速度(减少了创建新线程的时间)
  2. 降低资源消耗(重复利用线程池中线程,不需要每次都创建)
  3. 便于线程管理(…)
1
2
3
corePoolSize:核心池的大小
maximumPoolSize:最大线程数
keepAliveTime:线程没有任务时最多保持多长时间后会终止

JDK 5.0起提供了线程池相关API:

  • ExecutorService和Executors
    ExecutorService:真正的线程池接口。常见子类ThreadPoolExecutor
  • void execute(Runnable cgmmand):执行任务/命令,没有返回值,一般用来执行Runnable
  • Future submit(Callable task):执行任务,有返回值,一般又来执行Callable
  • void shutdown():关闭连接池
  • Executors: 工具类、线程池的工厂类,用于创建并返回不同类型的线程池
1
2
3
4
5
6
7
8
9
10
11
12
13
14
15
16
17
18
19
20
21
package com.humble.gaoji;
import java.util.concurrent.ExecutorService;
import java.util.concurrent.Executors;

public class TestPool {
public static void main(String[] args) {
ExecutorService service = Executors.newFixedThreadPool(10);
service.execute(new MyThread());
service.shutdown();
}
}

class MyThread implements Runnable {
@Override
public void run() {
System.out.println(Thread.currentThread().getName());
}
}

java学习6_GUI编程入门到游戏实战

GUI编程入门到游戏实战

Source

组件

  • 窗口
  • 弹窗
  • 面板
  • 文本框
  • 列表框
  • 按钮
  • 图片
  • 监听事件
  • 鼠标
  • 键盘事件
  • 破解工具

1. 简介

GUI的核心技术 :Swing,AWT

  • 界面不美观
  • 需要jar环境

有什么用?

  • 可以写一些小具
  • 工作时候可能需要维护swing界面,概率极小
  • 了解MVC架构,了解监听

2. AWT

2.1 AWT介绍

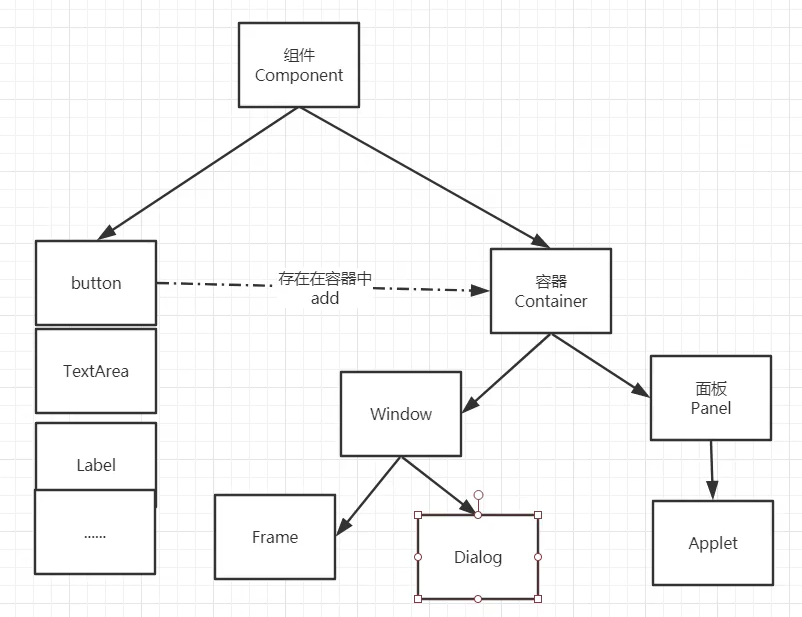
  • 包含了很多类和接口!GUI!
  • 元素:窗口,按钮,文本框
  • java.awt

在这里插入图片描述

2.2 组件和容器

2.2.1. Frame

1
2
3
4
5
6
7
8
9
10
11
12
13
14
15
package 第一个Frame窗口;
import java.awt.*;

//GUI的第一个界面
public class TestFrame {
public static void main(String[] args) {
Frame frame=new Frame("我的第一个Java图像界面窗口"); //Frame ,JDK,看源码
frame.setVisible(true); //需要设置可见性 w,h
frame.setSize(500,500); //设置窗口大小
//frame.setBackground(Color.red); //设置背景颜色
frame.setBackground(new Color(69, 142, 239));
frame.setLocation(200,200); //弹出初始位置
frame.setResizable(false); //设置大小固定
}
}

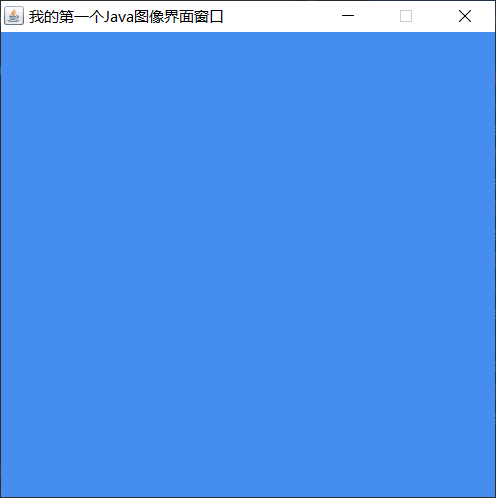
运行效果图

在这里插入图片描述

问题:发现窗口关闭不掉,停止java程序即可

尝试回顾封装

1
2
3
4
5
6
7
8
9
10
11
12
13
14
15
16
17
18
19
20
21
22
package 第一个Frame窗口;
import java.awt.*;

public class TestFrame01 {
public static void main(String[] args) {
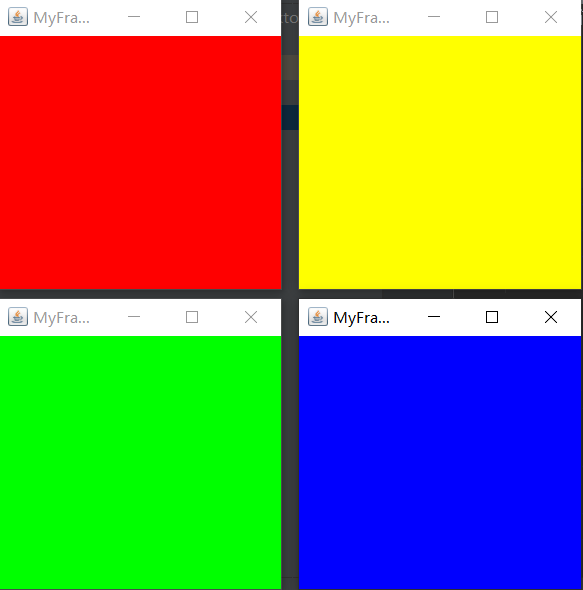
MyFrame MyFrame01=new MyFrame(100,100,300,300,Color.red);
MyFrame MyFrame02=new MyFrame(400,100,300,300,Color.yellow);
MyFrame MyFram03=new MyFrame(100,400,300,300,Color.green);
MyFrame MyFrame04=new MyFrame(400,400,300,300,Color.blue);
}
}
class MyFrame extends Frame{
static int id=0;//可能存在多个窗口,需要一个计时器
public MyFrame(int x,int y,int w,int h,Color color){
super("MyFrame"+(++id));
setBackground(color);
setVisible(true);
//setSize(x,y);
//setLocation(w,h);
setBounds(x,y,w,h);
}
}

在这里插入图片描述

2.2.2. Panel面板

解决了关闭事件

1
2
3
4
5
6
7
8
9
10
11
12
13
14
15
16
17
18
19
20
21
22
23
24
25
26
27
28
package Panel面板;
import java.awt.*;
import java.awt.event.WindowAdapter;
import java.awt.event.WindowEvent;

//Panel可以看成是一个空间,但是不能单独存在
public class TestPanel {
public static void main(String[] args) {
Frame frame=new Frame();
Panel panel=new Panel(); //布局概念
frame.setLayout(null); //设置布局
frame.setBounds(300,300,500,500); //坐标
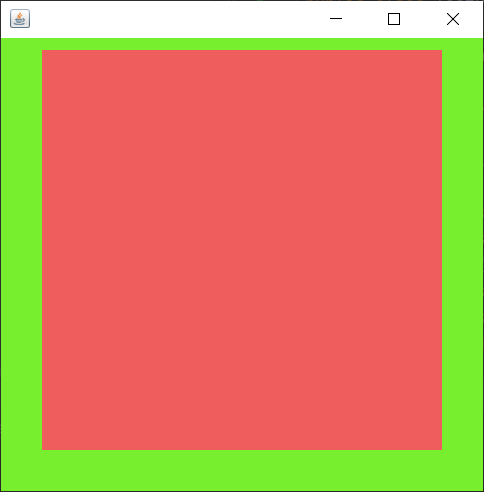
frame.setBackground(new Color(120, 239, 46, 255));
panel.setBounds(50,50,400,400); //panel设置坐标,相对于frame
panel.setBackground(new Color(239, 93, 93));
frame.add(panel);
frame.setVisible(true);//设置是否可见
//监听事件,监听窗口关闭事件,System.exit(0),强行关闭,正常关闭.System.exit(1),异常关闭
//适配器模式
frame.addWindowListener(new WindowAdapter() {
//窗口点击关闭时需要做的事情
@Override
public void windowClosing(WindowEvent e) {
System.exit(0); //结束程序
}
});
}
}

在这里插入图片描述

2.3 布局管理器

  • 流式布局
  • 东西南北中
  • 表格布局

流式布局

1
2
3
4
5
6
7
8
9
10
11
12
13
14
15
16
17
18
19
20
21
22
23
24
25
26
27
28
package FlowLayOut;
import java.awt.*;

/**
* 3种布局管理器
* (1)流式布局
* (2)东西南北中
* (3)表格布局
*/
public class TestFlowLayOut {
public static void main(String[] args) {
Frame frame=new Frame();
// 流式布局
//组件,按钮
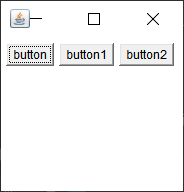
Button button = new Button("button");
Button button1 = new Button("button1");
Button button2 = new Button("button2");
//frame.setLayout(new FlowLayout());//FlowLayout.CENTER //设置为流式布局
frame.setLayout(new FlowLayout(FlowLayout.LEFT));
//frame.setLayout(new FlowLayout(FlowLayout.RIGHT));
frame.setSize(200,200);
//把按钮添加上去
frame.add(button);
frame.add(button1);
frame.add(button2);
frame.setVisible(true);
}
}

在这里插入图片描述

东西南北中

1
2
3
4
5
6
7
8
9
10
11
12
13
14
15
16
17
18
19
20
21
22
23
24
25
26
27
28
29
30
package 布局管理器;
import java.awt.*;
import static java.awt.BorderLayout.*;

/* 东西南北中 */
public class TestBorderLayOut {
public static void main(String[] args) {
Frame frame=new Frame("TestBorderLayout");

Button east = new Button("East");
Button west = new Button("West");
Button south = new Button("South");
Button north = new Button("North");
Button center = new Button("Center");

//frame.add(east,EAST);
//frame.add(west,WEST);
//frame.add(south,SOUTH);
//frame.add(north,NORTH);
//frame.add(center,CENTER);
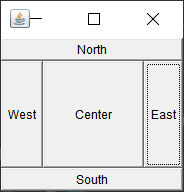
frame.add(east,BorderLayout.EAST);
frame.add(west,BorderLayout.WEST);
frame.add(south,BorderLayout.SOUTH);
frame.add(north,BorderLayout.NORTH);
frame.add(center,BorderLayout.CENTER);

frame.setSize(200,200);
frame.setVisible(true);
}
}

在这里插入图片描述

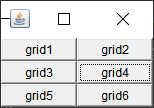
表格布局 Grid

1
2
3
4
5
6
7
8
9
10
11
12
13
14
15
16
17
18
19
20
21
22
23
24
25
package 布局管理器;
import java.awt.*;

/* 表格布局 */
public class TestGridLayout {
public static void main(String[] args) {
Frame frame=new Frame("TestGridLayout");

Button grid1 = new Button("grid1");
Button grid2 = new Button("grid2");
Button grid3 = new Button("grid3");
Button grid4 = new Button("grid4");
Button grid5 = new Button("grid5");
Button grid6 = new Button("grid6");
frame.setLayout(new GridLayout(3,2));
frame.add(grid1);
frame.add(grid2);
frame.add(grid3);
frame.add(grid4);
frame.add(grid5);
frame.add(grid6);
frame.pack();//Java函数
frame.setVisible(true);
}
}

在这里插入图片描述

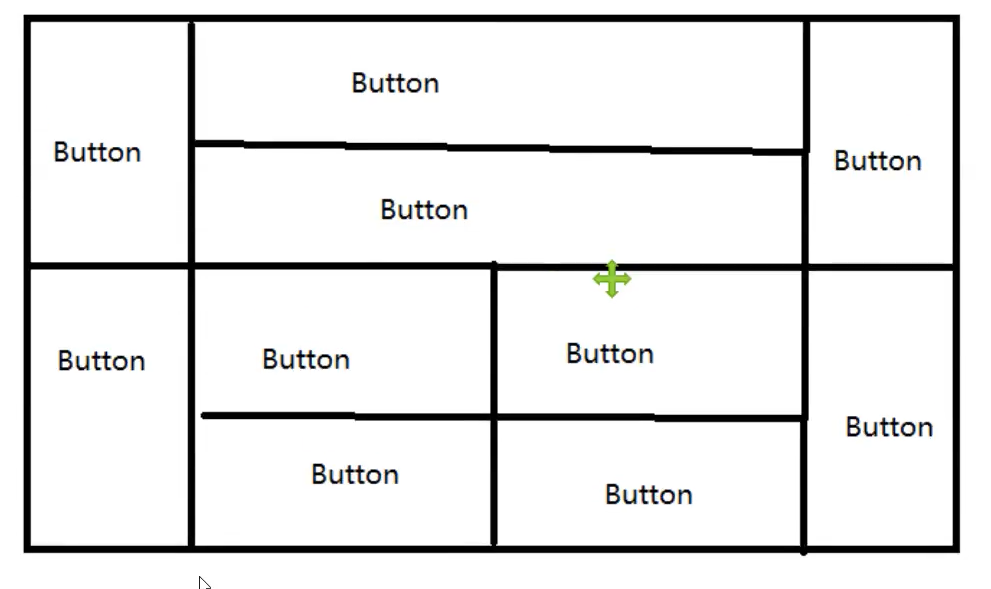
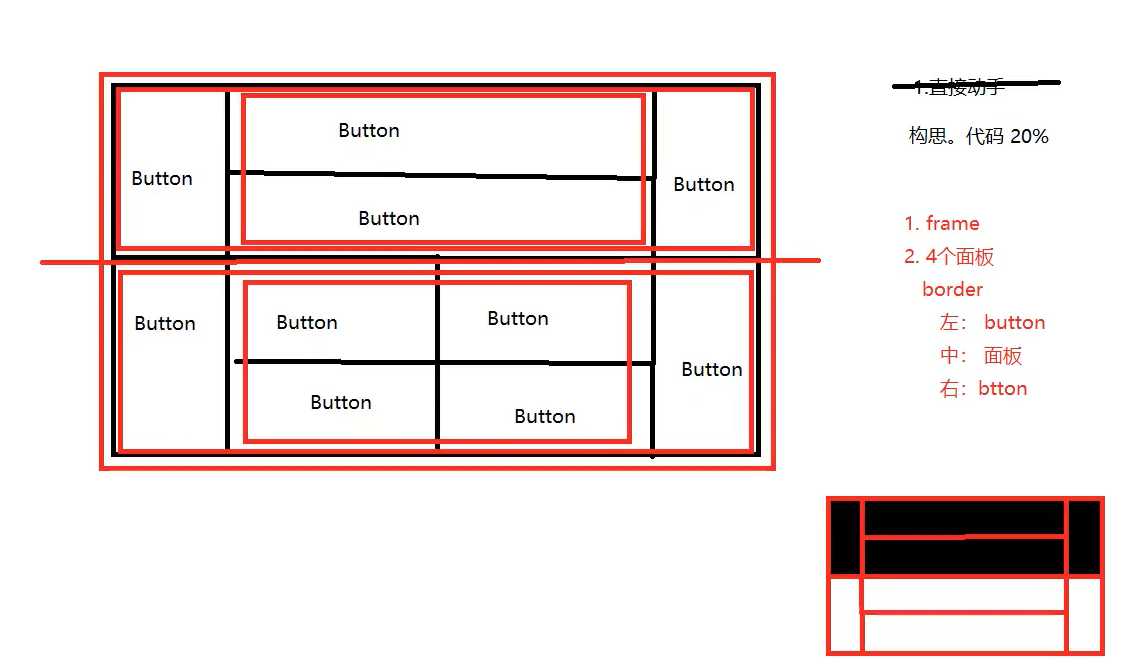
思考

在这里插入图片描述

分析过程

在这里插入图片描述

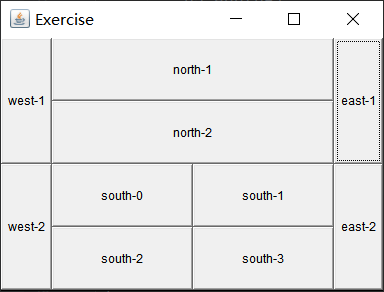
代码实现

1
2
3
4
5
6
7
8
9
10
11
12
13
14
15
16
17
18
19
20
21
22
23
24
25
26
27
28
29
30
31
32
33
34
35
36
37
38
39
40
41
42
43
package 布局管理器;
import java.awt.*;
import java.awt.event.WindowAdapter;
import java.awt.event.WindowEvent;

public class Exercise {
public static void main(String[] args) {
Frame frame=new Frame("Exercise"); //总窗口
frame.setSize(400,300);
frame.setBackground(new Color(1,1,1));
frame.setLocation(500,300);
frame.setVisible(true);
//分
frame.setLayout(new GridLayout(2,1));
//上板面
Panel p1=new Panel(new BorderLayout());
Panel p2=new Panel(new GridLayout(2,1));
p1.add(new Button("east-1"),BorderLayout.EAST);
p1.add(new Button("west-1"),BorderLayout.WEST);
p2.add(new Button("north-1"));
p2.add(new Button("north-2"));
//下板面
Panel p3=new Panel(new BorderLayout());
Panel p4=new Panel(new GridLayout(2,2));
p3.add(new Button("east-2"),BorderLayout.EAST);
p3.add(new Button("west-2"),BorderLayout.WEST);
for (int i = 0; i < 4; i++) {
p4.add(new Button("south-"+i));
}
//组合
p1.add(p2,BorderLayout.CENTER);
p3.add(p4,BorderLayout.CENTER);
frame.add(p1);
frame.add(p3);
//监听关闭窗口
frame.addWindowListener(new WindowAdapter() {
@Override
public void windowClosing(WindowEvent e) {
System.exit(0);
}
});
}
}

在这里插入图片描述

总结
  1. Frame是一个顶级窗口
  2. Panel无法单独显示,必须添加到某个容器中
  3. 布局管理器
    1. 流式布局
    2. 东西南北中
    3. 表格
  4. 大小,定位,背景颜色,可见性,监听!

2.4 事件监听

事件监听:当某个事件发生的时候,干什么?

1
2
3
4
5
6
7
8
9
10
11
12
13
14
15
16
17
18
19
20
21
22
23
24
25
26
27
28
29
30
31
32
33
34
35
36
37
38
39
40
package 事件监听;
import java.awt.*;
import java.awt.event.ActionEvent;
import java.awt.event.ActionListener;
import java.awt.event.WindowAdapter;
import java.awt.event.WindowEvent;

public class TestActionEvent {
public static void main(String[] args) {
//按下按钮,触发事件
Frame frame=new Frame("TestActionEvent");
Button button=new Button("button");
//因为addActionListener()需要一个ActionListener,所以我们需要构建一个ActionListener
MyActionListenner myActionListenner=new MyActionListenner();
button.addActionListener(myActionListenner);

frame.add(button,BorderLayout.CENTER);
frame.pack();

windowClose(frame);//关闭窗口
frame.setVisible(true);
}
//关闭窗口事件
public static void windowClose(Frame frame){
frame.addWindowListener(new WindowAdapter() {
@Override
public void windowClosing(WindowEvent e) {
System.exit(0);
}
});
}
}

//事件监听
class MyActionListenner implements ActionListener{
@Override
public void actionPerformed(ActionEvent e) {
System.out.println("aaa");
}
}

多个按钮,共享一个事件

1
2
3
4
5
6
7
8
9
10
11
12
13
14
15
16
17
18
19
20
21
22
23
24
25
26
27
28
29
30
31
32
33
34
35
package 事件监听;
import java.awt.*;
import java.awt.event.ActionEvent;
import java.awt.event.ActionListener;

/* 两个按钮,实现同一个监听 */
public class TestActionEvent02 {
public static void main(String[] args) {
//开始 停止
Frame frame=new Frame("开始-停止");
Button start = new Button("start");
Button stop = new Button("stop");
//可以定义触发所显示返回的信息,如果不定义,则会走默认值!
stop.setActionCommand("button-stop");
//可以多个按钮只写一个监听类,按钮可根据监听类,判断按钮实现的操作
MyMonitor myMonitor = new MyMonitor();
start.addActionListener(myMonitor);
stop.addActionListener(myMonitor);
frame.add(start,BorderLayout.NORTH);
frame.add(stop,BorderLayout.SOUTH);
frame.pack();
frame.setVisible(true);
}
}
//事件监听
class MyMonitor implements ActionListener{
@Override
public void actionPerformed(ActionEvent e) {
//e.getActionCommand()获取按钮信息
System.out.println("按钮被点击了,msg:"+e.getActionCommand());
if (e.getActionCommand().equals("start")){

}
}
}

2.5 输入文本框TextField监听

1
2
3
4
5
6
7
8
9
10
11
12
13
14
15
16
17
18
19
20
21
22
23
24
25
26
27
28
29
30
31
32
33
34
35
36
37
38
39
40
41
42
43
44
package 事件监听;
import java.awt.*;
import java.awt.event.ActionEvent;
import java.awt.event.ActionListener;
import java.awt.event.WindowAdapter;
import java.awt.event.WindowEvent;

/* 文本框 */
public class TestText01 {
public static void main(String[] args) {
new MyFrame(); //启动
}
}
class MyFrame extends Frame{
public MyFrame(){
TextField textField=new TextField();
add(textField);
//监听这个文本框输入的文字
MyActionListener01 myActionListener01 = new MyActionListener01();
//按下回车就会触发这个输入框的事件
textField.addActionListener(myActionListener01);
//设置替换编码
textField.setEchoChar('*');//设置编码格式,一般用于隐藏密码
pack();
setVisible(true);
windowsClose( this);
}
public static void windowsClose(Frame frame){
frame.addWindowListener(new WindowAdapter() {
@Override
public void windowClosing(WindowEvent e) {
System.exit(0);
}
});
}
}
class MyActionListener01 implements ActionListener{
@Override
public void actionPerformed(ActionEvent e) {
TextField field=(TextField) e.getSource();//获的一些资源
System.out.println(field.getText());//获得文本框的文本
field.setText("");
}
}

2.6 简易计算机,组合+内部类回顾复习!

oop(面向对象)原则:先组合,大于继承!

在这里插入图片描述

目前代码

1
2
3
4
5
6
7
8
9
10
11
12
13
14
15
16
17
18
19
20
21
22
23
24
25
26
27
28
29
30
31
32
33
34
35
36
37
38
39
40
41
42
43
44
45
46
47
48
49
50
51
52
53
54
55
56
package 事件监听;
import java.awt.*;
import java.awt.event.ActionEvent;
import java.awt.event.ActionListener;

/* 简易计算器 */
public class TestCalculator {
public static void main(String[] args) {
//new Calculator();
TestActionEvent.windowClose(new Calculator());//直接调用之间创建的窗口关闭事件
}
}
//计算器类
class Calculator extends Frame{
public Calculator() {
//3个文本框
TextField textField1 = new TextField(10);//字符数
TextField textField2 = new TextField(10);
TextField textField3 = new TextField(20);
//一个按钮
Button button = new Button("=");
button.addActionListener(new MyCalculatorListener(textField1,textField2,textField3));
//一个标签
Label label = new Label("+");
//布局
setLayout(new FlowLayout());
add(textField1);
add(label);
add(textField2);
add(button);
add(textField3);
pack();
setVisible(true);
}
}
class MyCalculatorListener implements ActionListener{
//获取三个变量
private TextField textField1,textField2,textField3;
public MyCalculatorListener(TextField textField1,TextField textField2,TextField textField3){
this.textField1=textField1;
this.textField2=textField2;
this.textField3=textField3;
}
@Override
public void actionPerformed(ActionEvent e) {
//获取加数和被加数
//parseInt将字符串参数作为有符号的十进制整数进行解析
int n1=Integer.parseInt(textField1.getText());
int n2=Integer.parseInt(textField2.getText());
//将这个值+法运算后,放到第三个框
textField3.setText(""+(n1+n2));
//清除前两个框
textField1.setText("");
textField2.setText("");
}
}

完全改造成面向对象写法

1
2
3
4
5
6
7
8
9
10
11
12
13
14
15
16
17
18
19
20
21
22
23
24
25
26
27
28
29
30
31
32
33
34
35
36
37
38
39
40
41
42
43
44
45
46
47
48
49
package 事件监听;
import java.awt.*;
import java.awt.event.ActionEvent;
import java.awt.event.ActionListener;

public class TestCalculator02 {
public static void main(String[] args) {
new Calculator01().loadFrame();
}
}
//计算器类
class Calculator01 extends Frame {
TextField textField1,textField2,textField3; //属性
public void loadFrame(){ //方法
textField1=new TextField(10);
textField2=new TextField(10);
textField3=new TextField(20);
Button button = new Button("=");
Label label = new Label("+");
button.addActionListener(new MyCalculatorListener01(this));
setLayout(new FlowLayout()); //布局
add(textField1);
add(label);
add(textField2);
add(button);
add(textField3);
pack();
setVisible(true);
}
}

class MyCalculatorListener01 implements ActionListener {
//获取计算机这个对象,在一个类中组合另外一个类
Calculator01 calculator01=null;
public MyCalculatorListener01(Calculator01 calculator01){
this.calculator01=calculator01;
}
@Override
public void actionPerformed(ActionEvent e) {
//获取加数和被加数
//将这个值+法运算后,放到第三个框
//清除前两个框
int n1=Integer.parseInt(calculator01.textField1.getText());
int n2=Integer.parseInt(calculator01.textField2.getText());
calculator01.textField3.setText(""+(n1+n2));
calculator01.textField1.setText("");
calculator01.textField2.setText("");
}
}

内部类:

  • 更好的包装
  • 内部类最好的方法,就是可以畅通无阻的访问外部类的属性和方法!
    1
    2
    3
    4
    5
    6
    7
    8
    9
    10
    11
    12
    13
    14
    15
    16
    17
    18
    19
    20
    21
    22
    23
    24
    25
    26
    27
    28
    29
    30
    31
    32
    33
    34
    35
    36
    37
    38
    39
    40
    41
    42
    package 事件监听;
    import java.awt.*;
    import java.awt.event.ActionEvent;
    import java.awt.event.ActionListener;

    public class TestCalculator03 {
    public static void main(String[] args) {
    new Calculator02().loadFrame();
    }
    }
    class Calculator02 extends Frame { //计算器类
    TextField textField1,textField2,textField3; //属性
    public void loadFrame(){ //方法
    textField1=new TextField(10);
    textField2=new TextField(10);
    textField3=new TextField(20);
    Button button = new Button("=");
    Label label = new Label("+");
    button.addActionListener(new MyCalculatorListener02());
    setLayout(new FlowLayout()); //布局
    add(textField1);
    add(label);
    add(textField2);
    add(button);
    add(textField3);
    pack();
    setVisible(true);
    }
    private class MyCalculatorListener02 implements ActionListener { //监听器
    @Override
    public void actionPerformed(ActionEvent e) {
    //获取加数和被加数
    //将这个值+法运算后,放到第三个框
    //清除前两个框
    int n1=Integer.parseInt(textField1.getText());
    int n2=Integer.parseInt(textField2.getText());
    textField3.setText(""+(n1+n2));
    textField1.setText("");
    textField2.setText("");
    }
    }
    }
    在这里插入图片描述

2.7 画笔

1
2
3
4
5
6
7
8
9
10
11
12
13
14
15
16
17
18
19
20
21
22
23
24
25
26
27
package 画笔Paint;
import java.awt.*;

/* 画笔 */
public class TestPaint {
public static void main(String[] args) {
new MyPaint().loadFrame();
}
}
class MyPaint extends Frame{
public void loadFrame(){
setBounds(200,200,600,400);
setVisible(true);
}
//画笔
@Override
public void paint(Graphics g) {
//画笔,需要有颜色,画笔可以画画
//g.setColor(new Color(157, 3, 253, 255));
g.drawOval(100,100,100,100);
g.fillOval(100,200,200,200);//实心的圆

//g.setColor(Color.RED);
g.fillRect(200,100,200,200);
//养成习惯,画笔用完,将他还原到最初的颜色
}
}

2.8 鼠标监听

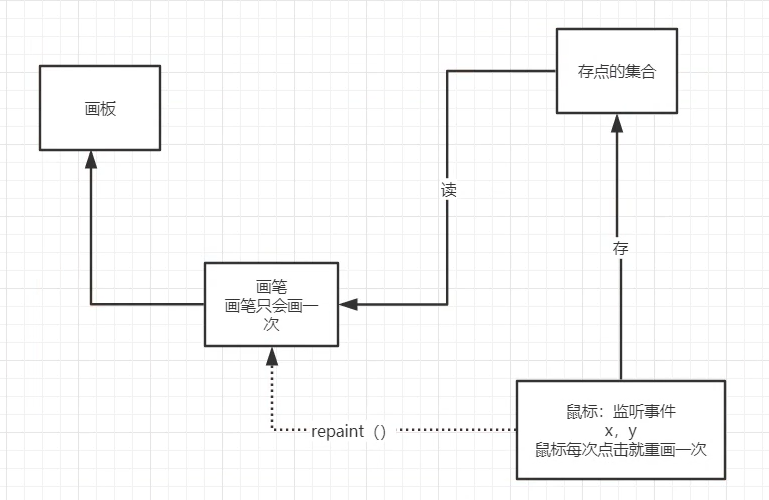
目的:想要实现鼠标画画

在这里插入图片描述

1
2
3
4
5
6
7
8
9
10
11
12
13
14
15
16
17
18
19
20
21
22
23
24
25
26
27
28
29
30
31
32
33
34
35
36
37
38
39
40
41
42
43
44
45
46
47
package 鼠标监听;
import java.awt.*;
import java.awt.event.MouseAdapter;
import java.awt.event.MouseEvent;
import java.util.ArrayList;
import java.util.Iterator;

/* 鼠标监听事件 */
public class TestMouseListener {
public static void main(String[] args) { new MyFrame("画图"); }
}
class MyFrame extends Frame {
//画画需要画笔,需要监听鼠标当前的位置,需要集合来存储这个点
ArrayList points;
public MyFrame(String title) {
super(title);
setBounds(200,200,400,300);
points=new ArrayList(); //鼠标点击的点的集合
setVisible(true);
this.addMouseListener(new MyMouseListener()); //鼠标监听器,正对这个窗口
}

@Override
public void paint(Graphics g) {
//画画,监听鼠标的事件
Iterator iterator=points.iterator();
while (iterator.hasNext()){
Point point=(Point)iterator.next();
g.setColor(Color.blue);
g.fillOval(point.x,point.y,10,10);
}
}
public void addPaint(Point point){ //添加一个点到界面上
points.add(point);
}
private class MyMouseListener extends MouseAdapter{ //适配器模式
@Override
public void mousePressed(MouseEvent e) {
MyFrame frame=(MyFrame)e.getSource();
//这个点击时,就会在界面上产生一个点!画
//这个点就是鼠标的点
frame.addPaint(new Point(e.getX(),e.getY()));
//每次点击鼠标都需要重新画一遍
frame.repaint();
}
}
}

2.9 窗口监听

1
2
3
4
5
6
7
8
9
10
11
12
13
14
15
16
17
18
19
20
21
22
23
24
25
26
27
28
29
30
31
package 窗口监听;
import java.awt.*;
import java.awt.event.WindowAdapter;
import java.awt.event.WindowEvent;

public class TestWindow {
public static void main(String[] args) { new WindowsFrame("窗口监听"); }
}
class WindowsFrame extends Frame{
public WindowsFrame(String title){
super(title);
setBackground(Color.yellow);
setBounds(100,100,400,400);
setVisible(true);
addWindowListener(new WindowAdapter() {//匿名内部类
@Override
public void windowClosing(WindowEvent e) { //关闭窗口
setVisible(false);//隐藏窗口
//System.exit(0);
System.out.println("windowClosing");
}
//激活窗口
@Override
public void windowActivated(WindowEvent e) {
WindowsFrame windowsFrame=(WindowsFrame) e.getSource();
windowsFrame.setTitle("被激活了");
System.out.println("windowActivated");
}
});
}
}

2.10 键盘监听

1
2
3
4
5
6
7
8
9
10
11
12
13
14
15
16
17
18
19
20
21
22
23
24
25
26
27
28
package 键盘监听;
import java.awt.*;
import java.awt.event.KeyAdapter;
import java.awt.event.KeyEvent;
import java.security.UnresolvedPermission;

/* 键盘监听 */
public class TestKeyListener {
public static void main(String[] args) { new KeyFrame("键盘监听"); }
}
class KeyFrame extends Frame{
public KeyFrame(String title){
super(title);
setBackground(new Color(255, 251, 0));
setBounds(100,100,400,400);
setVisible(true);
this.addKeyListener(new KeyAdapter() {
@Override
public void keyPressed(KeyEvent e) {
int keyCode=e.getKeyCode();
System.out.println(keyCode);
if (keyCode==KeyEvent.VK_UP){
System.out.println("你按压了上键");
}
}
});
}
}

3. Swing

3.1 窗口、面板

1
2
3
4
5
6
7
8
9
10
11
12
13
14
15
16
17
18
19
20
21
22
package Swing之JFrame窗体;
import javax.swing.*;
import java.awt.*;

public class TestJFrame {
public void init(){ //init();初始化
JFrame jFrame=new JFrame("这是一个JFrame窗口"); //顶级窗口
jFrame.setBounds(100,100,400,400);
jFrame.setVisible(true);
JLabel jLabel=new JLabel("这是我创建的第一个JFrame窗口"); //设置文字JLabel
jFrame.add(jLabel);
jLabel.setHorizontalAlignment(SwingConstants.CENTER); //让文本标签居中,设置水平对齐
//容器
jFrame.getContentPane().setBackground(Color.yellow);//背景颜色需要设置在容器中
//关闭事件
jFrame.setDefaultCloseOperation(WindowConstants.EXIT_ON_CLOSE);
}

public static void main(String[] args) {
new TestJFrame().init(); //创建一个窗口
}
}

3.2 弹窗

JDialog,用来被弹出,默认就有关闭事件

1
2
3
4
5
6
7
8
9
10
11
12
13
14
15
16
17
18
19
20
21
22
23
24
25
26
27
28
29
30
31
32
33
34
35
36
37
38
39
40
41
42
package JDialog弹窗;
import Swing之JFrame窗体.TestJFrame;
import javax.swing.*;
import java.awt.*;
import java.awt.event.ActionEvent;
import java.awt.event.ActionListener;

public class TestJDialog extends JFrame { //主窗口
public TestJDialog(String title){
super(title);
this.setVisible(true);
this.setBounds(100,100,400,400);
this.setDefaultCloseOperation(WindowConstants.EXIT_ON_CLOSE);
//JFrame放东西,容器
Container container=this.getContentPane();//Container集装箱
container.setLayout(null); //绝对布局
JButton button = new JButton("点击我,弹出一个新弹窗"); //按钮
button.setBounds(50,50,200,60);
container.add(button);
//创建按钮监听事件,点击一个按钮时,弹出一个弹窗
button.addActionListener(new ActionListener() {
@Override
public void actionPerformed(ActionEvent e) {
new FirstDialog();
}
});

}

public static void main(String[] args) {
new TestJDialog("主窗口");
}
}
class FirstDialog extends JDialog{
public FirstDialog(){
this.setVisible(true);
this.setBounds(300,300,400,400);
Container container= this.getContentPane();//Container集装箱
//container.setBackground(Color.yellow);
container.add(new Label("我是弹窗"));
}
}

3.3 标签

label

1
new JLabel("xxx")

图标 ICON

1
2
3
4
5
6
7
8
9
10
11
12
13
14
15
16
17
18
19
20
21
22
23
24
25
26
27
28
29
30
31
32
33
34
35
36
37
38
39
package IconImageIcon标签;
import javax.swing.*;
import java.awt.*;

/* 图标,需要实现类,Frame继承 */
public class TestIcon extends JFrame implements Icon {
private int width;
private int height;
public TestIcon() { }

public TestIcon(int width, int height) {
this.width = width;
this.height = height;
}

@Override
public void paintIcon(Component c, Graphics g, int x, int y) {
g.fillOval(x,y,width,height);
}

@Override
public int getIconWidth() { return this.width; }

@Override
public int getIconHeight() { return this.height; }

public static void main(String[] args) {
new TestIcon().init();
}
public void init(){
TestIcon testIcon =new TestIcon(15,15);
//图标可以放在标签上,也可以放在按钮上
JLabel jLabel=new JLabel("icontest",testIcon,SwingConstants.CENTER);
Container container= getContentPane();
container.add(jLabel);
this.setVisible(true);
this.setDefaultCloseOperation(WindowConstants.EXIT_ON_CLOSE);
}
}

在这里插入图片描述

图片 ImageIcon

1
2
3
4
5
6
7
8
9
10
11
12
13
14
15
16
17
18
19
20
21
22
package IconImageIcon标签;
import javax.swing.*;
import java.awt.*;
import java.net.URL;

public class TestImageIcon extends JFrame {
public static void main(String[] args) {
new TestImageIcon();
}
public TestImageIcon (){
//获取图片地址
JLabel jLabel=new JLabel("ImageIcon");
URL url=TestImageIcon.class.getResource("下载.jpg");
ImageIcon imageIcon=new ImageIcon(url);
jLabel.setIcon(imageIcon);
jLabel.setHorizontalAlignment(SwingConstants.CENTER);
Container container=getContentPane();
container.add(jLabel);
setVisible(true);
setDefaultCloseOperation(WindowConstants.EXIT_ON_CLOSE);
}
}

在这里插入图片描述

3.4 面板

JPanel

1
2
3
4
5
6
7
8
9
10
11
12
13
14
15
16
17
18
19
20
21
22
23
24
25
26
27
28
29
30
31
32
33
34
35
36
37
38
package 文本域JScroll面板;
import javax.swing.*;
import java.awt.*;

public class TestJPanel extends JFrame {
public TestJPanel(String title){
super(title);
Container container=getContentPane();
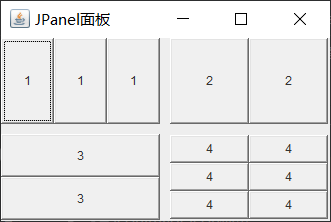
container.setLayout(new GridLayout(2,1,10,10));//后面两个参数的意思是面板的间距
JPanel jPanel1=new JPanel(new GridLayout(1,3));
JPanel jPanel2=new JPanel(new GridLayout(1,2));
JPanel jPanel3=new JPanel(new GridLayout(2,1));
JPanel jPanel4=new JPanel(new GridLayout(3,2));
jPanel1.add(new Button("1"));
jPanel2.add(new Button("2"));
jPanel3.add(new Button("3"));
jPanel4.add(new Button("4"));
container.add(jPanel1);
container.add(jPanel2);
container.add(jPanel3);
container.add(jPanel4);
setVisible(true);
setDefaultCloseOperation(WindowConstants.EXIT_ON_CLOSE);
}

public static void main(String[] args) {
new TestJPanel("JPanel面板");
}
}

在这里插入图片描述

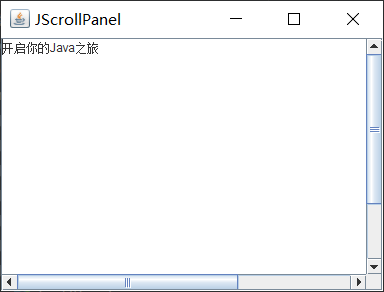
JScrollPanel面板(可滚动面板)

1
2
3
4
5
6
7
8
9
10
11
12
13
14
15
16
17
18
19
20
21
package 文本域JScroll面板;
import javax.swing.*;
import java.awt.*;

/* 滚屏 */
public class TestJScroll extends JFrame {
public static void main(String[] args) {
new TestJScroll("JScrollPanel");
}
public TestJScroll(String title){
super(title);
Container container=getContentPane();
JTextArea textArea = new JTextArea(20,50); //文本域
textArea.setText("开启你的Java之旅");
JScrollPane jScrollPane = new JScrollPane(textArea); //Scroll面板
container.add(jScrollPane);
setVisible(true);
setBounds(100,100,400,300);
setDefaultCloseOperation(WindowConstants.EXIT_ON_CLOSE);
}
}

在这里插入图片描述

3.5 按钮

图片按钮

1
2
3
4
5
6
7
8
9
10
11
12
13
14
15
16
17
18
19
20
21
22
23
package 图片按钮单选框多选框;
import javax.swing.*;
import java.awt.*;
import java.net.URL;

/* 图片按钮 */
public class TestJButton extends JFrame {
public static void main(String[] args) {
TestJButton testJButton=new TestJButton();
}
public TestJButton(){
Container container=this.getContentPane();
URL url=TestJButton.class.getResource("下载.jpg"); //将一个图片变成一个图标
ImageIcon imageIcon = new ImageIcon(url);
JButton jbutton = new JButton("按钮"); //将图片放在按钮上
jbutton.setIcon(imageIcon);
jbutton.setToolTipText("图片按钮");
container.add(jbutton);
this.setVisible(true);
this.setBounds(100,100,400,300);
this.setDefaultCloseOperation(WindowConstants.EXIT_ON_CLOSE);
}
}

在这里插入图片描述

  • 单选按钮

    1
    2
    3
    4
    5
    6
    7
    8
    9
    10
    11
    12
    13
    14
    15
    16
    17
    18
    19
    20
    21
    22
    23
    24
    25
    26
    27
    28
    29
    package 图片按钮单选框多选框;
    import javax.swing.*;
    import java.awt.*;
    import java.net.URL;

    /* 单选框,单选按钮 */
    public class TestJButton02 extends JFrame {
    public static void main(String[] args) {
    new TestJButton02();
    }
    public TestJButton02(){
    Container container=this.getContentPane();
    //单选框
    JRadioButton jRadioButton1 = new JRadioButton("jRadioButton1");
    JRadioButton jRadioButton2 = new JRadioButton("jRadioButton2");
    JRadioButton jRadioButton3 = new JRadioButton("jRadioButton3");
    //由于单选框只能选一个,分组,一个分组中只能选一个
    ButtonGroup buttonGroup = new ButtonGroup();
    buttonGroup.add(jRadioButton1);
    buttonGroup.add(jRadioButton2);
    buttonGroup.add(jRadioButton3);
    container.add(jRadioButton1,BorderLayout.NORTH);
    container.add(jRadioButton2,BorderLayout.CENTER);
    container.add(jRadioButton3,BorderLayout.SOUTH);
    this.setVisible(true);
    this.setBounds(100,100,400,300);
    this.setDefaultCloseOperation(WindowConstants.EXIT_ON_CLOSE);
    }
    }

    在这里插入图片描述

  • 复选按钮

    1
    2
    3
    4
    5
    6
    7
    8
    9
    10
    11
    12
    13
    14
    15
    16
    17
    18
    19
    20
    package 图片按钮单选框多选框;
    import javax.swing.*;
    import java.awt.*;

    public class TestJButton03 extends JFrame {
    public static void main(String[] args) {
    new TestJButton03();
    }
    public TestJButton03(){
    Container container=this.getContentPane();
    //多选框
    JCheckBox jCheckBox1 = new JCheckBox("jCheckBox1");
    JCheckBox jCheckBox2 = new JCheckBox("jCheckBox2");
    container.add(jCheckBox1,BorderLayout.NORTH);
    container.add(jCheckBox2,BorderLayout.SOUTH);
    this.setVisible(true);
    this.setBounds(100,100,400,300);
    this.setDefaultCloseOperation(WindowConstants.EXIT_ON_CLOSE);
    }
    }

    在这里插入图片描述

3.6 列表

  • 下拉框
    1
    2
    3
    4
    5
    6
    7
    8
    9
    10
    11
    12
    13
    14
    15
    16
    17
    18
    19
    20
    21
    22
    package 下拉框列表框;
    import javax.swing.*;
    import java.awt.*;

    /* 下拉框 */
    public class TestCombobox extends JFrame {
    public static void main(String[] args) {
    new TestCombobox();
    }
    public TestCombobox(){
    Container contentPane = getContentPane();
    JComboBox<Object> objectJComboBox = new JComboBox<>();
    objectJComboBox.addItem(null);
    objectJComboBox.addItem("语文");
    objectJComboBox.addItem("数学");
    objectJComboBox.addItem("英语");
    contentPane.add(objectJComboBox);
    pack();
    setVisible(true);
    setDefaultCloseOperation(WindowConstants.EXIT_ON_CLOSE);
    }
    }
              snakeX[i]=snakeX[i-1];
              snakeY[i]=snakeY[i-1];
          }
          //走向
          if (fx.equals("R")){
              snakeX[0]=snakeX[0]+25;
              //边界判断
              if (snakeX[0]>850){
                  snakeX[0]=25;
              }
          }
          if (fx.equals("L")){
              snakeX[0]=snakeX[0]-25;
              //边界判断
              if (snakeX[0]<25){
                  snakeX[0]=850;
              }
          }
          if (fx.equals("U")){
              snakeY[0]=snakeY[0]-25;
              //边界判断
              if (snakeY[0]<75){
                  snakeY[0]=650;
              }
          }
          if (fx.equals("D")){
              snakeY[0]=snakeY[0]+25;
              //边界判断
              if (snakeY[0]>650){
                  snakeY[0]=75;
              }
          }
          //判断失败,撞到自己就算失败
          for (int i=1;i<length;i++){
              if (snakeX[0]==snakeX[i]&&snakeY[0]==snakeY[i]){
                  isFail=true;
              }
          }
          repaint();//重画页面
      }
      timer.start();//定时器开启
    
    }
    }


在这里插入图片描述

openwrt笔记

feeds.conf.default

1
2
3
4
5
6
7
8
9
10
11
12
13
14
15
16
17
18
19
20
21
22
23
src-git packages https://github.com/openwrt/packages.git
src-git luci http://git.openwrt.org/project/luci.git
src-git routing https://github.com/openwrt-routing/packages.git
src-git telephony http://git.openwrt.org/feed/telephony.git
src-git management https://github.com/openwrt-management/packages.git
src-git oldpackages http://git.openwrt.org/packages.git
#src-svn xwrt http://x-wrt.googlecode.com/svn/trunk/package
#src-svn phone svn://svn.openwrt.org/openwrt/feeds/phone
#src-svn efl svn://svn.openwrt.org/openwrt/feeds/efl
#src-svn xorg svn://svn.openwrt.org/openwrt/feeds/xorg
#src-svn desktop svn://svn.openwrt.org/openwrt/feeds/desktop
#src-svn xfce svn://svn.openwrt.org/openwrt/feeds/xfce
#src-svn lxde svn://svn.openwrt.org/openwrt/feeds/lxde
#src-link custom /usr/src/openwrt/custom-feed
#src-bzr 通过使用bzr从数据源的path/URL下载数据
#src-cpy 通过从数据源path拷贝数据
#src-darcs 通过使用darcs从数据源path/URL下载数据
#src-git 通过使用git从数据源path/URL下载数据
#src-git local_feed_name https://example.com/repo_name/something.git;branch_name
#src-git local_feed_name https://example.com/repo_name/something.git^commit_hash
#src-hg 通过使用hg从数据源path/URL 下载数据
#src-link 创建一个数据源path的symlink
#src-svn 通过使用svn从数据源path/URL下载数据

Makefile中命令前-+@符号的意义

1
2
3
4
5
all: clean
@echo "make start"
....
clean:
-rm -f log ${target}
1
2
3
@   使命令在被执行前不被回显
- make的时候,带`-`的命令行出错不会终止编译
+ 使命令行可以通过指定 -n、-q 或 -t 选项来执行。

升级cmake

下载最新cmake源码tar包放到dl目录并计算md5

1
2
3
4
5
6
7
8
9
cd openwrt
cd tools/cmake
mv patches temp
vim Makefile
# PKG_VERSION:=2.8.12.2 改成 PKG_VERSION:=3.7.2
# PKG_SOURCE_URL:=http://www.cmake.org/files/v2.8/ 改成 PKG_SOURCE_URL:=https://cmake.org/files/v3.7/
# PKG_MD5SUM:XXXXXXX 改成 # PKG_MD5SUM:79bd7e65cd81ea3aa2619484ad6ff25a
cd -
make tools/cmake/compile V=s

编译glibc版的openwrt

1
2
3
4
make menuconfig
-> [*] Advanced configuration options (for developers)
-> [*] Toolchain Options
-> C Library implementation (Use glibc) # 用glibc替换musl

VMWare安装linux虚拟机

VMWare安装linux虚拟机卡在install open-vm-tools

VMWare安装ubuntu或者centos,提示说“快速安装”,然会生成autoinst.iso文件来快速安装,

安装之前会自动用autoinst.iso来安装vm-tools。会卡住很久。(把原本安装的删掉,重新来一遍)

解决方法:

创建完成后把“创建后开启此虚拟机”的对勾去掉,

在设置的ubuntu安装目录中先把虚拟光驱加载的自动安装文件找到autoinst.iso删除。

接着启动该虚拟机就可以进入安装程序。安装成功后再安装open-vm-tools

``bash
sudo apt-get install open-vm-tools
sudo apt-get install open-vm-tools-desktop


## 其他电脑无法访问我的虚拟机

虚拟机设置网络为 桥接模式,并勾选 直接xxxx物理网卡

java学习5_IO框架

千锋教育-2020年最新版 Java基础-IO框架

Source

  • 概念:内存与存储设备之间传输数据的通道。

  • 水借助管道传输;数据借助流传输。

流的分类

按方向【重点】

  • 输入流:将存储设备中的内容读入到内存中。
  • 输出流:将内存中的内容写入到存储设备中。

按单位

  • 字节流:以字节为单位,可以读写所有数据。
  • 字符流:以字符为单位,只能读写文本数据。

按功能

  • 字节流:具有实际传输数据的读写功能。
  • 过滤流:在节点流的基础之上增强功能。

字节流

字节流的父类(抽象类)

  • InputStream字节输入流
    • public int read(){}
    • public int read(byte[] b){}
    • public int read(byte[] b,int off,int len){}
  • OutputStream字节输出流
    • public void write(int n){}
    • public void write(byte[] b){}
    • public void write(byte[] b,int off,int len){}

字节流的子类

文件字节流

  • FileInputStream

    • public int read()//从输入流中读取一个字节数据,返回读到的字节数据,如果达到文件末尾,返回-1。
    • public int read(byte[] b)//从输入流中读取字节数组长度的字节数据存入数组中,返回实际读到的字节数;如果达到文件的尾部,则返回-1。
  • FileOutputStream

    • public void write(int b)//将指定字节写入输出流。
    • public void write(bute[] b)//一次写多个字节,将b数组中所有字节,写入输出流。
1
2
3
4
5
6
7
8
9
10
11
12
13
14
15
16
17
18
19
20
21
22
23
24
25
26
/**
* 演示文件字节输入流的使用
* FileInputStream
*/
public class Demo1 {
public static void main(String[] args) throws IOException {
//文件内容:abcdefg
FileInputStream fileInputStream=new FileInputStream("d:\\aaa.txt");

//read();读入单个字节
int data=fileInputStream.read();
System.out.println((char)data);//a
while((data=fileInputStream.read())!=-1) {
System.out.print((char)data);
}//bcdefg

//read(byte[] b);读入多个字节
byte[] b=new byte[1024];
if((data=fileInputStream.read(b))!=-1) {
System.out.println(new String(b,0,data));
}//bcdefg

//关闭流
fileInputStream.close();
}
}
1
2
3
4
5
6
7
8
9
10
11
12
13
14
15
16
17
18
19
20
21
22
/**
* 演示文件字节输出流的使用
* FileOutputStream
*/
public class Demo2 {
public static void main(String[] args) throws IOException {
//如果没有文件会自动创建
FileOutputStream fileOutputStream=new FileOutputStream("d:\\bbb.txt");

//write(int b);
fileOutputStream.write(97);
fileOutputStream.write('b');
fileOutputStream.write('c');

//write(byte[] b);
fileOutputStream.write(new String("helloworld").getBytes());
//此时文件bbb.txt内容为abc helloworld

//关闭流
fileOutputStream.close();
}
}

文件字节流小案例

1
2
3
4
5
6
7
8
9
10
11
12
13
14
15
16
17
18
19
20
21
22
23
/**
* 使用文件字节流复制文件
*/
public class Demo3 {
public static void main(String[] args) throws IOException {
//将图片读取到输入流
FileInputStream fileInputStream=new FileInputStream("d:\\MrG1.jpg");
//从输出流写入数据
FileOutputStream fileOutputStream=new FileOutputStream("d:\\MrG2.jpg");

int count;//保存一次读取到的实际个数
byte[] b=new byte[1024];

while((count=fileInputStream.read(b))!=-1) {
fileOutputStream.write(b, 0, count);
}
System.out.println("复制成功");

//关闭流
fileInputStream.close();
fileOutputStream.close();
}
}

字节缓冲流

  • 缓冲流:BufferedInputStream/BufferedOutputStream

    • 提高IO效率,减少访问磁盘的次数;
    • 数据存储在缓冲区中。flush可以将缓存区的内容写入文件,也可以直接close。
1
2
3
4
5
6
7
8
9
10
11
12
13
14
15
16
17
18
19
20
21
22
23
24
25
26
27
28
29
/**
* 使用字节缓冲流读取
* BufferedInputStream
*/
public class Demo4 {
public static void main(String[] args) throws IOException {
//使用该输入流每次会从硬盘读入
FileInputStream fileInputStream=new FileInputStream("d:\\aaa.txt");
//缓冲流需要一个底层流
//缓冲流每次从缓冲区读取
BufferedInputStream bufferedInputStream=new BufferedInputStream(fileInputStream);

//读取
int data;
while((data=bufferedInputStream.read())!=-1) {
System.out.print((char)data);
}

//我们也可以自己创建一个缓冲区;
//每次读取从自己创建的缓冲区中读取。
int count;
byte[] buf=new byte[1024];
while((count=bufferedInputStream.read(b,0,b.length))!=-1) {
System.out.println(new String(buf,0,count));
}

bufferedInputStream.close();
}
}
1
2
3
4
5
6
7
8
9
10
11
12
13
14
15
16
17
/**
* 使用字节缓冲流写入文件
* BufferedOutputStream
*/
public class Demo5 {
public static void main(String[] args) throws IOException {
FileOutputStream fileOutputStream=new FileOutputStream("d:\\buf.txt");
//缓冲流将数据写入到缓冲区
BufferedOutputStream bufferedOutputStream=new BufferedOutputStream(fileOutputStream);
//写入文件
bufferedOutputStream.write("helloworld".getBytes());
bufferedOutputStream.flush();

//其实内部也会调用flush
bufferedOutputStream.close();
}
}

对象流

  • 对象流:ObjectOutputStream/ObjectInputStream

    • 增加了缓冲区功能。
    • 增强了读写8种基本数据类型和字符串功能。
    • 增强了读写对象的功能:
      • readObject()//从流中读取一个对象。
      • writeObject(Object obj)向流中写入一个对象。

    使用流传输对象的过程称为序列化、反序列化。

序列化

1
2
3
4
5
6
7
8
9
10
11
12
13
14
15
16
17
18
19
20
/**
* 学生类
*/
public class Student {
private String name;
private int age;
public Student(String name, int age) {
super();
this.name = name;
this.age = age;
}
public int getAge() { return age; }
public void setAge(int age) { this.age = age; }
public String getName() { return name; }
public void setName(String name) { this.name = name; }
@Override
public String toString() {
return "Student [name=" + name + ", age=" + age + "]";
}
}
1
2
3
4
5
6
7
8
9
10
11
12
13
14
15
16
/**
* 使用ObjectOutputStream实现对象的序列化
* 注:序列化的类必要要实现Serializable接口
*/
public class Demo6 {
public static void main(String[] args) throws IOException {
//这个文件后缀名表示二进制文件,但你可以写成其他如obj等任意后缀。
FileOutputStream fileOutputStream=new FileOutputStream("d:\\stu.bin");
ObjectOutputStream objectOutputStream=new ObjectOutputStream(fileOutputStream);
//序列化(写入操作)
Student tang=new Student("唐瑞", 21);
objectOutputStream.writeObject(tang);
objectOutputStream.close();
System.out.println("序列化完毕");
}
}

:执行上述代码后IDE会抛出java.io.NotSerializableException,意思是Student类不能被序列化,需要实现Serializable接口。

1
2
//不需要实现任何方法
public class Student implements Serializable{ }

Serializable其实是一个标志接口,用来标志该类是否可以被序列化。我们进到该接口的源码可以发现里面不含任何属性和抽象方法。

1
public interface Serializable { }

反序列化

1
2
3
4
5
6
7
8
9
10
11
12
13
14
15
16
/**
* 使用ObjectInputStream实现反序列化(读取重构对象)
*/
public class Demo7 {
public static void main(String[] args) throws IOException, ClassNotFoundException {
FileInputStream fileInputStream=new FileInputStream("d:\\stu.bin");
ObjectInputStream objectInputStream=new ObjectInputStream(fileInputStream);
//读取文件(反序列化)
Student student=(Student) objectInputStream.readObject();

objectInputStream.close();

System.out.println("执行完毕");
System.out.println(student.toString());
}
}

序列化和反序列化注意事项

  • 序列化类必须实现Serializable接口,前文已经说过。
  • 序列化类中的对象属性也要求实现Serializable接口。也就是说如果Student类中有一个Grad类型的属性private Grad info;那么Grad这个类也要实现Serializable接口。
  • 序列化类中可以添加序列化版本号ID,以保证序列化的类和被序列化的类是同一个类。在上面的代码中我并没有添加序列号版本,虽然IDE没有报错,但是会显示一个警告,提示我添加序列化版本号(串行版本标识)。我们可以在Student类中添加:
1
private static final long serialVersionUID = 66666L;

此时再运行Demo7就会报一个无效类的异常:

1
java.io.InvalidClassException: local class incompatible: stream classdesc serialVersionUID = -3126921853274410929, local class serialVersionUID = 666660

意思就是两个类的serialVersionUID不一样。可以看到之前虽然没有显式添加序列版本号,但它已经自动生成了一个。我们再运行一下Demo6序列化,再运行Demo7反序列化就可以正常执行了。

  • 使用transient(短暂的)修饰属性,可以避免该属性被序列化。用它来修饰age:
1
private transient int age;

把tang这个对象序列化后再反序列化,这个对象的age属性就变成了0。

  • 静态属性不能被序列化。
  • 可以利用集合来序列化多个对象:
1
2
3
4
5
ArrayList<Student> arrayList=new ArrayList<Student>();
arrayList.add(s1);
arrayList.add(s2);
arrayList.add(s3);
objectOutputStream.writeObject(arrayList);
1
ArrayList<Student> list=(ArrayList<Student>)objectInputStream.readObject();

编码方式

  • IOS-8859-1

    收录除ASCII外,还包括西欧、希腊语、泰语、阿拉伯语、希伯来语对应的文字符号。采用1个字节来表示,最多只能表示256个字符。

  • UTF-8

    针对Unicode码表的可变长度字符编码。国际上使用的编码,也称为“万国码”,收录了几乎所有国家的常用字符。采用1至3个字节来表示一个字符。

  • GB2312

    简体中文,采用1个或2个字节来表示字符,95年之前所采用的编码。

  • GBK

    简体中文的扩充,GB2312的升级版本。

  • BIG5

    台湾,繁体中文。

当编码方式和解码方式不一致时,会出现乱码。假如Demo1中的文件内容不是字母而是“我爱中国”这样的汉字,那么读取出来的信息就是乱码。因为字节流按字节输入输出,而这四个汉字占了12个字节,把一个汉字按一个一个字节读入自然会出现问题,这时就需要使用字符流。

字符流

字符流的父类(抽象类)

  • Reader:字符输入流

    • public int read()

      从流中读取单个字符,用整型来返回读取的字符;当读到流底部时返回-1。

    • public int read(char[] c)

      从流中读取字符保存到c数组中,返回读取的字符个数,当读到流底部时返回-1。

    • public int read(char[] cbuf,int off,int len){}

      抽象方法。

  • Writer:字符输出流

    • public void write(int n)

      写入单个字符,只能写入包含16位低阶字节的整型数值,16位高阶字节将会被忽略。

    • public void write(String str)

      写入一个字符串。

    • public void write(char[] cbuf)

      写入一个字符数组。

字符流的子类

  • FileReader:

    • public int read()

      继承自InputStreamReader类。读取单个字符,返回读取的字符,当读到流底部时返回-1。

    • public int read(char[] c)

      继承自Reader类。

    • public int read(char[] cbuf,int offset,int length)

      继承自InputStreamReader类。从流中读取部分字符到cbuf中指定位置,返回读取到的字符个数,当读到流底部时返回-1。

1
2
3
4
5
6
7
8
9
10
11
12
13
14
15
public class Demo1 {
public static void main(String[] args) throws IOException {
//文件内容:
//要是能活在梦里,我情愿醒不过来。
FileReader fileReader=new FileReader("d:\\cbuf.txt");
int data;
//read();与字节流不同,该方法读取单个字符而不是字节
while((data=fileReader.read())!=-1) {
System.out.print((char)data);
}
//输出:
//要是能活在梦里,我情愿醒不过来。
fileReader.close();
}
}

这里记录我遇到的一个问题

上述代码执行后理应是正常输出一段文字,但我这里出现了文字乱码。猜测是编码出现了问题,于是查看本地文本的保存格式为UTF-8,感觉也没错,于是打开JDK API查看FileReader类的描述:

Convenience class for reading character files. The constructors of this class assume that the default character encoding and the default byte-buffer size are appropriate. To specify these values yourself, construct an InputStreamReader on a FileInputStream.

大意就是该类的构造方法有一个默认的字符编码格式和一个默认字节缓冲区,并没有指明这个编码格式就是UTF-8。于是查看系统默认编码,打开CMD输入chcp,得到一个值为936的活动编码页,通过查询得知该代码页所对应的国家(地区)或语言为:中国 - 简体中文(GB2312)。这与本地所保存的文本编码UTF-8不一致,所以导致了文字乱码的出现。而要指定编码格式需要创建一个InputStreamReader或FileInputStream对象使用其构造方法。

以下是我在本地能正常运行的代码:

1
2
3
4
5
6
7
8
9
10
11
public class Demo1 {
public static void main(String[] args) throws IOException {
//指定编码格式
InputStreamReader inputStreamReader=new InputStreamReader(new FileInputStream("d:\\cbuf.txt"),"UTF-8");
int data;
while((data=inputStreamReader.read())!=-1) {
System.out.print((char)data);
}
inputStreamReader.close();
}
}
  • FileWriter:

    • public void write(int c)

      继承自OutputStreamWriter类,写入一个字符。

    • public void write(String str)

      继承自Writer类。

    • public void Write(char[] cbuf)

      继承自Writer类。

1
2
3
4
5
6
7
8
9
10
11
/**
* 使用FileWriter写入文件
*/
public class Demo2 {
public static void main(String[] args) throws IOException {
FileWriter fileWriter=new FileWriter("d:\\w.txt");
fileWriter.write("给自己一个希望。");//写入
fileWriter.close();
System.out.println("执行完毕");
}
}

字符流小案例

1
2
3
4
5
6
7
8
9
10
11
12
13
14
15
16
17
18
19
/**
* 使用FileReader和FileWrite复制文本文件
* 注:不能复制图片或二进制文件
*/
public class Demo3 {
public static void main(String[] args) throws IOException {
InputStreamReader inputStreamReader=new InputStreamReader(new FileInputStream("d:\\w.txt"));
FileWriter fileWriter=new FileWriter("d:\\w2.txt");
//读写
int data=0;
while((data=inputStreamReader.read())!=-1) {
fileWriter.write(data);
}

inputStreamReader.close();
fileWriter.close();
System.out.println("执行完毕");
}
}

字符缓冲流

  • 缓冲流:BufferedReader/BufferedWriter

    • 高效读写
    • 支持换行输入符
    • 可一次写一行、读一行。
1
2
3
4
5
6
7
8
9
10
11
12
13
14
15
16
17
18
19
20
21
22
23
/**
* 使用字符缓冲流读取文件
* BufferedReader
*/
public class Demo4 {
public static void main(String[] args) throws IOException {
InputStreamReader inputStreamReader=new InputStreamReader(new FileInputStream("d:\\cbuf.txt"),"UTF-8");
BufferedReader bufferedReader=new BufferedReader(inputStreamReader);
//read(char[] cbuf)
char[] cbuf=new char[1024];
int count;
while((count=bufferedReader.read(cbuf))!=-1) {
System.out.println(new String(cbuf,0,count));
}

//readline();
//该方法一次读取一行,返回一个字符串
String line;
while((line=bufferedReader.readLine())!=null) {
System.out.println(line);
}
}
}
1
2
3
4
5
6
7
8
9
10
11
12
13
14
15
16
/**
* 使用字符缓冲流写入文件
* BufferedWriter
*/
public class Demo5 {
public static void main(String[] args) throws IOException {
BufferedWriter bufferedWriter=new BufferedWriter(new FileWriter("d:\\w3.txt"));
bufferedWriter.write("真有人看这篇博客吗?");
//写入一个换行符windows \r\n linux \n
bufferedWriter.newLine();
bufferedWriter.write("不会吧不会吧!!");

bufferedWriter.close();
System.out.println("执行完毕");
}
}

打印流

  • PrintWriter:

    • 封装了print()/println()方法,支持写入后换行。
    • 支持数据原样打印。
1
2
3
4
5
6
7
8
9
10
11
12
13
14
15
16
/**
* PrintWriter的使用
*/
public class Demo6 {
public static void main(String[] args) throws FileNotFoundException {
PrintWriter printWriter=new PrintWriter("d:\\p.txt");
//打印到文件
printWriter.println(97);//97
printWriter.println('b');//b
printWriter.println(3.14);//3.14
printWriter.println(true);//true

printWriter.close();
System.out.println("执行完毕");
}
}

转换流

  • 桥转换流:InputStreamReader/OutputStreamWriter

    • 可将字节流转换为字符流。
    • 可设置字符的编码方式。

    其实这个在上面的Demo中我已经用过了,这里不再演示InputStreamReader的使用。

1
2
3
4
5
6
7
8
9
10
11
12
/**
* 使用OutputStreamWriter写入文件
*/
public class Demo7 {
public static void main(String[] args) throws IOException {
//可以自行指定编码
OutputStreamWriter outputStreamWriter=new OutputStreamWriter(new FileOutputStream("d:\\info.txt"));
outputStreamWriter.write("知道的越多,不明白的也就更多,学海无涯。");
outputStreamWriter.close();
System.out.println("执行完毕");
}
}

File类

  • 概念:代表物理盘符中的一个文件或者文件夹

  • 方法

    • public boolean CreateNewFile()

      当且仅当指定的文件名不存在时创建一个指定的新的、空的文件。创建成功返回true,如果指定文件名已存在返回false。

    • public boolean mkdir()

      创建一个指定路径名的文件夹。当且仅当文件夹被创建时返回true,否则返回false。

    • public boolean delete()

      删除一个指定的文件或文件夹,文件夹必须为空才能被删除。当且仅当指定的文件或文件夹被删除时返回true,否则返回false。

    • public boolean exists()

      检查指定的文件或文件夹是否存在。当且仅当指定的文件或者文件夹存在时返回true,否则返回false。

    • public File[] listFiles()

      列出目录中的所有内容,返回一个指定路径名中的文件数组,如果指定的路径名不代表一个文件夹(目录)就返回null。

    • public boolean renameTo(File dest)

      重命名一个路径名所指定的文件。当且仅当修改操作成功时返回true,否则返回false。

文件操作

1
2
3
4
5
6
7
8
9
10
11
12
13
14
15
16
17
18
19
20
21
22
23
24
25
26
27
28
29
30
31
32
33
34
35
36
37
38
39
40
41
42
43
44
45
46
47
48
49
/**
* 演示文件操作
* 分隔符
*/
public class Demo1 {
public static void main(String[] args) throws IOException, InterruptedException {
//输出:
//路径分隔符:;
//名称分隔符:\
separator();

fileOp();
}
public static void separator() {
System.out.println("路径分隔符:"+File.pathSeparator);
System.out.println("名称分隔符:"+File.separator);
}
public static void fileOp() throws IOException, InterruptedException {
//1.创建文件
File file=new File("d:\\file.txt");
if(!file.exists()) {
boolean flag=file.createNewFile();
System.out.println("创建状态:"+flag);
}

//2.删除文件
//2.1 直接删除
/* System.out.println("删除结果:"+file.delete()); */
//2.2 使用JVM退出时删除(不是自己删除)
file.deleteOnExit();
//调用休眠程序观察删除操作
Thread.sleep(5000);

//3.获取文件信息
System.out.println("文件绝对路径:"+file.getAbsolutePath());
System.out.println("获取路径:"+file.getPath());
System.out.println("获取父目录:"+file.getParent());
System.out.println("获取文件名称:"+file.getName());
System.out.println("获取文件长度:"+file.length());
System.out.println("获取文件创建时间:"+new Date(file.lastModified()).toLocaleString());

//4.判断
System.out.println("是否可写:"+file.canWrite());
System.out.println("是否可读:"+file.canRead());
System.out.println("是否隐藏:"+file.isHidden());
System.out.println("是否是文件:"+file.isFile());
System.out.println("是否是文件夹:"+file.isDirectory());
}
}

文件夹操作

1
2
3
4
5
6
7
8
9
10
11
12
13
14
15
16
17
18
19
20
21
22
23
24
25
26
27
28
29
30
31
32
33
34
35
36
37
38
39
40
41
/**
* 文件夹的操作
*/
public class Demo2 {
public static void main(String[] args) {
directorOp();
}
public static void directorOp() {
//1.创建文件夹
File dir=new File("d:\\aaa\\bbb\\ccc");
if (!dir.exists()) {
//mkdir();只能创建单级目录
boolean flag=dir.mkdirs();//创建多级目录
System.out.println("创建结果:"+flag);
}

//2.删除文件夹
//2.1 直接删除(必须为空目录)
//System.out.println("删除结果:"+dir.delete());
//2.2 使用jvm删除
dir.deleteOnExit();

//3.获取文件夹信息
System.out.println("获取绝对路径:"+dir.getAbsolutePath());
System.out.println("获取路径:"+dir.getPath());
System.out.println("获取父目录:"+dir.getParent());
System.out.println("获取创建时间:"+new Date(dir.lastModified()).toLocaleString());
System.out.println("文件夹名称:"+dir.getName());

//4.判断
System.out.println("是否隐藏:"+dir.isHidden());
System.out.println("是否是文件:"+dir.isFile());

//5.遍历文件夹
File dir2=new File("d:\\");
String[] files=dir2.list();
for (String string : files) {
System.out.println(string);
}
}
}

文件过滤器

  • FileFilter接口:

    public interface FileFilter

    • boolean accept(File pathname)
    • 当调用File类中的listFiles()方法时,支持传入FileFilter接口实现类,对获取的文件进行过滤,只有满足条件的文件才可以出现在listFiles()的返回值中。

    在上文Demo2中添加演示代码:

1
2
3
4
5
6
7
8
9
10
11
12
13
14
public static void  directorOp() {
File[] files1=dir2.listFiles(new FileFilter() {
@Override
public boolean accept(File pathname) {
if(pathname.getName().endsWith(".txt")) {
return true;
}
return false;
}
});
for (File file : files1) {
System.out.println(file.getName());
}
}

文件操作小案例

1
2
3
4
5
6
7
8
9
10
11
12
13
14
15
16
17
18
19
20
21
22
23
24
25
26
27
28
29
30
31
32
33
34
35
36
/**
* 1.递归遍历文件夹
* 2.递归删除文件夹
*/
public class Demo3 {
public static void main(String[] args) {
//略
}
//案例1:递归遍历文件夹
public static void listDer(File dir) {
File[] files=dir.listFiles();
if(files!=null&&files.length>0) {
for (File file : files) {
if (file.isDirectory()) {
listDer(file);
}else {
System.out.println(file.getName());
}
}
}
}
//案例2:递归删除文件夹
public static void deleteDir(File dir) {
File[] files=dir.listFiles();
if (files!=null&&files.length>0) {
for (File file : files) {
if (file.isDirectory()) {
deleteDir(file);
}else {
file.delete();
}
}
}
dir.delete();
}
}

补充:Properties

  • Properties:属性集合

  • 特点:

  • 存储属性名和属性值(键值对)。

    • 属性名和属性值都是字符串类型。
    • 没有泛型。
    • 和流有关(所以没有整理在集合里面)。
  • 方法:

    • public String getProperty(String key)

      根据key在属性列表里查找value,如果原始属性列表找不到就去默认属性列表找。返回key所对应的value。

    • public void list(PrintWriter out)

      将属性列表打印在指定的输出流上,在debug时很有用。

    • public Object setProperty(String key,String value)

      内部调用的是Hashtable的put方法,将key和value成对地保存在属性列表中。返回这个key上一个对应的value,没有就返回null。

    Properties可以保存在一个流中或是从一个流中加载,属性列表中的每个键值对都是一个字符串。一个属性列表可以包括另一个第二属性列表来作为它的默认值,如果在原始属性列表中没有找到key时就搜索第二属性列表。

1
2
3
4
5
6
7
8
9
10
11
12
13
14
15
16
17
18
19
20
21
22
23
24
25
26
27
28
29
30
31
32
33
34
35
36
37
/**
* 演示集合properties的使用
*/
public class Demo1 {
public static void main(String[] args) throws IOException {
Properties properties=new Properties();
//添加数据
properties.setProperty("username", "tangrui");
properties.setProperty("age", "21");
System.out.println(properties.toString());

//遍历
//3.1 keySet 略
//3.2 entrySet 略
//3.3 stringPropertyNames()
Set<String> set=properties.stringPropertyNames();
for (String string : set) {
System.out.println(string+" "+properties.getProperty(string));
}

//和流有关的方法
//list
PrintWriter printWriter=new PrintWriter("d:\\print.txt");
properties.list(printWriter);
printWriter.close();
//store保存
FileOutputStream fileOutputStream=new FileOutputStream("d:\\s.properties");
properties.store(fileOutputStream, "NOTES");
fileOutputStream.close();
//load加载
Properties properties2=new Properties();
FileInputStream fileInputStream=new FileInputStream("d:\\s.properties");
properties2.load(fileInputStream);
fileInputStream.close();
System.out.println(properties2.toString());
}
}

java学习4_Java集合框架详解_通俗易懂

千锋教育-2020年最新版 Java集合框架详解 通俗易懂

Source

  • 概念:对象的容器,定义了对多个对象进行操作的的常用方法。可实现数组的功能。

  • 和数组的区别

    1. 数组长度固定,集合长度不固定。
    2. 数组可以存储基本类型和引用类型,集合只能存储引用类型。
  • 位置java.util.*;

Collection体系集合

Collection父接口

  • 特点:代表一组任意类型的对象,无序、无下标、不能重复。
  • 方法
    • boolean add(Object obj) //添加一个对象。
    • boolean addAll(Collection c) //将一个集合中的所有对象添加到此集合中。
    • void clear() //清空此集合中的所有对象。
    • boolean contains(Object o) //检查此集合中是否包含o对象。
    • boolean equals(Object o) //比较此集合是否与指定对象相等。
    • boolean isEmpty() //判断此集合是否为空。
    • boolean remove(Object o) //在此集合中移除o对象。
    • int size() //返回此集合中的元素个数。
    • Object[] toArray() //将此集合转换成数组。
1
2
3
4
5
6
7
8
9
10
11
12
13
14
15
16
17
18
19
20
21
22
23
24
25
26
27
28
29
30
31
32
33
34
35
36
37
38
39
40
41
42
 /**
* Collection接口的使用(一)
* 1.添加元素
* 2.删除元素
* 3.遍历元素
* 4.判断
*/
public class Demo1{
pubic static void main(String[] args){
//创建集合
Collection collection=new ArrayList();
// * 1.添加元素
Collection.add("苹果");
Collection.add("西瓜");
Collection.add("榴莲");
System.out.println("元素个数:"+collection.size());
System.out.println(collection);
// * 2.删除元素
collection.remove("榴莲");
System.out.println("删除之后:"+collection.size());
// * 3.遍历元素
//3.1 使用增强for
for(Object object : collection){
System.out.println(object);
}
//3.2 使用迭代器(迭代器专门用来遍历集合的一种方式)
//hasnext();判断是否有下一个元素
//next();获取下一个元素
//remove();删除当前元素
Iterator iterator=collection.Itertor();
while(iterator.hasnext()){
String object=(String)iterator.next();
System.out.println(s);
//删除操作
//collection.remove(s);引发错误:并发修改异常
//iterator.remove();应使用迭代器的方法
// * 4.判断
System.out.println(collection.contains("西瓜"));//true
System.out.println(collection.isEmpty());//false
}
}
}
1
2
3
4
5
6
7
8
9
10
11
12
13
14
15
16
17
18
19
20
21
22
23
24
25
26
27
28
29
30
31
32
33
34
35
36
37
38
39
 /**
* Collection接口的使用(二)
* 1.添加元素
* 2.删除元素
* 3.遍历元素
* 4.判断
*/
public class Demo2 {
public static void main(String[] args) {
Collection collection=new ArrayList();
Student s1=new Student("张三",18);
Student s2=new Student("李四", 20);
Student s3=new Student("王五", 19);
//1.添加数据
collection.add(s1);
collection.add(s2);
collection.add(s3);
//collection.add(s3);可重复添加相同对象
System.out.println("元素个数:"+collection.size());
System.out.println(collection.toString());
//2.删除数据
collection.remove(s1);
System.out.println("删除之后:"+collection.size());
//3.遍历数据
//3.1 增强for
for(Object object:collection) {
Student student=(Student) object;
System.out.println(student.toString());
}
//3.2迭代器
//迭代过程中不能使用collection的删除方法
Iterator iterator=collection.iterator();
while (iterator.hasNext()) {
Student student=(Student) iterator.next();
System.out.println(student.toString());
}
//4.判断和上一块代码类似。
}
}
1
2
3
4
5
6
7
8
9
10
11
12
13
14
15
16
17
18
19
20
21
22
23
24
25
26
27
28
 /**
* 学生类
*/
public class Student {
private String name;
private int age;
public Student(String name, int age) {
super();
this.name = name;
this.age = age;
}
public String getName() {
return name;
}
public void setName(String name) {
this.name = name;
}
public int getAge() {
return age;
}
public void setAge(int age) {
this.age = age;
}
@Override
public String toString() {
return "Student [name=" + name + ", age=" + age +"]";
}
}

Collection子接口

List集合

  • 特点:有序、有下标、元素可以重复。
  • 方法
    • void add(int index,Object o) //在index位置插入对象o。
    • boolean addAll(index,Collection c) //将一个集合中的元素添加到此集合中的index位置。
    • Object get(int index) //返回集合中指定位置的元素。
    • List subList(int fromIndex,int toIndex) //返回fromIndex和toIndex之间的集合元素。
1
2
3
4
5
6
7
8
9
10
11
12
13
14
15
16
17
18
19
20
21
22
23
24
25
26
27
28
29
30
31
32
33
34
35
36
37
38
39
40
41
42
43
44
45
46
47
48
49
50
51
52
53
54
55
 /**
* List子接口的使用(一)
* 特点:1.有序有下标 2.可以重复
*
* 1.添加元素
* 2.删除元素
* 3.遍历元素
* 4.判断
* 5.获取位置
*/
public class Demo3 {
public static void main(String[] args) {
List list=new ArrayList<>();
//1.添加元素
list.add("tang");
list.add("he");
list.add(0,"yu");//插入操作
System.out.println("元素个数:"+list.size());
System.out.println(list.toString());
//2.删除元素
list.remove(0);
//list.remove("yu");结果同上
System.out.println("删除之后:"+list.size());
System.out.println(list.toString());
//3.遍历元素
//3.1 使用for遍历
for(int i=0;i<list.size();++i) {
System.out.println(list.get(i));
}
//3.2 使用增强for
for(Object object:list) {
System.out.println(object);
}
//3.3 使用迭代器
Iterator iterator=list.iterator();
while (iterator.hasNext()) {
System.out.println(iterator.next());
}
//3.4使用列表迭代器,listIterator可以双向遍历,添加、删除及修改元素。
ListIterator listIterator=list.listIterator();
//从前往后
while (listIterator.hasNext()) {
System.out.println(listIterator.next());
}
//从后往前(此时“遍历指针”已经指向末尾)
while(listIterator.hasPrevious()) {
System.out.println(listIterator.previous());
}
//4.判断
System.out.println(list.isEmpty());
System.out.println(list.contains("tang"));
//5.获取位置
System.out.println(list.indexOf("tang"));
}
}
1
2
3
4
5
6
7
8
9
10
11
12
13
14
15
16
17
18
19
20
21
22
23
24
25
26
27
28
29
30
31
/**
* List子接口的使用(二)
* 1.添加元素
* 2.删除元素
* 3.遍历元素
* 4.判断
* 5.获取位置
*/
public class Demo4 {
public static void main(String[] args) {
List list=new ArrayList();
//1.添加数字数据(自动装箱)
list.add(20);
list.add(30);
list.add(40);
list.add(50);
System.out.println("元素个数:"+list.size());
System.out.println(list.toString());
//2.删除元素
list.remove(0);
//list.remove(20);很明显数组越界错误,改成如下
//list.remove(Object(20));
//list.remove(new Integer(20));
System.out.println("元素个数:"+list.size());
System.out.println(list.toString());
//3-5不再演示,与之前类似
//6.补充方法subList,返回子集合,含头不含尾
List list2=list.subList(1, 3);
System.out.println(list2.toString());
}
}

List实现类

ArrayList【重点】
  • 数组结构实现,查询块、增删慢;
  • JDK1.2版本,运行效率快、线程不安全。
1
2
3
4
5
6
7
8
9
10
11
12
13
14
15
16
17
18
19
20
21
22
23
24
25
26
27
28
29
30
31
32
33
34
35
36
37
38
39
40
41
42
43
44
45
46
47
48
49
50
51
/**
* ArrayList的使用
* 存储结构:数组;
* 特点:查找遍历速度快,增删慢。
* 1.添加元素
* 2.删除元素
* 3.遍历元素
* 4.判断
* 5.查找
*/
public class Demo5 {
public static void main(String[] args) {
ArrayList arrayList=new ArrayList<>();
//1.添加元素
Student s1=new Student("唐", 21);
Student s2=new Student("何", 22);
Student s3=new Student("余", 21);
arrayList.add(s1);
arrayList.add(s2);
arrayList.add(s3);
System.out.println("元素个数:"+arrayList.size());
System.out.println(arrayList.toString());
//2.删除元素
arrayList.remove(s1);
//arrayList.remove(new Student("唐", 21));
//注:这样可以删除吗(不可以)?显然这是两个不同的对象。
//假如两个对象属性相同便认为其是同一对象,那么如何修改代码?
//3.遍历元素
//3.1使用迭代器
Iterator iterator=arrayList.iterator();
while(iterator.hasNext()) {
System.out.println(iterator.next());
}
//3.2使用列表迭代器
ListIterator listIterator=arrayList.listIterator();
//从前往后遍历
while(listIterator.hasNext()) {
System.out.println(listIterator.next());
}
//从后往前遍历
while(listIterator.hasPrevious()) {
System.out.println(listIterator.previous());
}
//4.判断
System.out.println(arrayList.isEmpty());
//System.out.println(arrayList.contains(new Student("何", 22)));
//注:与上文相同的问题。
//5.查找
System.out.println(arrayList.indexOf(s1));
}
}

:Object里的equals(this==obj)用地址和当前对象比较,如果想实现代码中的问题,可以在学生类中重写equals方法:

1
2
3
4
5
6
7
8
9
10
11
12
13
14
15
16
17
18
19
20
21
@Override
public boolean equals(Object obj) {
//1.是否为同一对象
if (this==obj) {
return true;
}
//2.判断是否为空
if (obj==null) {
return false;
}
//3.判断是否是Student类型
if (obj instanceof Student) {
Student student=(Student) obj;
//4.比较属性
if(this.name.equals(student.getName())&&this.age==student.age) {
return true;
}
}
//不满足,返回false
return false;
}
ArrayList源码分析
  • 默认容量大小:private static final int DEFAULT_CAPACITY = 10;
  • 存放元素的数组:transient Object[] elementData;
  • 实际元素个数:private int size;
  • 创建对象时调用的无参构造函数:
1
2
3
4
5
 //这是一个空的数组
private static final Object[] DEFAULTCAPACITY_EMPTY_ELEMENTDATA = {};
public ArrayList() {
this.elementData = DEFAULTCAPACITY_EMPTY_ELEMENTDATA;
}

这段源码说明当你没有向集合中添加任何元素时,集合容量为0。那么默认的10个容量怎么来的呢?

这就得看看add方法的源码了:

1
2
3
4
5
public boolean add(E e) {
ensureCapacityInternal(size + 1); // Increments modCount!!
elementData[size++] = e;
return true;
}

假设你new了一个数组,当前容量为0,size当然也为0。这时调用add方法进入到ensureCapacityInternal(size + 1);该方法源码如下:

1
2
3
private void ensureCapacityInternal(int minCapacity) {
ensureExplicitCapacity(calculateCapacity(elementData, minCapacity));
}

该方法中的参数minCapacity传入的值为size+1也就是 1,接着我们再进入到calculateCapacity(elementData, minCapacity)里面:

1
2
3
4
5
6
private static int calculateCapacity(Object[] elementData, int minCapacity) {
if (elementData == DEFAULTCAPACITY_EMPTY_ELEMENTDATA) {
return Math.max(DEFAULT_CAPACITY, minCapacity);
}
return minCapacity;
}

上文说过,elementData就是存放元素的数组,当前容量为0,if条件成立,返回默认容量DEFAULT_CAPACITY也就是10。这个值作为参数又传入ensureExplicitCapacity()方法中,进入该方法查看源码:

1
2
3
4
5
6
private void ensureExplicitCapacity(int minCapacity) {
modCount++;
// overflow-conscious code
if (minCapacity - elementData.length > 0)
grow(minCapacity);
}

我们先不要管modCount这个变量。

因为elementData数组长度为0,所以if条件成立,调用grow方法,重要的部分来了,我们再次进入到grow方法的源码中:

1
2
3
4
5
6
7
8
9
10
11
private void grow(int minCapacity) {
// overflow-conscious code
int oldCapacity = elementData.length;
int newCapacity = oldCapacity + (oldCapacity >> 1);
if (newCapacity - minCapacity < 0)
newCapacity = minCapacity;
if (newCapacity - MAX_ARRAY_SIZE > 0)
newCapacity = hugeCapacity(minCapacity);
// minCapacity is usually close to size, so this is a win:
elementData = Arrays.copyOf(elementData, newCapacity);
}

这个方法先声明了一个oldCapacity变量将数组长度赋给它,其值为0;又声明了一个newCapacity变量其值为oldCapacity+一个增量,可以发现这个增量是和原数组长度有关的量,当然在这里也为0。第一个if条件满足,newCapacity的值为10(这就是默认的容量,不理解的话再看看前面)。第二个if条件不成立,也可以不用注意,因为MAX_ARRAY_SIZE的定义如下:

1
private static final int MAX_ARRAY_SIZE = Integer.MAX_VALUE - 8;

这个值太大了以至于第二个if条件没有了解的必要。

最后一句话就是为elementData数组赋予了新的长度,Arrays.copyOf()方法返回的数组是新的数组对象,原数组对象不会改变,该拷贝不会影响原来的数组。copyOf()的第二个自变量指定要建立的新数组长度,如果新数组的长度超过原数组的长度,则保留数组默认值。

这时候再回到add的方法中,接着就向下执行elementData[size++] = e;到这里为止关于ArrayList就讲解得差不多了,当数组长度为10的时候你们可以试着过一下源码,查一下每次的增量是多少(答案是每次扩容为原来的1.5倍)。

Vector
  • 数组结构实现,查询快、增删慢;
  • JDK1.0版本,运行效率慢、线程安全。
1
2
3
4
5
6
7
8
9
10
11
12
13
14
15
16
17
18
19
20
21
22
23
24
25
26
27
28
29
30
31
32
33
34
/**
* Vector的演示使用
*
*1.添加数据
*2.删除数据
*3.遍历
*4.判断
*/
public class Demo1 {
public static void main(String[] args) {
Vector vector=new Vector<>();
//1.添加数据
vector.add("tang");
vector.add("he");
vector.add("yu");
System.out.println("元素个数:"+vector.size());
//2.删除数据
/*
* vector.remove(0); vector.remove("tang");
*/
//3.遍历
//使用枚举器
Enumeration enumeration=vector.elements();
while (enumeration.hasMoreElements()) {
String s = (String) enumeration.nextElement();
System.out.println(s);
}
//4.判断
System.out.println(vector.isEmpty());
System.out.println(vector.contains("he"));
//5. Vector其他方法
//firstElement() lastElement() ElementAt();
}
}
LinkedList
  • 链表结构实现,增删快,查询慢。
1
2
3
4
5
6
7
8
9
10
11
12
13
14
15
16
17
18
19
20
21
22
23
24
25
26
27
28
29
30
31
32
33
34
35
36
37
38
39
40
41
42
43
44
45
46
47
48
49
/**
* LinkedList的用法
* 存储结构:双向链表
* 1.添加元素
* 2.删除元素
* 3.遍历
* 4.判断
*/
public class Demo2 {
public static void main(String[] args) {
LinkedList linkedList=new LinkedList<>();
Student s1=new Student("唐", 21);
Student s2=new Student("何", 22);
Student s3=new Student("余", 21);
//1.添加元素
linkedList.add(s1);
linkedList.add(s2);
linkedList.add(s3);
linkedList.add(s3);
System.out.println("元素个数:"+linkedList.size());
System.out.println(linkedList.toString());
//2.删除元素
/*
* linkedList.remove(new Student("唐", 21));
* System.out.println(linkedList.toString());
*/
//3.遍历
//3.1 使用for
for(int i=0;i<linkedList.size();++i) {
System.out.println(linkedList.get(i));
}
//3.2 使用增强for
for(Object object:linkedList) {
Student student=(Student) object;
System.out.println(student.toString());
}
//3.3 使用迭代器
Iterator iterator =linkedList.iterator();
while (iterator.hasNext()) {
Student student = (Student) iterator.next();
System.out.println(student.toString());
}
//3.4 使用列表迭代器(略)
//4. 判断
System.out.println(linkedList.contains(s1));
System.out.println(linkedList.isEmpty());
System.out.println(linkedList.indexOf(s3));
}
}
LinkedList源码分析

LinkedList首先有三个属性:

  • 链表大小:transient int size = 0;
  • (指向)第一个结点/头结点: transient Node<E> first;
  • (指向)最后一个结点/尾结点:transient Node<E> last;

关于Node类型我们再进入到类里看看:

1
2
3
4
5
6
7
8
9
10
11
private static class Node<E> {
E item;
Node<E> next;
Node<E> prev;

Node(Node<E> prev, E element, Node<E> next) {
this.item = element;
this.next = next;
this.prev = prev;
}
}

首先item存放的是实际数据;next指向下一个结点而prev指向上一个结点。

Node带参构造方法的三个参数分别是前一个结点、存储的数据、后一个结点,调用这个构造方法时将它们赋值给当前对象。

LinkedList是如何添加元素的呢?先看看add方法:

1
2
3
4
public boolean add(E e) {
linkLast(e);
return true;
}

进入到linkLast方法:

1
2
3
4
5
6
7
8
9
10
11
void linkLast(E e) {
final Node<E> l = last;
final Node<E> newNode = new Node<>(l, e, null);
last = newNode;
if (l == null)
first = newNode;
else
l.next = newNode;
size++;
modCount++;
}

假设刚开始new了一个LinkedList对象,first和last属性都为空,调用add进入到linkLast方法。

首先创建一个Node变量 l 将last(此时为空)赋给它,然后new一个newNode变量存储数据,并且它的前驱指向l,后继指向null;再把last指向newNode。如下图所示:

如果满足if条件,说明这是添加的第一个结点,将first指向newNode:

至此,LinkedList对象的第一个数据添加完毕。假设需要再添加一个数据,我们可以再来走一遍,过程同上不再赘述,图示如下:

ArrayList和LinkedList区别
  • ArrayList:必须开辟连续空间,查询快,增删慢。
  • LinkedList:无需开辟连续空间,查询慢,增删快。

泛型概述

  • Java泛型是JDK1.5中引入的一个新特性,其本质是参数化类型,把类型作为参数传递。
  • 常见形式有泛型类、泛型接口、泛型方法。
  • 语法:
    • <T,…> T称为类型占位符,表示一种引用类型。
  • 好处:
    • 提高代码的重用性。
    • 防止类型转换异常,提高代码的安全性。
泛型类
1
2
3
4
5
6
7
8
9
10
11
12
13
14
15
16
17
18
19
/**
* 泛型类
* 语法:类名<T>
* T是类型占位符,表示一种引用类型,编写多个使用逗号隔开
*
*/
public class myGeneric<T>{
//1.创建泛型变量
//不能使用new来创建,因为泛型是不确定的类型,也可能拥有私密的构造方法。
T t;
//2.泛型作为方法的参数
public void show(T t) {
System.out.println(t);
}
//泛型作为方法的返回值
public T getT() {
return t;
}
}
1
2
3
4
5
6
7
8
9
10
11
12
13
14
15
16
17
18
/**
* 注意:
* 1.泛型只能使用引用类型
* 2.不同泛型类型的对象不能相互赋值
*/
public class testGeneric {
public static void main(String[] args) {
//使用泛型类创建对象
myGeneric<String> myGeneric1=new myGeneric<String>();
myGeneric1.t="tang";
myGeneric1.show("he");

myGeneric<Integer> myGeneric2=new myGeneric<Integer>();
myGeneric2.t=10;
myGeneric2.show(20);
Integer integer=myGeneric2.getT();
}
}
泛型接口
1
2
3
4
5
6
7
8
9
10
11
/**
* 泛型接口
* 语法:接口名<T>
* 注意:不能创建泛型静态常量
*/
public interface MyInterface<T> {
//创建常量
String nameString="tang";

T server(T t);
}
1
2
3
4
5
6
7
8
9
10
/**
* 实现接口时确定泛型类
*/
public class MyInterfaceImpl implements MyInterface<String>{
@Override
public String server(String t) {
System.out.println(t);
return t;
}
}
1
2
3
4
//测试
MyInterfaceImpl myInterfaceImpl=new MyInterfaceImpl();
myInterfaceImpl.server("xxx");
//xxx
1
2
3
4
5
6
7
8
9
10
/**
* 实现接口时不确定泛型类
*/
public class MyInterfaceImpl2<T> implements MyInterface<T>{
@Override
public T server(T t) {
System.out.println(t);
return t;
}
}
1
2
3
4
//测试
MyInterfaceImpl2<Integer> myInterfaceImpl2=new MyInterfaceImpl2<Integer>();
myInterfaceImpl2.server(2000);
//2000
泛型方法
1
2
3
4
5
6
7
8
9
/**
* 泛型方法
* 语法:<T> 返回类型
*/
public class MyGenericMethod {
public <T> void show(T t) {
System.out.println("泛型方法"+t);
}
}
1
2
3
4
5
//测试
MyGenericMethod myGenericMethod=new MyGenericMethod();
myGenericMethod.show("tang");
myGenericMethod.show(200);
myGenericMethod.show(3.14);
泛型集合
  • 概念:参数化类型、类型安全的集合,强制集合元素的类型必须一致。
  • 特点
    • 编译时即可检查,而非运行时抛出异常。
    • 访问时,不必类型转换(拆箱)。
    • 不同泛型指尖引用不能相互赋值,泛型不存在多态。

之前我们在创建LinkedList类型对象的时候并没有使用泛型,但是进到它的源码中会发现:

1
2
3
public class LinkedList<E>
extends AbstractSequentialList<E>
implements List<E>, Deque<E>, Cloneable, java.io.Serializable{//略}

它是一个泛型类,而我之前使用的时候并没有传递,说明java语法是允许的,这个时候传递的类型是Object类,虽然它是所有类的父类,可以存储任意的类型,但是在遍历、获取元素时需要原来的类型就要进行强制转换。这个时候就会出现一些问题,假如往链表里存储了许多不同类型的数据,在强转的时候就要判断每一个原来的类型,这样就很容易出现错误。

Set集合概述

Set子接口
  • 特点:无序、无下标、元素不可重复。
  • 方法:全部继承自Collection中的方法。
1
2
3
4
5
6
7
8
9
10
11
12
13
14
15
16
17
18
19
20
21
22
23
24
25
26
27
28
29
30
31
32
33
34
35
36
/**
* 测试Set接口的使用
* 特点:1.无序,没有下标;2.重复
* 1.添加数据
* 2.删除数据
* 3.遍历【重点】
* 4.判断
*/
public class Demo1 {
public static void main(String[] args) {
Set<String> set=new HashSet<String>();
//1.添加数据
set.add("tang");
set.add("he");
set.add("yu");
System.out.println("数据个数:"+set.size());
System.out.println(set.toString());//无序输出
//2.删除数据
/*
* set.remove("tang"); System.out.println(set.toString());
*/
//3.遍历【重点】
//3.1 使用增强for
for (String string : set) {
System.out.println(string);
}
//3.2 使用迭代器
Iterator<String> iterator=set.iterator();
while (iterator.hasNext()) {
System.out.println(iterator.next());
}
//4.判断
System.out.println(set.contains("tang"));
System.out.println(set.isEmpty());
}
}

Set实现类

HashSet【重点】
  • 基于HashCode计算元素存放位置。
  • 当存入元素的哈希码相同时,会调用equals进行确认,如结果为true,则拒绝后者存入。
1
2
3
4
5
6
7
8
9
10
11
12
13
14
15
16
17
18
19
20
21
22
23
24
25
26
27
/**
* 人类
*/
public class Person {
private String name;
private int age;
public Person(String name,int age) {
this.name = name;
this.age = age;
}
public String getName() {
return name;
}
public void setName(String name) {
this.name = name;
}
public int getAge() {
return age;
}
public void setAge(int age) {
this.age = age;
}
@Override
public String toString() {
return "Peerson [name=" + name + ", age=" + age + "]";
}
}
1
2
3
4
5
6
7
8
9
10
11
12
13
14
15
16
17
18
19
20
21
22
23
24
25
26
27
28
29
30
31
32
33
34
35
36
37
38
39
40
41
42
43
/**
* HashSet集合的使用
* 存储结构:哈希表(数组+链表+红黑树)
* 1.添加元素
* 2.删除元素
* 3.遍历
* 4.判断
*/
public class Demo3 {
public static void main(String[] args) {
HashSet<Person> hashSet=new HashSet<>();
Person p1=new Person("tang",21);
Person p2=new Person("he", 22);
Person p3=new Person("yu", 21);
//1.添加元素
hashSet.add(p1);
hashSet.add(p2);
hashSet.add(p3);
//重复,添加失败
hashSet.add(p3);
//直接new一个相同属性的对象,依然会被添加,不难理解。
//假如相同属性便认为是同一个对象,怎么修改?
hashSet.add(new Person("yu", 21));
System.out.println(hashSet.toString());
//2.删除元素
hashSet.remove(p2);
//3.遍历
//3.1 增强for
for (Person person : hashSet) {
System.out.println(person);
}
//3.2 迭代器
Iterator<Person> iterator=hashSet.iterator();
while (iterator.hasNext()) {
System.out.println(iterator.next());
}
//4.判断
System.out.println(hashSet.isEmpty());
//直接new一个相同属性的对象结果输出是false,不难理解。
//注:假如相同属性便认为是同一个对象,该怎么做?
System.out.println(hashSet.contains(new Person("tang", 21)));
}
}

:hashSet存储过程:

  1. 根据hashCode计算保存的位置,如果位置为空,则直接保存,否则执行第二步。
  2. 执行equals方法,如果方法返回true,则认为是重复,拒绝存储,否则形成链表。

存储过程实际上就是重复依据,要实现“注”里的问题,可以重写hashCode和equals代码:

1
2
3
4
5
6
7
8
9
10
11
12
13
14
15
16
17
18
19
20
21
22
23
24
25
26
@Override
public int hashCode() {
final int prime = 31;
int result = 1;
result = prime * result + age;
result = prime * result + ((name == null) ? 0 : name.hashCode());
return result;
}
@Override
public boolean equals(Object obj) {
if (this == obj)
return true;
if (obj == null)
return false;
if (getClass() != obj.getClass())
return false;
Person other = (Person) obj;
if (age != other.age)
return false;
if (name == null) {
if (other.name != null)
return false;
} else if (!name.equals(other.name))
return false;
return true;
}

hashCode方法里为什么要使用31这个数字大概有两个原因:

  1. 31是一个质数,这样的数字在计算时可以尽量减少散列冲突。
  2. 可以提高执行效率,因为31*i=(i<\5)-i,31乘以一个数可以转换成移位操作,这样能快一点;但是也有网上一些人对这两点提出质疑。
TreeSet
  • 基于排序顺序实现不重复。
  • 实现了SortedSet接口,对集合元素自动排序。
  • 元素对象的类型必须实现Comparable接口,指定排序规则。
  • 通过CompareTo方法确定是否为重复元素。
1
2
3
4
5
6
7
8
9
10
11
12
13
14
15
16
17
18
19
20
21
22
23
24
25
26
/**
* 使用TreeSet保存数据
* 存储结构:红黑树
* 要求:元素类必须实现Comparable接口,compareTo方法返回0,认为是重复元素
*/
public class Demo4 {
public static void main(String[] args) {
TreeSet<Person> persons=new TreeSet<Person>();
Person p1=new Person("tang",21);
Person p2=new Person("he", 22);
Person p3=new Person("yu", 21);
//1.添加元素
persons.add(p1);
persons.add(p2);
persons.add(p3);
//注:直接添加会报类型转换错误,需要实现Comparable接口
System.out.println(persons.toString());
//2.删除元素
persons.remove(p1);
persons.remove(new Person("he", 22));
System.out.println(persons.toString());
//3.遍历(略)
//4.判断
System.out.println(persons.contains(new Person("yu", 21)));
}
}

查看Comparable接口的源码,发现只有一个compareTo抽象方法,在人类中实现它:

1
2
3
4
5
6
7
8
9
10
public class Person implements Comparable<Person>{
@Override
//1.先按姓名比
//2.再按年龄比
public int compareTo(Person o) {
int n1=this.getName().compareTo(o.getName());
int n2=this.age-o.getAge();
return n1==0?n2:n1;
}
}

除了实现Comparable接口里的比较方法,TreeSet也提供了一个带比较器Comparator的构造方法,使用匿名内部类来实现它:

1
2
3
4
5
6
7
8
9
10
11
12
13
14
15
16
17
18
19
20
21
22
23
24
25
/**
* TreeSet的使用
* Comparator:实现定制比较(比较器)
*/
public class Demo5 {
public static void main(String[] args) {
TreeSet<Person> persons=new TreeSet<Person>(new Comparator<Person>() {
@Override
public int compare(Person o1, Person o2) {
// 先按年龄比较
// 再按姓名比较
int n1=o1.getAge()-o2.getAge();
int n2=o1.getName().compareTo(o2.getName());
return n1==0?n2:n1;
}
});
Person p1=new Person("tang",21);
Person p2=new Person("he", 22);
Person p3=new Person("yu", 21);
persons.add(p1);
persons.add(p2);
persons.add(p3);
System.out.println(persons.toString());
}
}

接下来我们来做一个小案例:

1
2
3
4
5
6
7
8
9
10
11
12
13
14
15
16
17
18
19
20
21
22
23
24
25
26
/**
* 要求:使用TreeSet集合实现字符串按照长度进行排序
* helloworld tangrui hechengyang wangzixu yuguoming
* Comparator接口实现定制比较
*/
public class Demo6 {
public static void main(String[] args) {
TreeSet<String> treeSet=new TreeSet<String>(new Comparator<String>() {
@Override
//先比较字符串长度
//再比较字符串
public int compare(String o1, String o2) {
int n1=o1.length()-o2.length();
int n2=o1.compareTo(o2);
return n1==0?n2:n1;
}
});
treeSet.add("helloworld");
treeSet.add("tangrui");
treeSet.add("hechenyang");
treeSet.add("yuguoming");
treeSet.add("wangzixu");
System.out.println(treeSet.toString());
//输出[tangrui, wangzixu, yuguoming, hechenyang, helloworld]
}
}

Map体系集合

  • Map接口的特点:

    1. 用于存储任意键值对(Key-Value)。
    2. 键:无序、无下标、不允许重复(唯一)。
    3. 值:无序、无下标、允许重复。

Map集合概述

  • 特点:存储一对数据(Key-Value),无序、无下标,键不可重复。
  • 方法
    • V put(K key,V value)//将对象存入到集合中,关联键值。key重复则覆盖原值。
    • Object get(Object key)//根据键获取相应的值。
    • keySet<K>//返回所有的key
    • Collection<V> values()//返回包含所有值的Collection集合。
    • Set<Map.Entry<K,V>>//键值匹配的set集合
1
2
3
4
5
6
7
8
9
10
11
12
13
14
15
16
17
18
19
20
21
22
23
24
25
26
/**
* Map接口的使用
* 特点:1.存储键值对 2.键不能重复,值可以重复 3.无序
*/
public class Demo1 {
public static void main(String[] args) {
Map<String,Integer> map=new HashMap<String, Integer>();
//1.添加元素
map.put("tang", 21);
map.put("he", 22);
map.put("fan", 23);
System.out.println(map.toString());
//2.删除元素
map.remove("he");
System.out.println(map.toString());
//3.遍历
//3.1 使用keySet();
for (String key : map.keySet()) {
System.out.println(key+" "+map.get(key));
}
//3.2 使用entrySet();效率较高
for (Map.Entry<String, Integer> entry : map.entrySet()) {
System.out.println(entry.getKey()+" "+entry.getValue());
}
}
}

Map集合的实现类

HashMap【重点】

  • JDK1.2版本,线程不安全,运行效率快;允许用null作为key或是value。
1
2
3
4
5
6
7
8
9
10
11
12
13
14
15
16
17
18
19
20
21
22
23
24
25
26
27
28
/**
* 学生类
*/
public class Student {
private String name;
private int id;
public Student(String name, int id) {
super();
this.name = name;
this.id = id;
}
public String getName() {
return name;
}
public void setName(String name) {
this.name = name;
}
public int getId() {
return id;
}
public void setId(int id) {
this.id = id;
}
@Override
public String toString() {
return "Student [name=" + name + ", age=" + id + "]";
}
}
1
2
3
4
5
6
7
8
9
10
11
12
13
14
15
16
17
18
19
20
21
22
23
24
25
26
27
28
29
30
31
32
33
34
35
36
37
38
/**
* HashMap的使用
* 存储结构:哈希表(数组+链表+红黑树)
*/
public class Demo2 {
public static void main(String[] args) {
HashMap<Student, String> hashMap=new HashMap<Student, String>();
Student s1=new Student("tang", 36);
Student s2=new Student("yu", 101);
Student s3=new Student("he", 10);
//1.添加元素
hashMap.put(s1, "成都");
hashMap.put(s2, "杭州");
hashMap.put(s3, "郑州");
//添加失败,但会更新值
hashMap.put(s3,"上海");
//添加成功,不过两个属性一模一样;
//注:假如相同属性便认为是同一个对象,怎么修改?
hashMap.put(new Student("he", 10),"上海");
System.out.println(hashMap.toString());
//2.删除元素
hashMap.remove(s3);
System.out.println(hashMap.toString());
//3.遍历
//3.1 使用keySet()遍历
for (Student key : hashMap.keySet()) {
System.out.println(key+" "+hashMap.get(key));
}
//3.2 使用entrySet()遍历
for (Entry<Student, String> entry : hashMap.entrySet()) {
System.out.println(entry.getKey()+" "+entry.getValue());
}
//4.判断
//注:同上
System.out.println(hashMap.containsKey(new Student("he", 10)));
System.out.println(hashMap.containsValue("成都"));
}
}

注:和之前说过的HashSet类似,重复依据是hashCode和equals方法,重写即可:

1
2
3
4
5
6
7
8
9
10
11
12
13
14
15
16
17
18
19
20
21
22
23
24
25
26
@Override
public int hashCode() {
final int prime = 31;
int result = 1;
result = prime * result + id;
result = prime * result + ((name == null) ? 0 : name.hashCode());
return result;
}
@Override
public boolean equals(Object obj) {
if (this == obj)
return true;
if (obj == null)
return false;
if (getClass() != obj.getClass())
return false;
Student other = (Student) obj;
if (id != other.id)
return false;
if (name == null) {
if (other.name != null)
return false;
} else if (!name.equals(other.name))
return false;
return true;
}

HashMap源码分析

  • 默认初始化容量:static final int DEFAULT_INITIAL_CAPACITY = 1 << 4; // aka 16
  • 数组最大容量:static final int MAXIMUM_CAPACITY = 1 << 30;
  • 默认加载因子:static final float DEFAULT_LOAD_FACTOR = 0.75f;
  • 链表调整为红黑树的链表长度阈值(JDK1.8):static final int TREEIFY_THRESHOLD = 8;
  • 红黑树调整为链表的链表长度阈值(JDK1.8):static final int UNTREEIFY_THRESHOLD = 6;
  • 链表调整为红黑树的数组最小阈值(JDK1.8):static final int MIN_TREEIFY_CAPACITY = 64;
  • HashMap存储的数组:transient Node<K,V>[] table;
  • HashMap存储的元素个数:transient int size;
  1. 默认加载因子是什么?

    • 就是判断数组是否扩容的一个因子。假如数组容量为100,如果HashMap的存储元素个数超过了100*0.75=75,那么就会进行扩容。
  2. 链表调整为红黑树的链表长度阈值是什么?

    • 假设在数组中下标为3的位置已经存储了数据,当新增数据时通过哈希码得到的存储位置又是3,那么就会在该位置形成一个链表,当链表过长时就会转换成红黑树以提高执行效率,这个阈值就是链表转换成红黑树的最短链表长度;
  3. 红黑树调整为链表的链表长度阈值是什么?

    • 当红黑树的元素个数小于该阈值时就会转换成链表。
  4. 链表调整为红黑树的数组最小阈值是什么?

    • 并不是只要链表长度大于8就可以转换成红黑树,在前者条件成立的情况下,数组的容量必须大于等于64才会进行转换。

    HashMap的数组table存储的就是一个个的Node<K,V>类型,很清晰地看到有一对键值,还有一个指向next的指针(以下只截取了部分源码):

1
2
3
4
5
static class Node<K,V> implements Map.Entry<K,V> {
final K key;
V value;
Node<K,V> next;
}

之前的代码中在new对象时调用的是HashMap的无参构造方法,进入到该构造方法的源码查看一下:

1
2
3
public HashMap() {
this.loadFactor = DEFAULT_LOAD_FACTOR; // all other fields defaulted
}

发现没什么内容,只是赋值了一个默认加载因子;而在上文我们观察到源码中table和size都没有赋予初始值,说明刚创建的HashMap对象没有分配容量,并不拥有默认的16个空间大小,这样做的目的是为了节约空间,此时table为null,size为0。

当我们往对象里添加元素时调用put方法:

1
2
3
public V put(K key, V value) {
return putVal(hash(key), key, value, false, true);
}

put方法把key和value传给了putVal,同时还传入了一个hash(Key)所返回的值,这是一个产生哈希值的方法,再进入到putVal方法(部分源码):

1
2
3
4
5
6
7
8
9
10
final V putVal(int hash, K key, V value, boolean onlyIfAbsent, boolean evict) {
Node<K,V>[] tab; Node<K,V> p; int n, i;
if ((tab = table) == null || (n = tab.length) == 0)
n = (tab = resize()).length;
if ((p = tab[i = (n - 1) & hash]) == null)
tab[i] = newNode(hash, key, value, null);
else{
//略
}
}

这里面创建了一个tab数组和一个Node变量p,第一个if实际是判断table是否为空,而我们现在只关注刚创建HashMap对象时的状态,此时tab和table都为空,满足条件,执行内部代码,这条代码其实就是把resize()所返回的结果赋给tab,n就是tab的长度,resize顾名思义就是重新调整大小。查看resize()源码(部分):

1
2
3
4
5
6
7
8
9
10
11
12
13
14
15
final Node<K,V>[] resize() {
Node<K,V>[] oldTab = table;
int oldCap = (oldTab == null) ? 0 : oldTab.length;
int oldThr = threshold;
if (oldCap > 0);
else if (oldThr > 0);
else { // zero initial threshold signifies using defaults
newCap = DEFAULT_INITIAL_CAPACITY;
newThr = (int)(DEFAULT_LOAD_FACTOR * DEFAULT_INITIAL_CAPACITY);
}
@SuppressWarnings({"rawtypes","unchecked"})
Node<K,V>[] newTab = (Node<K,V>[])new Node[newCap];
table = newTab;
return newTab;
}

该方法首先把table及其长度赋值给oldTab和oldCap;threshold是阈值的意思,此时为0,所以前两个if先不管,最后else里newCap的值为默认初始化容量16;往下创建了一个newCap大小的数组并将其赋给了table,刚创建的HashMap对象就在这里获得了初始容量。然后我们再回到putVal方法,第二个if就是根据哈希码得到的tab中的一个位置是否为空,为空便直接添加元素,此时数组中无元素所以直接添加。至此HashMap对象就完成了第一个元素的添加。当添加的元素超过16*0.75=12时,就会进行扩容:

1
2
3
4
final V putVal(int hash, K key, V value, boolean onlyIfAbsent,boolean evict){
if (++size > threshold)
resize();
}

扩容的代码如下(部分):

1
2
3
4
5
6
7
8
final Node<K,V>[] resize() {
int oldCap = (oldTab == null) ? 0 : oldTab.length;
int newCap;
if (oldCap > 0) {
if (oldCap >= MAXIMUM_CAPACITY) {//略}
else if ((newCap = oldCap << 1) < MAXIMUM_CAPACITY && oldCap >= DEFAULT_INITIAL_CAPACITY)
}
}

核心部分是else if里的移位操作,也就是说每次扩容都是原来大小的两倍

  • :额外说明的一点是在JDK1.8以前链表是头插入,JDK1.8以后链表是尾插入。

HashSet源码分析

了解完HashMap之后,再回过头来看之前的HashSet源码,为什么放在后面写你们看一下源码就知道了(部分):

1
2
3
4
5
6
7
8
public class HashSet<E> extends AbstractSet<E> implements Set<E>, Cloneable, java.io.Serializable
{
private transient HashMap<E,Object> map;
private static final Object PRESENT = new Object();
public HashSet() {
map = new HashMap<>();
}
}

可以看见HashSet的存储结构就是HashMap,那它的存储方式是怎样的呢?可以看一下add方法:

1
public boolean add(E e) { return map.put(e, PRESENT)==null; }

很明了地发现它的add方法调用的就是map的put方法,把元素作为map的key传进去的。。

Hashtable

  • JDK1.0版本,线程安全,运行效率慢;不允许null作为key或是value。

  • 初始容量11,加载因子0.75。

    这个集合在开发过程中已经不用了,稍微了解即可。

Properties

  • Hashtable的子类,要求key和value都是String。通常用于配置文件的读取。

它继承了Hashtable的方法,与流关系密切,此处不详解。

TreeMap

  • 实现了SortedMap接口(是Map的子接口),可以对key自动排序。
1
2
3
4
5
6
7
8
9
10
11
12
13
14
15
16
17
18
19
20
21
22
23
24
25
26
27
28
29
30
31
32
33
/**
* TreeMap的使用
* 存储结构:红黑树
*/
public class Demo3 {
public static void main(String[] args) {
TreeMap<Student, Integer> treeMap=new TreeMap<Student, Integer>();
Student s1=new Student("tang", 36);
Student s2=new Student("yu", 101);
Student s3=new Student("he", 10);
//1.添加元素
treeMap.put(s1, 21);
treeMap.put(s2, 22);
treeMap.put(s3, 21);
//不能直接打印,需要实现Comparable接口,因为红黑树需要比较大小
System.out.println(treeMap.toString());
//2.删除元素
treeMap.remove(new Student("he", 10));
System.out.println(treeMap.toString());
//3.遍历
//3.1 使用keySet()
for (Student key : treeMap.keySet()) {
System.out.println(key+" "+treeMap.get(key));
}
//3.2 使用entrySet()
for (Entry<Student, Integer> entry : treeMap.entrySet()) {
System.out.println(entry.getKey()+" "+entry.getValue());
}
//4.判断
System.out.println(treeMap.containsKey(s1));
System.out.println(treeMap.isEmpty());
}
}

在学生类中实现Comparable接口:

1
2
3
4
5
6
public class Student implements Comparable<Student>{
@Override
public int compareTo(Student o) {
int n1=this.id-o.id;
return n1;
}

除此之外还可以使用比较器来定制比较:

1
2
3
4
5
6
7
TreeMap<Student, Integer> treeMap2=new TreeMap<Student, Integer>(new Comparator<Student>() {
@Override
public int compare(Student o1, Student o2) {
// 略
return 0;
}
});

TreeSet源码

和HashSet类似,放在TreeMap之后讲便一目了然(部分):

1
2
3
4
5
6
7
8
9
10
11
12
public class TreeSet<E> extends AbstractSet<E>
implements NavigableSet<E>, Cloneable, java.io.Serializable
{
private transient NavigableMap<E,Object> m;
private static final Object PRESENT = new Object();
TreeSet(NavigableMap<E,Object> m) {
this.m = m;
}
public TreeSet() {
this(new TreeMap<E,Object>());
}
}

TreeSet的存储结构实际上就是TreeMap,再来看其存储方式:

1
public boolean add(E e) { return m.put(e, PRESENT)==null; }

它的add方法调用的就是TreeMap的put方法,将元素作为key传入到存储结构中。

Collections工具类

  • 概念:集合工具类,定义了除了存取以外的集合常用方法。
  • 方法
    • public static void reverse(List<?> list)//反转集合中元素的顺序
    • public static void shuffle(List<?> list)//随机重置集合元素的顺序
    • public static void sort(List<T> list)//升序排序(元素类型必须实现Comparable接口)
1
2
3
4
5
6
7
8
9
10
11
12
13
14
15
16
17
18
19
20
21
22
23
24
25
26
27
28
29
30
31
32
33
34
35
36
37
38
39
40
41
42
43
44
45
46
47
48
49
50
51
52
/**
* 演示Collections工具类的使用
*
*/
public class Demo4 {
public static void main(String[] args) {
List<Integer> list=new ArrayList<Integer>();
list.add(20);
list.add(10);
list.add(30);
list.add(90);
list.add(70);

//sort排序
System.out.println(list.toString());
Collections.sort(list);
System.out.println(list.toString());
System.out.println("---------");

//binarySearch二分查找
int i=Collections.binarySearch(list, 10);
System.out.println(i);

//copy复制
List<Integer> list2=new ArrayList<Integer>();
for(int i1=0;i1<5;++i1) {
list2.add(0);
}
//该方法要求目标元素容量大于等于源目标
Collections.copy(list2, list);
System.out.println(list2.toString());

//reserve反转
Collections.reverse(list2);
System.out.println(list2.toString());

//shuffle 打乱
Collections.shuffle(list2);
System.out.println(list2.toString());

//补充:list转成数组
Integer[] arr=list.toArray(new Integer[0]);
System.out.println(arr.length);
//补充:数组转成集合
String[] nameStrings= {"tang","he","yu"};
//受限集合,不能添加和删除
List<String> list3=Arrays.asList(nameStrings);
System.out.println(list3);

//注:基本类型转成集合时需要修改为包装类
}
}

java学习3_如何重写对象的equals方法和hashCode方法

Source

前言:Java 对象如果要比较是否相等,则需要重写 equals 方法,同时重写 hashCode 方法,而且 hashCode 方法里面使用质数 31。接下来看看各种为什么。

一、需求:

对比两个对象是否相等。对于下面的 User 对象,只需姓名和年龄相等则认为是同一个对象。

二、解决方案:

需要重写对象的 equals 方法和 hashCode 方法

1
2
3
4
5
6
7
8
9
10
11
12
13
14
15
16
17
18
19
20
21
22
23
24
25
26
27
28
29
30
31
32
33
34
35
36
37
38
39
40
41
42
43
44
45
46
47
48
49
50
51
52
53
54
55
56
57
58
59
60
61
62
63
64
65
66
67
68
69
package com.yule.user.entity;
import org.springframework.util.StringUtils;

/**
* 用户实体
*
* @author yule
* @date 2018/8/6 21:51
*/
public class User {
private String id;
private String name;
private String age;

public User(){ }

public User(String id, String name, String age){
this.id = id;
this.name = name;
this.age = age;
}

public String getId() { return id; }
public void setId(String id) { this.id = id; }
public String getName() { return name; }
public void setName(String name) { this.name = name; }
public String getAge() { return age; }
public void setAge(String age) { this.age = age; }

@Override
public String toString() { return this.id + " " + this.name + " " + this.age; }

@Override
public boolean equals(Object obj) {
if(this == obj){ return true; }//地址相等

if(obj == null){
return false;//非空性:对于任意非空引用x,x.equals(null)应该返回false。
}

if(obj instanceof User){
User other = (User) obj;
//需要比较的字段相等,则这两个对象相等
if(equalsStr(this.name, other.name) && equalsStr(this.age, other.age)){
return true;
}
}

return false;
}

private boolean equalsStr(String str1, String str2){
if(StringUtils.isEmpty(str1) && StringUtils.isEmpty(str2)){
return true;
}
if(!StringUtils.isEmpty(str1) && str1.equals(str2)){
return true;
}
return false;
}

@Override
public int hashCode() {
int result = 17;
result = 31 * result + (name == null ? 0 : name.hashCode());
result = 31 * result + (age == null ? 0 : age.hashCode());
return result;
}
}

三、测试

1、创建两个对象,名字和年龄相等则对象 equals 为 true。

1
2
3
4
5
6
@Test
public void testEqualsObj(){
User user1 = new User("1", "xiaohua", "14");
User user2 = new User("2", "xiaohua", "14");
System.out.println((user1.equals(user2)));//打印为 true
}

四、为什么要重写 equals 方法

因为不重写 equals 方法,执行 user1.equals(user2) 比较的就是两个对象的地址(即 user1 == user2),肯定是不相等的,见 Object 源码:

1
public boolean equals(Object obj) { return (this == obj); }

五、为什么要重写 hashCode 方法

既然比较两个对象是否相等,使用的是 equals 方法,那么只要重写了 equals 方法就好了,干嘛又要重写 hashCode 方法呢?

其实当 equals 方法被重写时,通常有必要重写 hashCode 方法,以维护 hashCode 方法的常规协定,该协定声明相等对象必须具有相等的哈希码。那这又是为什么呢?看看下面这个例子就懂了。

User 对象的 hashCode 方法如下,没有重写父类的 hashCode 方法

1
2
@Override
public int hashCode() { return super.hashCode(); }

使用 hashSet

1
2
3
4
5
6
7
8
9
10
11
@Test
public void testHashCodeObj(){
User user1 = new User("1", "xiaohua", "14");
User user2 = new User("2", "xiaohua", "14");
Set<User> userSet = new HashSet<>();
userSet.add(user1);
userSet.add(user2);
System.out.println(user1.equals(user2));
System.out.println(user1.hashCode() == user2.hashCode());
System.out.println(userSet);
}

结果

显然,这不是我们要的结果,我们是希望两个对象如果相等,那么在使用 hashSet 存储时也能认为这两个对象相等。

通过看 hashSet 的 add 方法能够得知 add 方法里面使用了对象的 hashCode 方法来判断,所以我们需要重写 hashCode 方法来达到我们想要的效果。

将 hashCode 方法重写后,执行上面结果为

1
2
3
4
5
6
7
@Override
public int hashCode() {
int result = 17;
result = 31 * result + (name == null ? 0 : name.hashCode());
result = 31 * result + (age == null ? 0 : age.hashCode());
return result;
}
1
2
3
true
true
[1 xiaohua 14]

所以:hashCode 是用于散列数据的快速存取,如利用 HashSet/HashMap/Hashtable 类来存储数据时,都会根据存储对象的 hashCode 值来进行判断是否相同的。

六、如何重写 hashCode

生成一个 int 类型的变量 result,并且初始化一个值,比如17

对类中每一个重要字段,也就是影响对象的值的字段,也就是 equals 方法里有比较的字段,进行以下操作:a. 计算这个字段的值filedHashValue = filed.hashCode(); b. 执行 result = 31 * result + filedHashValue;

七、为什么要使用 31

看一看 String hashCode 方法的源码:

1
2
3
4
5
6
7
8
9
10
11
12
13
14
15
16
17
18
19
20
21
22
23
/**
* Returns a hash code for this string. The hash code for a
* {@code String} object is computed as
* s[0]*31^(n-1) + s[1]*31^(n-2) + ... + s[n-1]
* using {@code int} arithmetic, where {@code s[i]} is the
* <i>i</i>th character of the string, {@code n} is the length of
* the string, and {@code ^} indicates exponentiation.
* (The hash value of the empty string is zero.)
*
* @return a hash code value for this object.
*/
public int hashCode() {
int h = hash;
if (h == 0 && value.length > 0) {
char val[] = value;

for (int i = 0; i < value.length; i++) {
h = 31 * h + val[i];
}
hash = h;
}
return h;
}

可以从注释看出:空字符串的 hashCode 方法返回是 0。并且注释中也给了个公式,可以了解了解。

String 源码中也使用的 31,然后网上说有这两点原因:

原因一:更少的乘积结果冲突

31是质子数中一个“不大不小”的存在,如果你使用的是一个如2的较小质数,那么得出的乘积会在一个很小的范围,很容易造成哈希值的冲突。而如果选择一个100以上的质数,得出的哈希值会超出int的最大范围,这两种都不合适。而如果对超过 50,000 个英文单词(由两个不同版本的 Unix 字典合并而成)进行 hash code 运算,并使用常数 31, 33, 37, 39 和 41 作为乘子,每个常数算出的哈希值冲突数都小于7个(国外大神做的测试),那么这几个数就被作为生成hashCode值得备选乘数了。

所以从 31,33,37,39 等中间选择了 31 的原因看原因二。

原因二:31 可以被 JVM 优化

JVM里最有效的计算方式就是进行位运算了:

  • 左移 << : 左边的最高位丢弃,右边补全0(把 << 左边的数据*2的移动次幂)。

  • 右移 >> : 把>>左边的数据/2的移动次幂。

  • 无符号右移 >>> : 无论最高位是0还是1,左边补齐0。

    所以 : 31 * i = (i << 5) - i(左边31*2=62,右边2*2^5-2=62) - 两边相等,JVM就可以高效的进行计算啦。。。